本文实例讲述了laravel5.6框架使用ckeditor5相关配置。分享给大家供大家参考,具体如下:
laravel 相关配置
文件的上传与存储
参考文档:
https://laravel-china.org/docs/laravel/5.6/requests/1367#1d60f1
https://laravel-china.org/docs/laravel/5.6/filesystem/1390
https://docs.ckeditor.com/ckeditor4/latest/guide/dev_file_upload.html#response-file-uploaded-successfully
创建符号链接
|
1
|
php artisan storage:link
|
project/public/storage -> project/storage/app/public
修改配置文件config/filesystem.php
|
1
|
'default' => env('filesystem_driver', 'public')
|
修改nginx和php的配置文件中上传内容大小的限制
|
1
2
3
4
5
6
7
8
9
10
11
12
13
14
15
16
|
#修改nginx配置文件
vim /usr/local/nginx/conf/nginx.conf
http {
include mime.types;
default_type application/octet-stream;
client_max_body_size 10m;
.....
}
#重启nginx
/usr/local/nginx/sbin/nginx -s reload
#修改php-fpm配置文件
vim /usr/local/etc/php/7.2/php.ini
post_max_size = 20m
upload_max_filesize = 20m
#重启php-fpm
/usr/local/sbin/php72-fpm restart
|
编写文件处理方法
|
1
2
3
4
5
6
7
8
9
10
11
12
13
14
15
16
17
18
19
20
21
22
23
24
25
26
27
28
29
30
31
32
33
34
35
36
37
38
39
40
41
42
43
44
45
|
/**
* 处理上传文件
* @return [type] [description]
*/
public function uploadfile(request $request){
$postfile = 'upload';
$allowedprefix = ['jpg','png','doc','docx','xls','xlsx','zip','ppt','pptx','rar','pdf'];
//检查文件是否上传成功
if(!$request->hasfile($postfile) || !$request->file($postfile)->isvalid()){
return $this->ckeditoruploadresponse(0,'文件上传失败');
}
$extension = $request->file($postfile)->extension();
$size = $request->file($postfile)->getclientsize();
$filename = $request->file($postfile)->getclientoriginalname();
//检查后缀名
log::info('extension',[$filename=>$extension]);
if(!in_array($extension, $allowedprefix)){
return $this->ckeditoruploadresponse(0,'文件类型不合法');
}
//检查大小
log::info('size',[$filename=>$size]);
if($size > 10*1024*1024){
return $this->ckeditoruploadresponse(0,'文件大小超过限制');
}
//保存文件
$path = '/storage/'.$request->file($postfile)->store('images');
return $this->ckeditoruploadresponse(1,'',$filename,$path);
}
/**
* ckeditor 上传文件的标准返回格式
* @param [type] $uploaded [description]
* @param string $error [description]
* @param string $filename [description]
* @param string $url [description]
*/
private function ckeditoruploadresponse($uploaded,$error='',$filename='',$url=''){
return [
"uploaded" => $uploaded,
"filename" => $filename,
"url" => $url,
"error" => [
"message" => $error
]
];
}
|
路由配置
|
1
2
3
4
|
#文件上传路由
route::post('/create/uploadfile','admin\\articles\\createcontroller@uploadfile');
#从word中复制内容时,自动上传图片路由
route::post('/create/uploadfile&responsetype=json','admin\\articles\\createcontroller@uploadfile');
|
ckeditor相关配置
ckeditor配置参数:https://docs.ckeditor.com/ckeditor4/latest/api/ckeditor_config.html
|
1
2
3
4
5
6
7
8
9
|
ckeditor.replace('content',{
height:500,
filetools_requestheaders : {
'x-csrf-token': $('meta[name="csrf-token"]').attr('content')
},
isfileuploadsupported : true,
filebrowseruploadurl : '/create/uploadfile',
language : 'zh-cn',
});
|
laravel-csrf保护
相关文档:
https://docs.ckeditor.com/ckeditor4/latest/api/ckeditor_config.html#cfg-filetools_requestheaders
首先,在页面head部分添加csrf参数
|
1
2
|
<!-- csrf token -->
<meta name="csrf-token" content="{{ csrf_token() }}">
|
然后,为ckeditor编辑器的xhr请求增加请求头参数
|
1
2
3
|
filetools_requestheaders : {
'x-csrf-token': $('meta[name="csrf-token"]').attr('content')
}
|
隐藏“浏览服务器”按钮
“浏览服务器”按钮,用于实现对已上传文件的管理,可以借助ckfinder实现,由于目前没有该需求,并且引入该功能会导致文件安全问题,本文采用了隐藏该按钮的方案。
参考附录:ckeditor隐藏“浏览服务器”按钮
基本思路是从一下三个文件中,查找关键字browseserver,通过设置display属性隐藏该按钮。
ckeditor/plugins/image/dialogs/image.js
ckeditor/plugins/flash/dialogs/flash.js
ckeditor/plugins/link/dialogs/link.js
image
flash
link
附录:ckeditor隐藏“浏览服务器”按钮
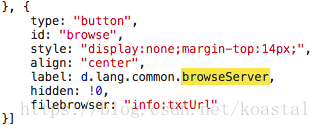
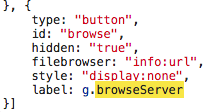
由于ckeditor中的"上传图片""上传文件""上传flash” 三个功能中都有“浏览服务器”按钮,所以我们要修改3个js文件,先打开ckeditor文件夹中的ckeditor\\plugins\\image\\dialogs\\image.js文件,ctrl+f,搜索"browseserver”,找到该词第一次出现的位置,在后面添加双引号内的内容",style:'display:none;'"。如下图:

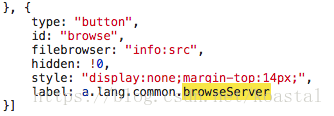
再搜索"filebrowser",找到该词第二次出现的位置,如下图填入

ctrl+s保存该js文件,出去刷新下自己的ckeditor,点击图片上传按钮后,你会发现浏览服务器按钮不见了。
下面去弄掉文件上传中的“浏览服务器”按钮。
打开ckeditor\\plugins\\link\\dialogs\\link.js文件,还是搜索"browseserver"第一次出现的地方,如下图插入双引号内的内容",style:'display:none;'"。

ctrl+s保存该js文件,出去刷新下自己的ckeditor,点击“链接”按钮后,你会发现“文件上传选项”中的浏览服务器按钮不见了。
最后弄掉上传flash中的浏览服务器按钮,打开ckeditor\\plugins\\flash\\dialogs\\flash.js文件,还是搜索"browseserver"第一次出现的地方,如上图位置处插入双引号内的内容",style:'display:none;'"。(这个和上面的几乎一样,就不截图了)。ctrl+s保存该js文件,出去刷新下自己的ckeditor,点击“上传flash”按钮后,你会发现浏览服务器按钮不见了。
至此,一个从前端到后台,浏览服务器被全面禁用了的ckeditor诞生了!
原文链接:https://blog.csdn.net/koastal/article/details/80668260

相关文章


- ASP.NET自助建站系统的数据库备份与恢复操作指南 2025-06-10
- 个人网站服务器域名解析设置指南:从购买到绑定全流程 2025-06-10
- 个人网站搭建:如何挑选具有弹性扩展能力的服务器? 2025-06-10
- 个人服务器网站搭建:如何选择适合自己的建站程序或框架? 2025-06-10
- 64M VPS建站:能否支持高流量网站运行? 2025-06-10