Hello,大家好,我是麦洛,今天带大家来了解一下SpringBoot如何继承Sentinel来实现接口流量控制
Sentinel控制台搭建
在我的上一篇文章阿里出品的Sentinel到底是个什么玩意?中,已经介绍过如何准备Sentinel控制台,大家可以直接参考;
Sentinel 客户端
项目搭建
首先我们来创建一个测试项目,这里初始化项目的url建议大家填写阿里云的地址,会有惊喜
- http://start.aliyun.com
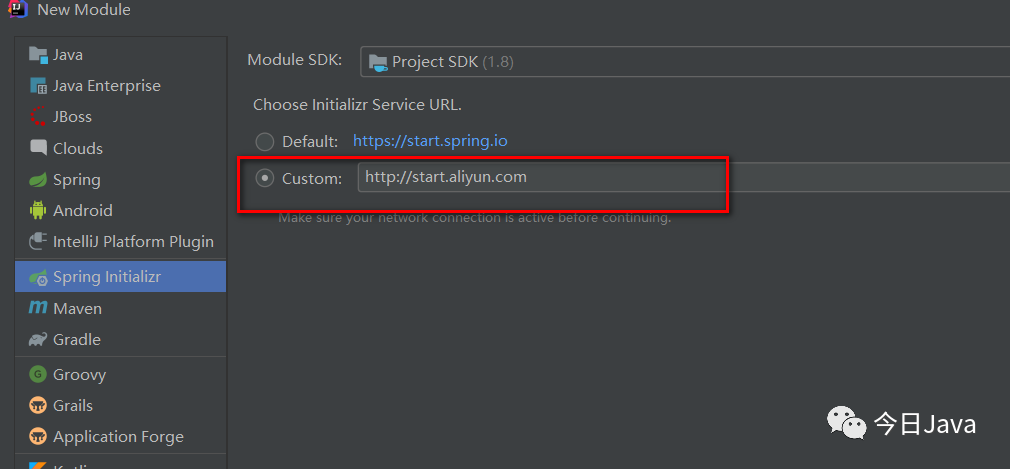
接下来就是常规操作,一路next,在下图的位置稍微注意一下
说明:
同大家以前创建项目一样,只需要在这里勾选Sentinel就可以啦
项目创建好以后,我们发现pom文件中引入了下面的依赖
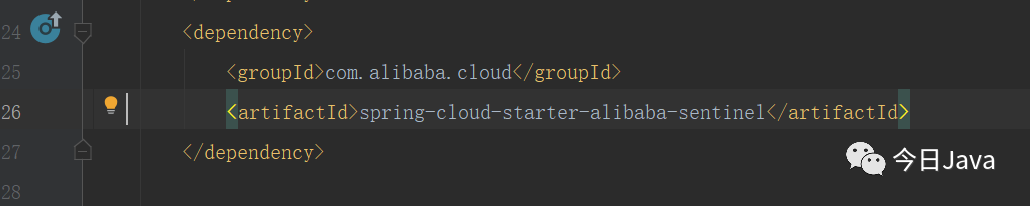
有的小伙伴看网上博客,也会有下面的方式,指定版本号
- <!–sentinel–>
- <dependency>
- <groupId>com.alibaba.cloud</groupId>
- <artifactId>spring-cloud-starter-alibaba-sentinel</artifactId>
- <version>2.1.0.RELEASE</version>
- </dependency>
如果你使用我推荐的阿里云的Url,会发现Sentinel的版本号都定义父工程,Cloud的各个组件的兼容性就不要大家操心了
- <dependencyManagement>
- <dependencies>
- <dependency>
- <groupId>org.springframework.boot</groupId>
- <artifactId>spring-boot-dependencies</artifactId>
- <version>${spring-boot.version}</version>
- <type>pom</type>
- <scope>import</scope>
- </dependency>
- <dependency>
- <groupId>com.alibaba.cloud</groupId>
- <artifactId>spring-cloud-alibaba-dependencies</artifactId>
- <version>${spring-cloud-alibaba.version}</version>
- <type>pom</type>
- <scope>import</scope>
- </dependency>
- </dependencies>
- </dependencyManagement>
打开项目配置文件,会发现它已经为我们自动加好了配置,真的超级方便
- server.port=8083
- #应用名称
- spring.application.name=springcloud-sentinel
- #Sentinel控制台地址
- spring.cloud.sentinel.transport.dashboard=localhost:8080
- #取消Sentinel控制台懒加载
- #默认情况下Sentinel会在客户端首次调用的时候进行初始化,开始向控制台发送心跳包
- #配置sentinel.eager=true时,取消Sentinel控制台懒加载功能
- spring.cloud.sentinel.eager=true
- #如果有多套网络,又无法正确获取本机IP,则需要使用下面的参数设置当前机器可被外部访问的IP地址,供admin控制台使用
- #spring.cloud.sentinel.transport.client-ip=#sentinel配置
- spring.application.name=frms
- spring.cloud.sentinel.transport.dashboard=localhost:8080
- spring.cloud.sentinel.transport.heartbeat-interval-ms=500
如何定义资源
编程式定义
官网提供的demo
- packagecom.milo.sentinel;
- importcom.alibaba.csp.sentinel.Entry;
- importcom.alibaba.csp.sentinel.SphU;
- importcom.alibaba.csp.sentinel.slots.block.BlockException;
- importcom.alibaba.csp.sentinel.slots.block.RuleConstant;
- importcom.alibaba.csp.sentinel.slots.block.flow.FlowRule;
- importcom.alibaba.csp.sentinel.slots.block.flow.FlowRuleManager;
- importorg.springframework.boot.SpringApplication;
- importorg.springframework.boot.autoconfigure.SpringBootApplication;
- importjava.util.ArrayList;
- importjava.util.List;
- /**
- *项目入口
- *@authorMiloLee
- *@date2021-3-2019:07
- *
- */
- @SpringBootApplication
- publicclassSentinelApplication{
- publicstaticvoidmain(String[]args){
- SpringApplication.run(SentinelApplication.class,args);
- //配置规则.
- initFlowRules();
- while(true){
- //1.5.0版本开始可以直接利用try-with-resources特性
- try(Entryentry=SphU.entry("HelloWorld")){
- //被保护的逻辑
- Thread.sleep(300);
- System.out.println("helloworld");
- }catch(BlockException|InterruptedExceptionex){
- //处理被流控的逻辑
- System.out.println("blocked!");
- }
- }
- }
- privatestaticvoidinitFlowRules(){
- List<FlowRule>rules=newArrayList<>();
- FlowRulerule=newFlowRule();
- rule.setResource("HelloWorld");
- rule.setGrade(RuleConstant.FLOW_GRADE_QPS);
- //SetlimitQPSto20.
- rule.setCount(20);
- rules.add(rule);
- FlowRuleManager.loadRules(rules);
- }
- }
注解式定义
- @SpringBootApplication
- publicclassApplication{
- publicstaticvoidmain(String[]args){
- SpringApplication.run(ServiceApplication.class,args);
- }
- }
- @Service
- publicclassTestService{
- @SentinelResource(value="sayHello")
- publicStringsayHello(Stringname){
- return"Hello,"+name;
- }
- }
- @RestController
- publicclassTestController{
- @Autowired
- privateTestServiceservice;
- @GetMapping(value="/hello/{name}")
- publicStringapiHello(@PathVariableStringname){
- returnservice.sayHello(name);
- }
- }
@SentinelResource 注解用来标识资源是否被限流、降级。上述例子上该注解的属性 sayHello 表示资源名。
启动控制台
- java-Dserver.port=8080-Dcsp.sentinel.dashboard.server=localhost:8080-Dproject.name=sentinel-dashboard-jarsentinel-dashboard-1.8.1.jar
控制台配置规则
控制台的操作我们用编程式定义的例子来演示,大家启动我们的服务
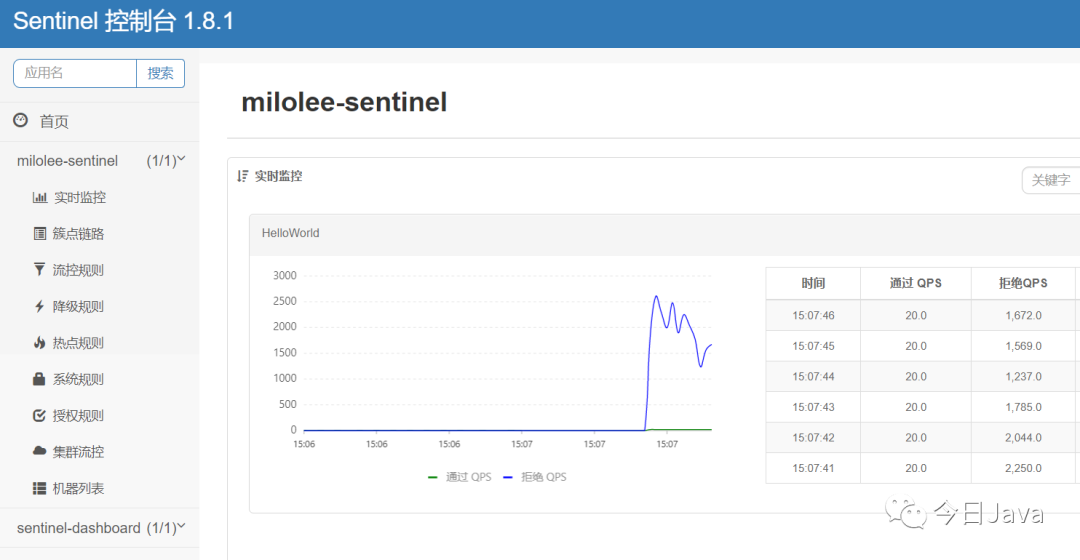
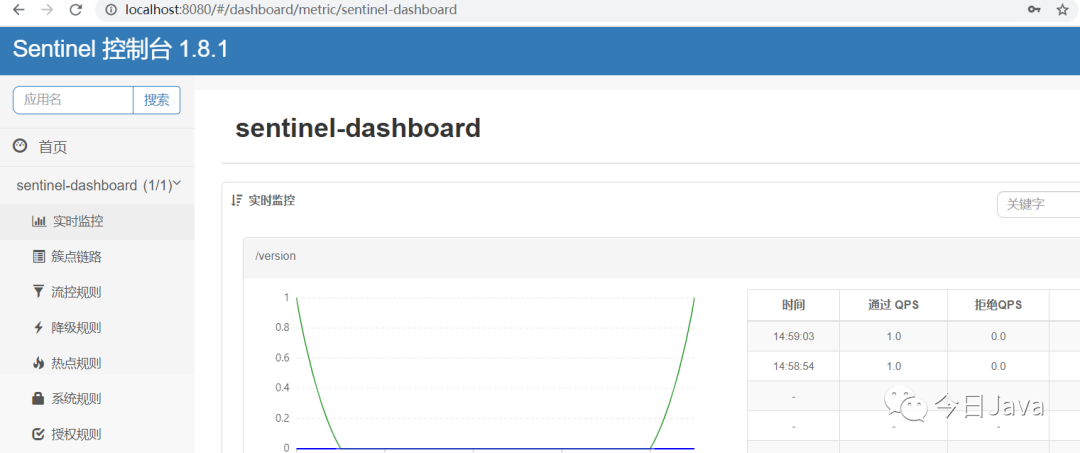
我们会发现除了sentinel-dashboard之外,多了一个milolee-sentinel,这个就是我们的服务,它的名称其实对应我们配置文件定义的应用名称:
- #应用名称
- spring.application.name=milolee-sentinel
点击机器列表,这这里如果能发现你的机器,那就是成功上线了

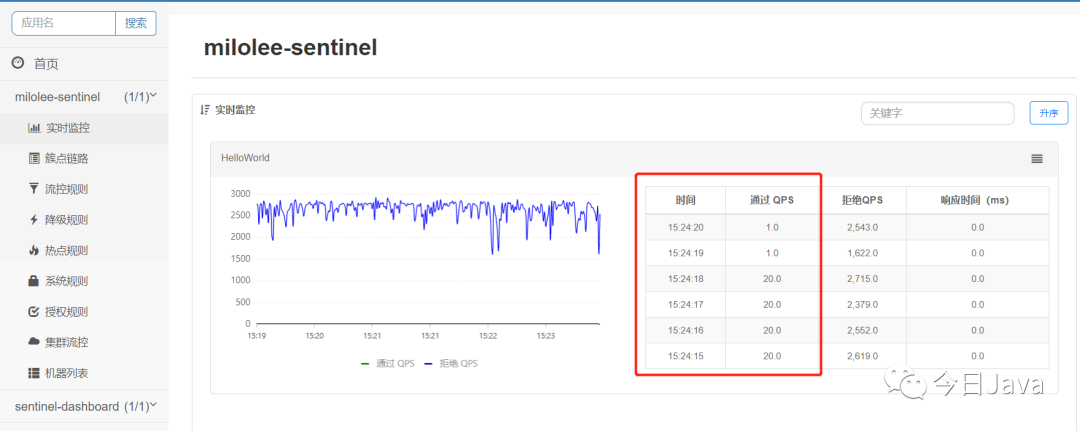
实时监控
簇点链路
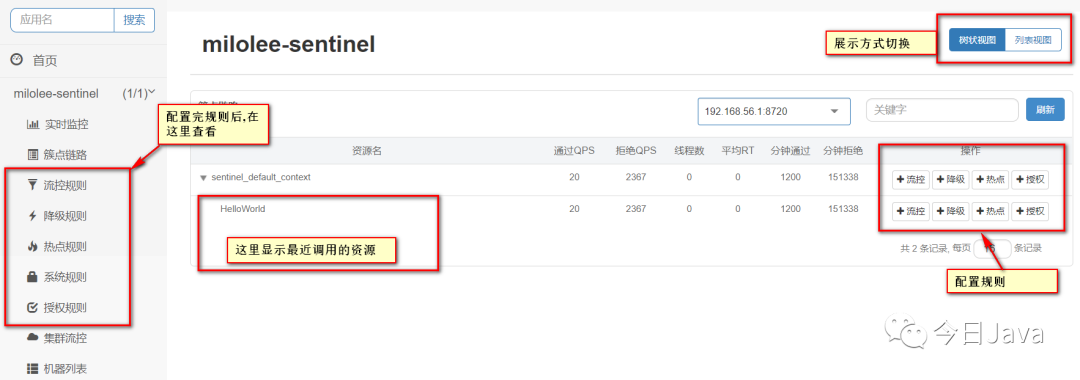
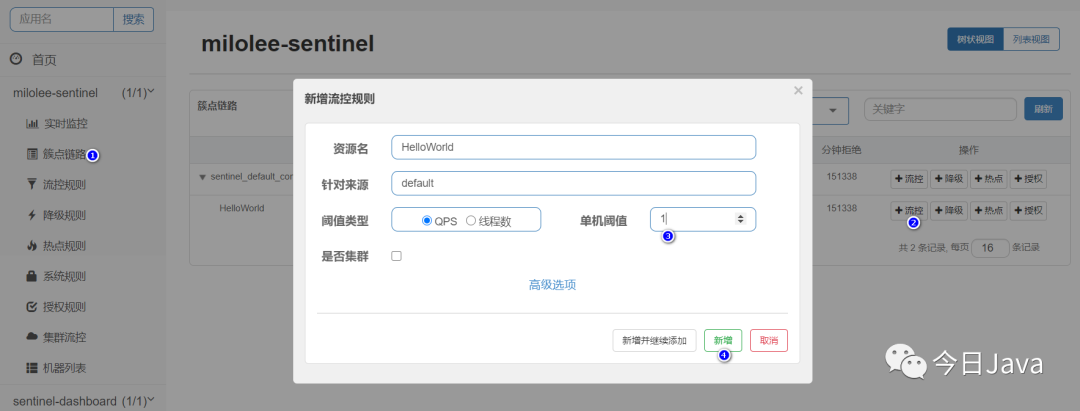
流控规则配置
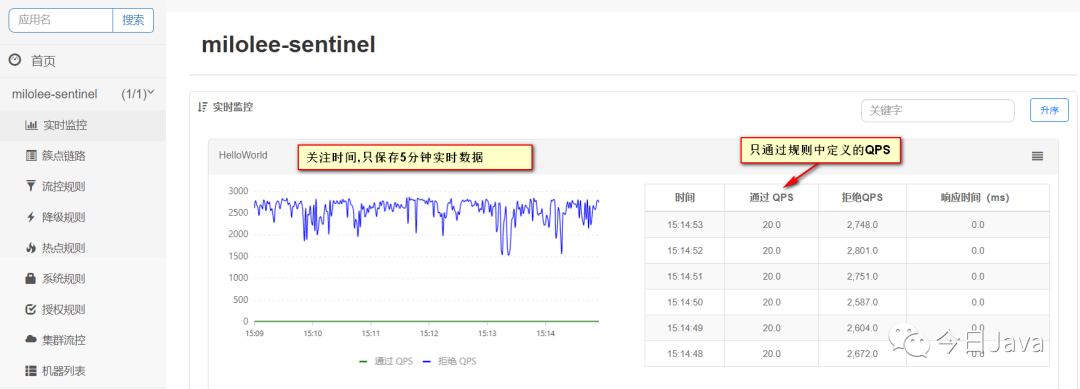
给我们的资源HelloWorld配置流控规则,它的QPS(每秒请求数)为1,如图:
通过查看实时监控,我们发现已经生效
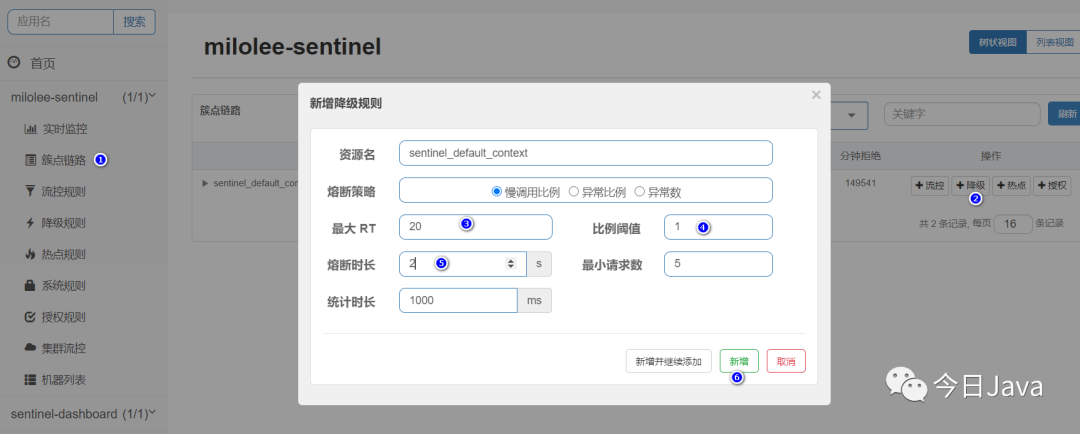
降级规则配置
给我们的资源HelloWorld添加一个降级规则配置,如果QPS大于1,且平均响应时间大于20ms,则接口下来接口在2秒钟无法访问,之后自动恢复。
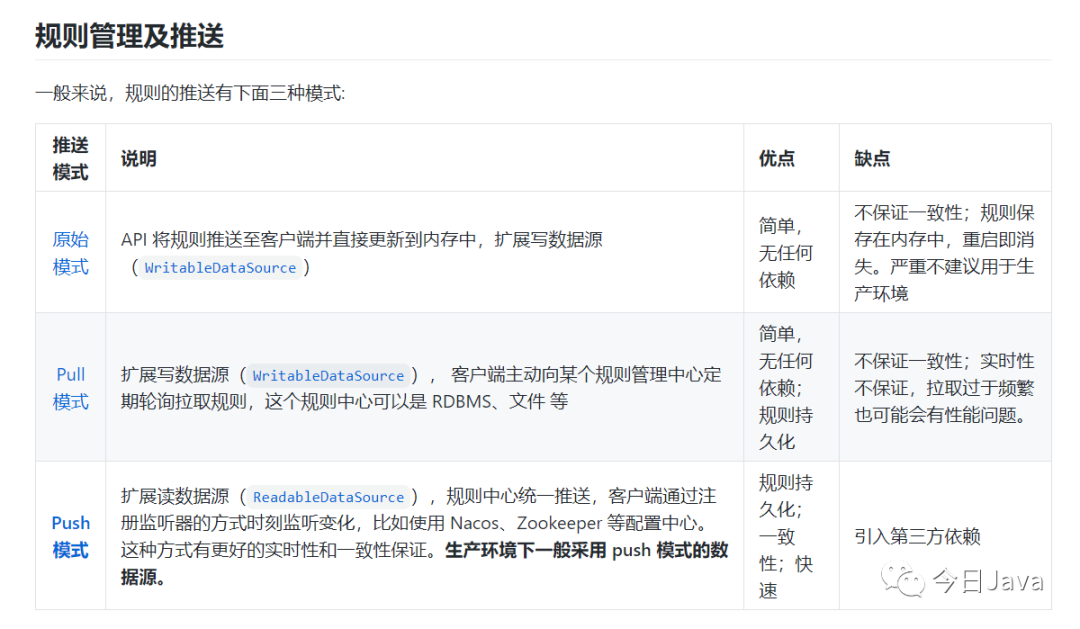
目前这些规则仅在内存态生效,应用重启之后,该规则会丢失。后续文章我们会继续学习动态规则
关于控制台的使用,大家可以参考官方文档,比较详细https://sentinelguard.io/zh-cn/docs/dashboard.html
原文地址:https://mp.weixin.qq.com/s/Zl5csnQfhg8FrNm9hLZyaA