servlet 实现文件上传
所谓文件上传就是将本地的文件发送到服务器中保存。例如我们向百度网盘中上传本地的资源或者我们将写好的博客上传到服务器等等就是典型的文件上传。
servlet 3.0
上次完成文件下载功能使用的是 servlet 2.5,但是想要完成文件上传,那么继续使用 servlet 2.5 肯定不是一个好的选择,因此我们使用 servlet 3.0 来完成文件上传。下面我来简单介绍一下 servlet 3.0 的新特性:
1、新增的注解支持
该版本新增了若干注解,用于简化 servlet、过滤器(filter)和监听器(listener)的声明,这使得 web.xml 部署描述文件从该版本开始不再是必选的了。
2、httpservletrequest 对文件上传的支持
此前,对于处理上传文件的操作一直是让开发者头疼的问题,因为 servlet 本身没有对此提供直接的支持,需要使用第三方框架来实现,而且使用起来也不够简单。如今这都成为了历史,servlet 3.0 已经提供了这个功能,而且使用也非常简单。
servlet 3.0 的新特性当然肯定不止这些,但是其他的新特性在这里我们暂时还用不到,也就不做过多了解了。
必要条件
想要完成文件上传,肯定不是这么简单,它对浏览器端和服务器端都有许多的要求。
对浏览器的要求:
-
一个文件的大小一般肯定不止 1 kb,既然这样,那么要上传一个文件肯定不能使用
get方式了,所以上传文件时必须采用post方式。 -
2.表单中必须有一个文件上传项
<input type="file">,而且必须有 name 属性。 -
必须设置表单的
enctype属性值为multipart/form-data。
对服务器的要求:
- 当然,我们肯定得使用 servlet 3.0。
-
servlet 3.0 中接收普通上传组件(除了文件上传组件)通过
request.getparameter(string)接收,而文件上传组件通过request.getpart(string)接收。 -
servlet 3.0 要求服务器必须是
tomcat7及其以上。
准备工作
工欲善其事,必先利其器。
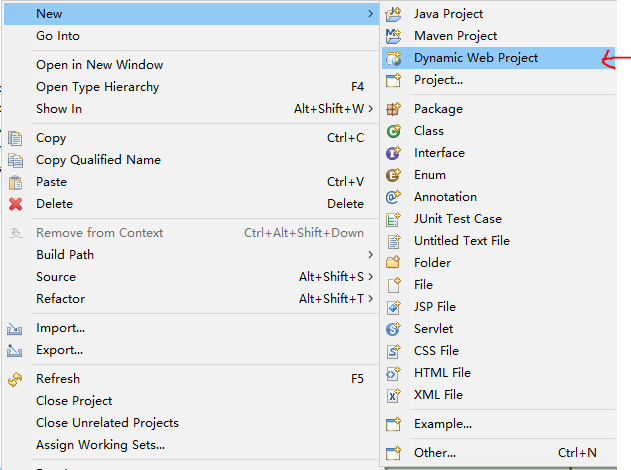
1、首先,打开 eclipse,新建一个 dynamic web project。
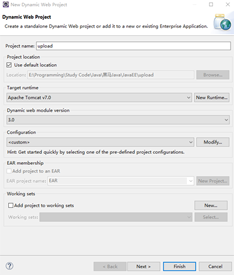
2、键入项目名,选择运行时环境为 apache tomcat v7.0,选择 servlet 版本为 3.0,然后点击 finished。
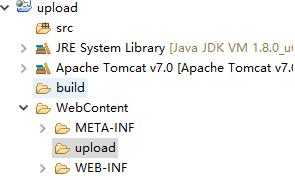
3、在项目的 webcontent 目录下,新建一个文件夹 upload,用来存放上传过来的文件。
4、在 webcontent 目录下新建一个 index.jsp。
|
1
2
3
4
5
6
7
8
9
10
11
12
13
14
15
16
17
|
<%@ page language="java" contenttype="text/html; charset=utf-8"
pageencoding="utf-8"%>
<!doctype html>
<html>
<head>
<meta charset="utf-8">
<title>上传</title>
</head>
<body>
<form action="${pagecontext.request.contextpath}/uploadservlet" method="post" enctype="multipart/form-data">
<label>选择一个文件:</label>
<input type="file" name="file"><br>
<input type="submit" value="上传"><br>
</form>
</body>
</html>
|
5、使用 tomcat 将次项目发布,并在浏览器中预览。

将服务器启动,然后在浏览器中输入:http://localhost:8080/upload。
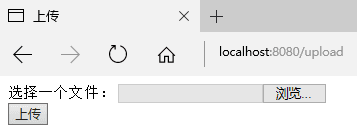
好吧!样子有点丑,希望不要介意!如果出现以上界面,那么,准备工作就完成了!
完成案例
首先,新建一个 servlet,在 servlet 3.0 我们不必再为配置 web.xml 而烦恼了,只要要在 servlet 的类名上面一行添加一个注解:
|
1
|
@webservlet("/uploadservlet")
|
这个注解就相当与 servlet 2.5 中的:
|
1
2
3
4
5
6
7
8
|
<servlet>
<servlet-name>uploadservlet</servlet-name>
<servlet-class>club.luckylight.upload.uploadservlet</servlet-class>
</servlet>
<servlet-mapping>
<servlet-name>uploadservlet</servlet-name>
<url-pattern>/uploadservlet</url-pattern>
</servlet-mapping>
|
这样比较,使用注解不是简便了很多。
然后,我们还需要添加另一个注解:
|
1
|
@multipartconfig
|
该注解主要是为了辅助 servlet 3.0 中 httpservletrequest 提供的对上传文件的支持。该注解标注在 servlet 上面,以表示该 servlet 希望处理的请求的 mime类型 是 multipart/form-data。
接下来,我们就需要根据上传组件的 name 属性获取它了。这里我们使用 path request.getpart(string) 方法。
|
1
|
part part = request.getpart("file");
|
然后,我们就需要根据 part 获取头信息,然后根据头信息获取文件的路径。
在浏览器抓包,获取头信息为:
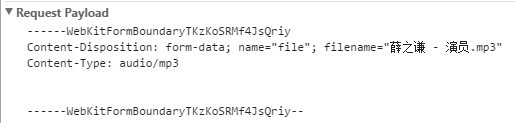
据此,我们可以获取文件名或者文件路径。
|
1
2
|
string header = part.getheader("content-disposition");
string path = header.substring(header.indexof("filename=") + 10, header.length() - 1);
|
由于获取的有可能是文件名,也有可能是文件路径,为此,有必要编写一个工具类,用来获取文件的真实名称。
|
1
2
3
4
5
6
7
8
9
10
11
12
13
14
15
16
|
/**
* 根据文件的路径获取文件真实名称
*
* @param path
* 文件的路径
* @return 文件名称
*/
public static string getrealname(string path) {
int index = path.lastindexof("\\\\");
if (index == -1) {
index = path.lastindexof("/");
}
return path.substring(index + 1);
}
|
然后,调用这个方法,获得文件名。
|
1
|
string name = uploadutils.getrealname(path);
|
接下来,我们有必要,给每个文件分配一个存放目录,因此我又编写了一个方法,用来生成一个目录。
|
1
2
3
4
5
6
7
8
9
10
11
12
13
14
15
16
17
18
|
/**
* 根据文件名返回一个目录
*
* @param name
* 文件名称
* @return 目录
*/
public static string getdir(string name) {
int i = name.hashcode();
string hex = integer.tohexstring(i);
int j = hex.length();
for (int k = 0; k < 8 - j; k++) {
hex = "0" + hex;
}
return "/" + hex.charat(0) + "/" + hex.charat(1);
}
|
到此,万事俱备,只欠东风。我们只需要将文件拷贝到服务器。
|
1
2
3
4
5
6
7
8
9
10
11
12
13
14
15
16
17
18
19
20
21
22
23
24
25
26
|
// 获取文件的真实路径
string realpath = this.getservletcontext().getrealpath("/upload" + dir);
file file = new file(realpath);
if (!file.exists()) {
file.mkdirs();
}
// 获取输入流
inputstream inputstream = part.getinputstream();
// 定义输出流
fileoutputstream outputstream = new fileoutputstream(new file(file, name));
// 从输入流中读入数据并写到输出字节流中
int len = -1;
byte[] bytes = new byte[1024];
while ((len = inputstream.read(bytes)) != -1) {
outputstream.write(bytes, 0, len);
}
// 关闭资源
outputstream.close();
inputstream.close();
// 删除临时文件
part.delete();
|
下面来测试一下:
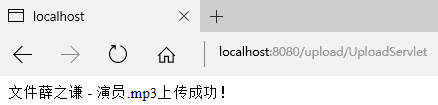
然后,在 tomcat 的 webapps -> 项目名 -> upload 中就可以找到上传成功的文件了!

最后,我们打开音乐来试验下是否真的上传成功了?
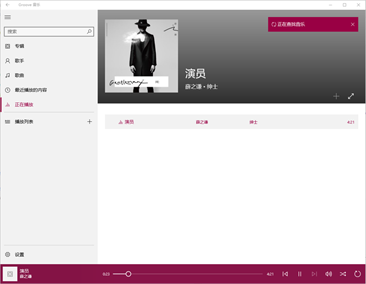
嗯!薛之谦低沉的声音从耳机中传来,看来确实是上传成功了!
完整代码
uploadservlet.java
|
1
2
3
4
5
6
7
8
9
10
11
12
13
14
15
16
17
18
19
20
21
22
23
24
25
26
27
28
29
30
31
32
33
34
35
36
37
38
39
40
41
42
43
44
45
46
47
48
49
50
51
52
53
54
55
56
57
58
59
60
61
62
63
64
65
66
67
68
69
70
|
package club.luckylight.upload;
import java.io.file;
import java.io.fileoutputstream;
import java.io.ioexception;
import java.io.inputstream;
import javax.servlet.servletexception;
import javax.servlet.annotation.multipartconfig;
import javax.servlet.annotation.webservlet;
import javax.servlet.http.httpservlet;
import javax.servlet.http.httpservletrequest;
import javax.servlet.http.httpservletresponse;
import javax.servlet.http.part;
import club.luckylight.util.uploadutils;
@webservlet("/uploadservlet")
@multipartconfig
public class uploadservlet extends httpservlet {
private static final long serialversionuid = 5661013723204858883l;
protected void doget(httpservletrequest request, httpservletresponse response)
throws servletexception, ioexception {
// 获取文件上传组件
part part = request.getpart("file");
// 获取文件的路径
string header = part.getheader("content-disposition");
string path = header.substring(header.indexof("filename=") + 10, header.length() - 1);
// 获取文件名
string name = uploadutils.getrealname(path);
// 获取文件的存放目录
string dir = uploadutils.getdir(name);
string realpath = this.getservletcontext().getrealpath("/upload" + dir);
file file = new file(realpath);
if (!file.exists()) {
file.mkdirs();
}
// 对拷流
inputstream inputstream = part.getinputstream();
fileoutputstream outputstream = new fileoutputstream(new file(file, name));
int len = -1;
byte[] bytes = new byte[1024];
while ((len = inputstream.read(bytes)) != -1) {
outputstream.write(bytes, 0, len);
}
// 关闭资源
outputstream.close();
inputstream.close();
// 删除临时文件
part.delete();
response.setcontenttype("text/html;charset=utf-8");
response.getwriter().print("文件" + name + "上传成功!");
}
protected void dopost(httpservletrequest request, httpservletresponse response)
throws servletexception, ioexception {
doget(request, response);
}
}
|
uploadutils.java
|
1
2
3
4
5
6
7
8
9
10
11
12
13
14
15
16
17
18
19
20
21
22
23
24
25
26
27
28
29
30
31
32
33
34
35
36
37
38
39
40
|
package club.luckylight.util;
public class uploadutils {
/**
* 根据文件的路径获取文件真实名称
*
* @param path
* 文件的路径
* @return 文件名称
*/
public static string getrealname(string path) {
int index = path.lastindexof("\\\\");
if (index == -1) {
index = path.lastindexof("/");
}
return path.substring(index + 1);
}
/**
* 根据文件名返回一个目录
*
* @param name
* 文件名称
* @return 目录
*/
public static string getdir(string name) {
int i = name.hashcode();
string hex = integer.tohexstring(i);
int j = hex.length();
for (int k = 0; k < 8 - j; k++) {
hex = "0" + hex;
}
return "/" + hex.charat(0) + "/" + hex.charat(1);
}
}
|
总结
这样,文件上传案例就完成了,希望对大家的学习有所帮助,也希望大家多多支持快网idc。
原文链接:http://www.jianshu.com/p/1968019b6927#

相关文章


- ASP.NET本地开发时常见的配置错误及解决方法? 2025-06-10
- ASP.NET自助建站系统的数据库备份与恢复操作指南 2025-06-10
- 个人网站服务器域名解析设置指南:从购买到绑定全流程 2025-06-10
- 个人网站搭建:如何挑选具有弹性扩展能力的服务器? 2025-06-10
- 个人服务器网站搭建:如何选择适合自己的建站程序或框架? 2025-06-10