一、带索引目录的表视图
1.效果图
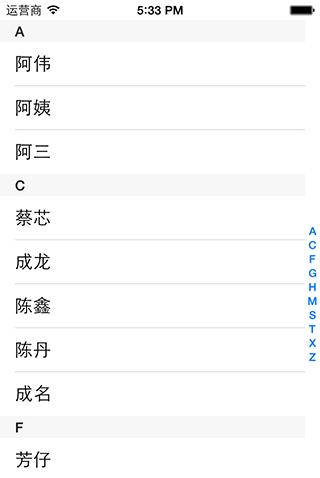
2.数据源
本想获取通讯录中得名字,但为了用模拟器调试方便,就写死了数据,所以也只写了部分字母,总之有那么点意思就成
@interface viewcontroller ()<uitableviewdatasource,uitableviewdelegate>
{
nsarray *sectiontitles; // 每个分区的标题
nsarray *contentsarray; // 每行的内容
}
/** @brief 准备数据源 在viewdidload方法中调用*/
– (void)readysource
{
sectiontitles = [[nsarray alloc] initwithobjects:
@"a",@"c",@"f",@"g",@"h",@"m",@"s",@"t",@"x",@"z", nil];
contentsarray = [[nsarray alloc] initwithobjects:
@[@"阿伟",@"阿姨",@"阿三"],
@[@"蔡芯",@"成龙",@"陈鑫",@"陈丹",@"成名"],
@[@"芳仔",@"房祖名",@"方大同",@"芳芳",@"范伟"],
@[@"郭靖",@"郭美美",@"过儿",@"过山车"],
@[@"何仙姑",@"和珅",@"郝歌",@"好人"],
@[@"妈妈",@"毛主席"],
@[@"孙中山",@"沈冰",@"婶婶"],
@[@"涛涛",@"淘宝",@"套娃"],
@[@"小二",@"夏紫薇",@"许巍",@"许晴"],
@[@"周恩来",@"周杰伦",@"张柏芝",@"张大仙"],nil];
}
3.显示索引
// 每个分区的页眉
-(nsstring *)tableview:(uitableview *)tableview titleforheaderinsection:(nsinteger)section
{
return [sectiontitles objectatindex:section];
}
// 索引目录
-(nsarray *)sectionindextitlesfortableview:(uitableview *)tableview
{
return sectiontitles;
}
④点击索引,跳转到点击的分区
// 点击目录
-(nsinteger)tableview:(uitableview *)tableview sectionforsectionindextitle:(nsstring *)title atindex:(nsinteger)index
{
// 获取所点目录对应的indexpath值
nsindexpath *selectindexpath = [nsindexpath indexpathforrow:0 insection:index];
// 让table滚动到对应的indexpath位置
[tableview scrolltorowatindexpath:selectindexpath atscrollposition:uitableviewscrollpositionbottom animated:yes];
return index;
}
二、可以进行行标记的表视图
1.效果图
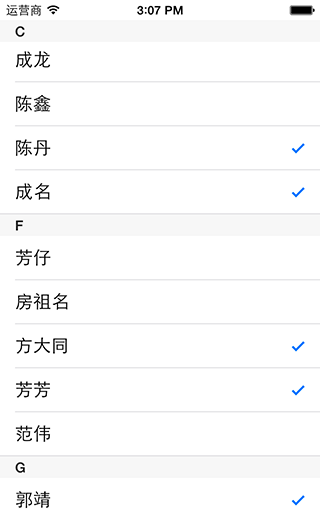
2.在cellforrow方法中,将cell的accessorytype设置为none
// 定义其辅助样式
cell.accessorytype = uitableviewcellaccessorynone;
3.在didselectrow方法中
// 点击行事件
-(void)tableview:(uitableview *)tableview didselectrowatindexpath:(nsindexpath *)indexpath
{
// 获取点击行的cell
uitableviewcell *cell = [tableview cellforrowatindexpath:indexpath];
// 如果cell已经被标记
if (cell.accessorytype == uitableviewcellaccessorycheckmark) {
// 取消标记
cell.accessorytype = uitableviewcellaccessorynone;
}
// 如果cell未标记
else{
// 标记cell
cell.accessorytype = uitableviewcellaccessorycheckmark;
}
// 取消选中效果
[tableview deselectrowatindexpath:indexpath animated:yes];
}
此时,点击行即可选中,取消选中,但是滚动一下视图吧,你会发现下面某些未被点击的行也已经被标记了,这是因为cell的重用机制造成的,在第一篇文章中就这个问题有提到过
4.解决cell重用问题,在cellforrow方法中,定义cellidetifier时,将其每一行都定义为不同的值,就不会出现覆盖,重复等现象了,但是这个方法太过粗暴,并不是最好的解决办法,情急之下可以先用,然后再慢慢调试table上的数据
nsstring *cellidentifier = [nsstring stringwithformat:@"cellidentifier%d%d",indexpath.row,indexpath.section];
三、定制表视图的每一行内容
1.我们做一个类似网易新闻客户端的新闻列表的table,如下图左;简易效果图,如下图右


2.数据源,在interface中声明
nsmutablearray *news_marray;// 新闻内容数据源
新建一个model类,命名为"newsmodel",存放每一项数据
newsmodel.h如下,.m中没有添加其他代码,如果需要拷贝,可以重载copywithzone方法,
#import <foundation/foundation.h>
typedef ns_enum(nsinteger, newsreporttype){
newsreportordinary, // 普通新闻
newsreportexclusive,// 独家新闻
newsreportspecial, // 专题新闻
};
@interface newsmodel : nsobject
@property (nonatomic, copy)nsstring * news_image; //图片
@property (nonatomic, copy)nsstring * news_title; //标题
@property (nonatomic, copy)nsstring * news_summary; //摘要
@property (nonatomic, assign)nsinteger news_replyno; //跟帖数量
@property (nonatomic, assign)newsreporttype reporttype; //报道类型
@end
在viewdidload方法中
news_marray = [[nsmutablearray alloc] init];
for(nsinteger index =0; index<10; index++){
newsmodel *model = [[newsmodel alloc] init];
model.news_image = [nsstring stringwithformat:@"%d.jpg",index+1];
model.news_title = @"曾在月光之下望烟花";
model.news_summary = @"曾共看夕阳渐降下 我怎么舍得去放下 要怎么舍得去放下";
model.news_replyno = index+196;
model.reporttype = index%3;
[news_marray addobject:model];
}
3.行数
// 每个分区行数
-(nsinteger)tableview:(uitableview *)tableview numberofrowsinsection:(nsinteger)section
{
return [news_marray count];
}
4.自定义cell上控件
在cellforrow方法中if(cell==nil)前
/*****自定义cell******/
newsmodel *model = [news_marray objectatindex:indexpath.row];
uiimageview * image_view; //1.添加imageview
uilabel * title_label; //2.添加标题label
uilabel * summary_label; //3.添加摘要label
uilabel * replyno_label; //4.添加跟帖数量label
uibutton * extra_view; //5.属于专题或者独家报道,进行标记
/********************/
在if(cell==nil)内
/*****自定义cell******/
//1.添加imageview
cgrect imageviewf = cgrectmake(5, 5, 85, 65);
image_view = [[uiimageview alloc] initwithframe:imageviewf];
[cell addsubview:image_view];
//2.添加标题label
cgrect titlelabelf = cgrectmake(95, 5, 230, 24);
title_label = [[uilabel alloc] initwithframe:titlelabelf];
title_label.font = [uifont systemfontofsize:16];//字体大小
[cell addsubview:title_label];
//3.添加摘要label
cgrect summarylabelf = cgrectmake(97, 27, 210, 40);
summary_label = [[uilabel alloc] initwithframe:summarylabelf];
summary_label.font = [uifont systemfontofsize:12]; // 字体大小
summary_label.textcolor = [uicolor darkgraycolor]; // 文字颜色
summary_label.numberoflines = 2;
[cell addsubview:summary_label];
//4.跟帖数量label
cgrect replynolabelf = cgrectmake(210, 45, 95, 24);
replyno_label = [[uilabel alloc] initwithframe:replynolabelf];
replyno_label.font = [uifont systemfontofsize:12]; // 字体大小
replyno_label.textcolor = [uicolor darkgraycolor]; // 文字颜色
replyno_label.textalignment = nstextalignmentright; // 文字右对齐
//5.专题extraview
cgrect extraviewf = cgrectmake(270, 50, 28, 14);
extra_view = [[uibutton alloc] initwithframe:extraviewf];
extra_view.titlelabel.font = [uifont boldsystemfontofsize:10];
[extra_view settitlecolor:[uicolor whitecolor] forstate:uicontrolstatenormal];
// 普通新闻,只添加跟帖数量
if (model.reporttype==newsreportordinary) {
[cell addsubview:replyno_label];
}
// 专题新闻,添加专题标志,并添加跟帖数量
else if(model.reporttype == newsreportspecial){
// 设置背景色
extra_view.backgroundcolor = [uicolor colorwithred:120.0/255.0 green:170.0/255.0 blue:245.0/255.0 alpha:1.0];
[extra_view settitle:@"独家" forstate:uicontrolstatenormal];// 设置标题
[cell addsubview:extra_view]; // 添加
replyno_label.frame = cgrectmake(170, 45, 95, 24); // 改变跟帖数量label的坐标
[cell addsubview:replyno_label]; // 添加跟帖数量label
}
// 独家新闻,只添加独家标志
else if(model.reporttype == newsreportexclusive){
extra_view.backgroundcolor = [uicolor redcolor]; // 设置背景颜色
[extra_view settitle:@"专题" forstate:uicontrolstatenormal]; // 设置标题
[cell addsubview:extra_view]; // 添加到cell
}
/********************/
在if(cell==nil)后
/*****自定义cell******/
[image_view setimage:[uiimage imagenamed:model.news_image]];// 设置图片
title_label.text = model.news_title; // 设置标题
summary_label.text = model.news_summary; // 设置小标题
replyno_label.text = [nsstring stringwithformat:@"%d 跟帖",model.news_replyno];// 设置跟帖数量
/********************/
5.设置行高
-(cgfloat) tableview:(uitableview *)tableview heightforrowatindexpath:(nsindexpath *)indexpath
{
return 75;
}

相关文章


- ASP.NET自助建站系统的域名绑定与解析教程 2025-06-10
- 个人服务器网站搭建:如何选择合适的服务器提供商? 2025-06-10
- ASP.NET自助建站系统中如何实现多语言支持? 2025-06-10
- 64M VPS建站:如何选择最适合的网站建设平台? 2025-06-10
- ASP.NET本地开发时常见的配置错误及解决方法? 2025-06-10