druid是阿里巴巴开源的数据库连接池,提供了优秀的对数据库操作的监控功能,本文要讲解一下springboot项目怎么集成druid。
本文在基于jpa的项目下开发,首先在pom文件中额外加入druid依赖,pom文件如下:
|
1
2
3
4
5
6
7
8
9
10
11
12
13
14
15
16
17
18
19
20
21
22
23
24
25
26
27
28
29
30
31
32
33
34
35
36
37
38
39
40
41
42
43
44
45
46
47
48
49
50
51
52
53
54
55
56
57
58
59
60
61
62
63
64
65
66
67
|
<?xml version="1.0" encoding="utf-8"?>
<project xmlns="http://maven.apache.org/pom/4.0.0" xmlns:xsi="http://www.w3.org/2001/xmlschema-instance"
xsi:schemalocation="http://maven.apache.org/pom/4.0.0 http://maven.apache.org/xsd/maven-4.0.0.xsd">
<modelversion>4.0.0</modelversion>
<groupid>com.dalaoyang</groupid>
<artifactid>springboot_druid</artifactid>
<version>0.0.1-snapshot</version>
<packaging>jar</packaging>
<name>springboot_druid</name>
<description>springboot_druid</description>
<parent>
<groupid>org.springframework.boot</groupid>
<artifactid>spring-boot-starter-parent</artifactid>
<version>1.5.12.release</version>
<relativepath/> <!-- lookup parent from repository -->
</parent>
<properties>
<project.build.sourceencoding>utf-8</project.build.sourceencoding>
<project.reporting.outputencoding>utf-8</project.reporting.outputencoding>
<java.version>1.8</java.version>
</properties>
<dependencies>
<dependency>
<groupid>org.springframework.boot</groupid>
<artifactid>spring-boot-starter-data-jpa</artifactid>
</dependency>
<dependency>
<groupid>org.springframework.boot</groupid>
<artifactid>spring-boot-starter-web</artifactid>
</dependency>
<dependency>
<groupid>org.springframework.boot</groupid>
<artifactid>spring-boot-devtools</artifactid>
<scope>runtime</scope>
</dependency>
<dependency>
<groupid>mysql</groupid>
<artifactid>mysql-connector-java</artifactid>
<scope>runtime</scope>
</dependency>
<dependency>
<groupid>org.springframework.boot</groupid>
<artifactid>spring-boot-starter-test</artifactid>
<scope>test</scope>
</dependency>
<dependency>
<groupid>com.alibaba</groupid>
<artifactid>druid</artifactid>
<version>1.0.28</version>
</dependency>
</dependencies>
<build>
<plugins>
<plugin>
<groupid>org.springframework.boot</groupid>
<artifactid>spring-boot-maven-plugin</artifactid>
</plugin>
</plugins>
</build>
</project>
|
application.properties上半段和整合jpa一点没变,下面加入了一些druid的配置,如果对druid的配置有什么不理解的,可以去网上查一下。(这篇文章我觉得写的很好,传送门)
|
1
2
3
4
5
6
7
8
9
10
11
12
13
14
15
16
17
18
19
20
21
22
23
24
25
26
27
28
29
30
31
32
33
34
35
36
37
38
39
40
41
42
43
44
45
46
47
48
49
50
51
|
#端口号
server.port=8888
##validate 加载hibernate时,验证创建数据库表结构
##create 每次加载hibernate,重新创建数据库表结构,这就是导致数据库表数据丢失的原因。
##create-drop 加载hibernate时创建,退出是删除表结构
##update 加载hibernate自动更新数据库结构
##validate 启动时验证表的结构,不会创建表
##none 启动时不做任何操作
spring.jpa.hibernate.ddl-auto=create
##控制台打印sql
spring.jpa.show-sql=true
##数据库配置
##数据库地址
spring.datasource.url=jdbc:mysql://localhost:3306/test?characterencoding=utf8&usessl=false
##数据库用户名
spring.datasource.username=root
##数据库密码
spring.datasource.password=root
##数据库驱动
spring.datasource.driver-class-name=com.mysql.jdbc.driver
#这里是不同的
#使用druid的话 需要多配置一个属性spring.datasource.type
spring.datasource.type=com.alibaba.druid.pool.druiddatasource
# 连接池的配置信息
# 初始化大小,最小,最大
spring.datasource.initialsize=5
spring.datasource.minidle=5
spring.datasource.maxactive=20
# 配置获取连接等待超时的时间
spring.datasource.maxwait=60000
# 配置间隔多久才进行一次检测,检测需要关闭的空闲连接,单位是毫秒
spring.datasource.timebetweenevictionrunsmillis=60000
# 配置一个连接在池中最小生存的时间,单位是毫秒
spring.datasource.minevictableidletimemillis=300000
spring.datasource.validationquery=select 1 from dual
spring.datasource.testwhileidle=true
spring.datasource.testonborrow=false
spring.datasource.testonreturn=false
# 打开pscache,并且指定每个连接上pscache的大小
spring.datasource.poolpreparedstatements=true
spring.datasource.maxpoolpreparedstatementperconnectionsize=20
# 配置监控统计拦截的filters,去掉后监控界面sql无法统计,'wall'用于防火墙
spring.datasource.filters=stat,wall,log4j
# 通过connectproperties属性来打开mergesql功能;慢sql记录
|
然后在项目中加入druidconfig,简单讲解一下,这个配置文件主要是加载application.properties的配置,代码如下:
|
1
2
3
4
5
6
7
8
9
10
11
12
13
14
15
16
17
18
19
20
21
22
23
24
25
26
27
28
29
30
31
32
33
34
35
36
37
38
39
40
41
42
43
44
45
46
47
48
49
50
51
52
53
54
55
56
57
58
59
60
61
62
63
64
65
66
67
68
69
70
71
72
73
74
75
76
77
78
79
80
81
82
83
84
85
86
87
88
89
90
91
92
93
94
95
96
97
98
99
100
101
102
103
104
105
|
package com.dalaoyang.config;
import java.sql.sqlexception;
import javax.sql.datasource;
import org.apache.log4j.logger;
import org.springframework.beans.factory.annotation.value;
import org.springframework.context.annotation.bean;
import org.springframework.context.annotation.configuration;
import org.springframework.context.annotation.primary;
import com.alibaba.druid.pool.druiddatasource;
/**
* @author dalaoyang
* @description
* @project springboot_learn
* @package com.dalaoyang.config
* @email yangyang@dalaoyang.cn
* @date 2018/4/12
*/
@configuration
public class druidconfig {
private logger logger = logger.getlogger(this.getclass());
@value("${spring.datasource.url}")
private string dburl;
@value("${spring.datasource.username}")
private string username;
@value("${spring.datasource.password}")
private string password;
@value("${spring.datasource.driver-class-name}")
private string driverclassname;
@value("${spring.datasource.initialsize}")
private int initialsize;
@value("${spring.datasource.minidle}")
private int minidle;
@value("${spring.datasource.maxactive}")
private int maxactive;
@value("${spring.datasource.maxwait}")
private int maxwait;
@value("${spring.datasource.timebetweenevictionrunsmillis}")
private int timebetweenevictionrunsmillis;
@value("${spring.datasource.minevictableidletimemillis}")
private int minevictableidletimemillis;
@value("${spring.datasource.validationquery}")
private string validationquery;
@value("${spring.datasource.testwhileidle}")
private boolean testwhileidle;
@value("${spring.datasource.testonborrow}")
private boolean testonborrow;
@value("${spring.datasource.testonreturn}")
private boolean testonreturn;
@value("${spring.datasource.poolpreparedstatements}")
private boolean poolpreparedstatements;
@value("${spring.datasource.maxpoolpreparedstatementperconnectionsize}")
private int maxpoolpreparedstatementperconnectionsize;
@value("${spring.datasource.filters}")
private string filters;
@value("{spring.datasource.connectionproperties}")
private string connectionproperties;
@bean
@primary //主数据源
public datasource datasource(){
druiddatasource datasource = new druiddatasource();
datasource.seturl(this.dburl);
datasource.setusername(username);
datasource.setpassword(password);
datasource.setdriverclassname(driverclassname);
//configuration
datasource.setinitialsize(initialsize);
datasource.setminidle(minidle);
datasource.setmaxactive(maxactive);
datasource.setmaxwait(maxwait);
datasource.settimebetweenevictionrunsmillis(timebetweenevictionrunsmillis);
datasource.setminevictableidletimemillis(minevictableidletimemillis);
datasource.setvalidationquery(validationquery);
datasource.settestwhileidle(testwhileidle);
datasource.settestonborrow(testonborrow);
datasource.settestonreturn(testonreturn);
datasource.setpoolpreparedstatements(poolpreparedstatements);
datasource.setmaxpoolpreparedstatementperconnectionsize(maxpoolpreparedstatementperconnectionsize);
try {
datasource.setfilters(filters);
} catch (sqlexception e) {
logger.error("druid configuration exception", e);
}
datasource.setconnectionproperties(connectionproperties);
return datasource;
}
}
|
然后创建druidfilter,代码如下:
|
1
2
3
4
5
6
7
8
9
10
11
12
13
14
15
16
17
18
19
|
package com.dalaoyang.filter;
import javax.servlet.annotation.webfilter;
import javax.servlet.annotation.webinitparam;
import com.alibaba.druid.support.http.webstatfilter;
/**
* @author dalaoyang
* @description
* @project springboot_learn
* @package com.dalaoyang.filter
* @email yangyang@dalaoyang.cn
* @date 2018/4/12
*/
@webfilter(filtername="druidwebstatfilter",urlpatterns="/*",
initparams={
@webinitparam(name="exclusions",value="*.js,*.gif,*.jpg,*.bmp,*.png,*.css,*.ico,/druid/*")//忽略资源
}
)
public class druidfilter extends webstatfilter {
}
|
新建druidservlet,在类上面加注解@webservlet,其中配置了登录druid监控页面的账号密码,白名单黑名单之类的配置,代码如下:
|
1
2
3
4
5
6
7
8
9
10
11
12
13
14
15
16
17
18
19
20
21
22
|
package com.dalaoyang.servlet;
import javax.servlet.annotation.webinitparam;
import javax.servlet.annotation.webservlet;
import com.alibaba.druid.support.http.statviewservlet;
/**
* @author dalaoyang
* @description
* @project springboot_learn
* @package com.dalaoyang.servlet
* @email yangyang@dalaoyang.cn
* @date 2018/4/12
*/
@webservlet(urlpatterns="/druid/*",
initparams={
@webinitparam(name="allow",value=""),// ip白名单(没有配置或者为空,则允许所有访问)
@webinitparam(name="deny",value=""),// ip黑名单 (deny优先于allow)
@webinitparam(name="loginusername",value="admin"),// 登录druid管理页面用户名
@webinitparam(name="loginpassword",value="admin")// 登录druid管理页面密码
})
public class druidservlet extends statviewservlet {
}
|
然后在启动类加入注解@servletcomponentscan,让项目扫描到servlet,代码如下:
|
1
2
3
4
5
6
7
8
9
10
11
12
|
package com.dalaoyang;
import org.springframework.boot.springapplication;
import org.springframework.boot.autoconfigure.springbootapplication;
import org.springframework.boot.web.servlet.servletcomponentscan;
@springbootapplication
// 启动类必须加入@servletcomponentscan注解,否则无法扫描到servlet
@servletcomponentscan
public class springbootdruidapplication {
public static void main(string[] args) {
springapplication.run(springbootdruidapplication.class, args);
}
}
|
剩余的就是和整合jpa一样的entity(实体类),repository(数据操作层),controller(测试使用的controller),直接展示代码。
city
|
1
2
3
4
5
6
7
8
9
10
11
12
13
14
15
16
17
18
19
20
21
22
23
24
25
26
27
28
29
30
31
32
33
34
35
36
37
38
39
40
41
42
43
44
45
46
47
48
49
50
51
52
53
54
55
56
57
|
package com.dalaoyang.entity;
import javax.persistence.*;
/**
* @author dalaoyang
* @description
* @project springboot_learn
* @package com.dalaoyang.entity
* @email 397600342@qq.com
* @date 2018/4/7
*/
@entity
@table(name="city")
public class city {
@id
@generatedvalue(strategy=generationtype.auto)
private int cityid;
private string cityname;
private string cityintroduce;
public city(int cityid, string cityname, string cityintroduce) {
this.cityid = cityid;
this.cityname = cityname;
this.cityintroduce = cityintroduce;
}
public city(string cityname, string cityintroduce) {
this.cityname = cityname;
this.cityintroduce = cityintroduce;
}
public city() {
}
public int getcityid() {
return cityid;
}
public void setcityid(int cityid) {
this.cityid = cityid;
}
public string getcityname() {
return cityname;
}
public void setcityname(string cityname) {
this.cityname = cityname;
}
public string getcityintroduce() {
return cityintroduce;
}
public void setcityintroduce(string cityintroduce) {
this.cityintroduce = cityintroduce;
}
}
|
cityrepository
|
1
2
3
4
5
6
7
8
9
10
11
12
13
14
|
package com.dalaoyang.repository;
import com.dalaoyang.entity.city;
import org.springframework.data.jpa.repository.jparepository;
/**
* @author dalaoyang
* @description
* @project springboot_learn
* @package com.dalaoyang.repository
* @email 397600342@qq.com
* @date 2018/4/7
*/
public interface cityrepository extends jparepository<city,integer> {
}
|
citycontroller
|
1
2
3
4
5
6
7
8
9
10
11
12
13
14
15
16
17
18
19
20
21
22
23
24
25
26
27
28
29
30
31
32
33
34
35
36
37
38
39
40
41
42
43
44
45
46
47
48
|
package com.dalaoyang.controller;
import com.dalaoyang.entity.city;
import com.dalaoyang.repository.cityrepository;
import org.springframework.beans.factory.annotation.autowired;
import org.springframework.web.bind.annotation.getmapping;
import org.springframework.web.bind.annotation.restcontroller;
/**
* @author dalaoyang
* @description
* @project springboot_learn
* @package com.dalaoyang.controller
* @email 397600342@qq.com
* @date 2018/4/7
*/
@restcontroller
public class citycontroller {
@autowired
private cityrepository cityrepository;
//http://localhost:8888/savecity?cityname=北京&cityintroduce=中国首都
@getmapping(value = "savecity")
public string savecity(string cityname,string cityintroduce){
city city = new city(cityname,cityintroduce);
cityrepository.save(city);
return "success";
}
//http://localhost:8888/deletecity?cityid=2
@getmapping(value = "deletecity")
public string deletecity(int cityid){
cityrepository.delete(cityid);
return "success";
}
//http://localhost:8888/updatecity?cityid=3&cityname=沈阳&cityintroduce=辽宁省省会
@getmapping(value = "updatecity")
public string updatecity(int cityid,string cityname,string cityintroduce){
city city = new city(cityid,cityname,cityintroduce);
cityrepository.save(city);
return "success";
}
//http://localhost:8888/getcitybyid?cityid=3
@getmapping(value = "getcitybyid")
public city getcitybyid(int cityid){
city city = cityrepository.findone(cityid);
return city;
}
}
|
然后启动项目,可以看到控制台已经创建了city表。

然后访问http://localhost:8888/druid,可以看到如下图:
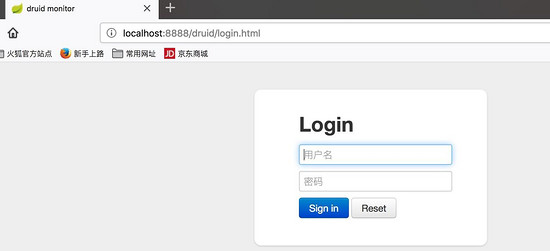
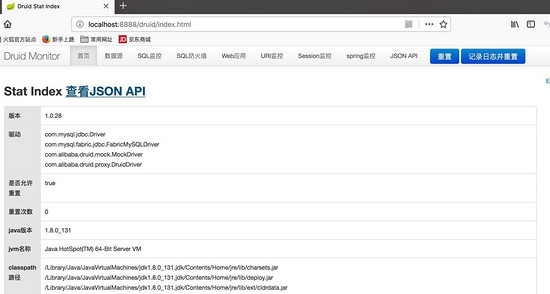
输入账号密码admin,admin,如下图
然后这时我们可以访问http://localhost:8888/savecity?cityname=北京&cityintroduce=中国首都
然后点击导航上面的sql监控,如下图,
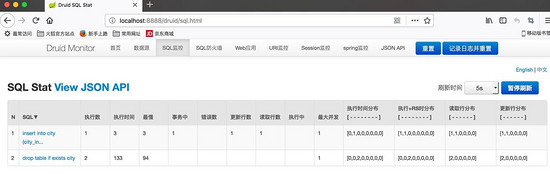
从上图可以看到启动项目创建表的sql已经刚刚执行的sql。到这里整合已经完成了。
源码下载 :https://gitee.com/dalaoyang/springboot_learn
以上就是本文的全部内容,希望对大家的学习有所帮助,也希望大家多多支持快网idc。
原文链接:https://juejin.im/post/5aceec94f265da2395315d68

相关文章


- ASP.NET自助建站系统的数据库备份与恢复操作指南 2025-06-10
- 个人网站服务器域名解析设置指南:从购买到绑定全流程 2025-06-10
- 个人网站搭建:如何挑选具有弹性扩展能力的服务器? 2025-06-10
- 个人服务器网站搭建:如何选择适合自己的建站程序或框架? 2025-06-10
- 64M VPS建站:能否支持高流量网站运行? 2025-06-10