什么是 Swagger?
Swagger的目标是为REST APIs 定义一个标准的,与语言无关的接口,使人和计算机在看不到源码或者看不到文档或者不能通过网络流量检测的情况下能发现和理解各种服务的功能。当服务通过Swagger定义,消费者就能与远程的服务互动通过少量的实现逻辑。类似于低级编程接口,Swagger去掉了调用服务时的很多猜测。
背景
由于swagger不仅提供了自动实现接口文档的说明而且支持页面调试,告别postman等工具,无需开发人员手动写api文档,缩减开发成本得到大家广泛认可但是由于swagger没有提供上传文件的支持,所以只能靠开发人员自己实现。今天就来看看如何扩展swagger达到上传文件的需求
动起小手手
1安装swagger
nuget安装Swashbuckle.AspNetCore.Swagger组件
2设置生成xml
右键项目>属性>生成
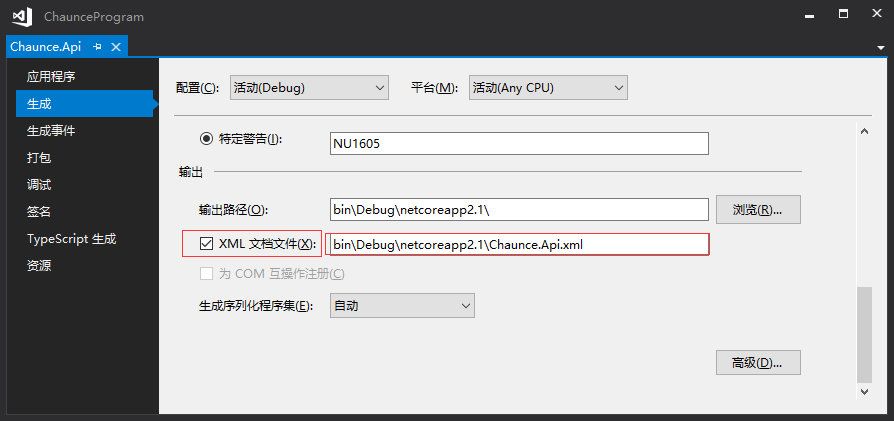
相应的把其他需要生成文档说明的项目也按上步骤进行设置xml
关键swagger代码
|
1
2
3
4
5
6
7
8
9
10
11
12
13
14
15
16
17
18
19
20
21
22
23
24
25
26
27
28
29
30
31
32
33
34
35
36
37
38
39
40
41
42
43
44
45
46
47
48
49
50
51
52
53
54
55
56
57
58
59
60
61
62
63
64
65
66
67
68
69
70
71
72
73
74
75
76
77
78
79
|
using Microsoft.AspNetCore.Builder;
using Microsoft.Extensions.Configuration;
using Microsoft.Extensions.DependencyInjection;
using Microsoft.Extensions.PlatformAbstractions;
using Swashbuckle.AspNetCore.Swagger;
using System;
using System.Collections.Generic;
using System.IO;
using System.Linq;
using System.Threading.Tasks;
namespace Chaunce.Api.App_Start
{
/// <summary>
/// SwaggerConfig
/// </summary>
public class SwaggerConfig
{
/// <summary>
/// InitSwagger
/// </summary>
/// <param name="services"></param>
public static void InitSwagger(IServiceCollection services)
{
services.AddSwaggerGen(c =>
{
c.OperationFilter<SwaggerFileUploadFilter>();//增加文件过滤处理
var security = new Dictionary<string, IEnumerable<string>> { { "Bearer", new string[] { } }, };
c.AddSecurityRequirement(security);//添加一个必须的全局安全信息,和AddSecurityDefinition方法指定的方案名称要一致,这里是Bearer。
var basePath = PlatformServices.Default.Application.ApplicationBasePath;// 获取到应用程序的根路径
var xmlApiPath = Path.Combine(basePath, "Chaunce.Api.xml");//api文件xml(在以上步骤2设置生成xml的路径)
var xmlModelPath = Path.Combine(basePath, "Chaunce.ViewModels.xml");//请求modelxml
c.IncludeXmlComments(xmlApiPath);
c.IncludeXmlComments(xmlModelPath);
c.SwaggerDoc("v1", new Info
{
Title = "Chaunce数据接口",
Version = "v1",
Description = "这是一个webapi接口文档说明",
TermsOfService = "None",
Contact = new Contact { Name = "Chaunce官网", Email = "info@Chaunce.com", Url = "http://blog.Chaunce.top/" },
License = new License
{
Name = "Swagger官网",
Url = "http://swagger.io/",
}
});
c.IgnoreObsoleteActions();
c.AddSecurityDefinition("Bearer", new ApiKeyScheme
{
Description = "权限认证(数据将在请求头中进行传输) 参数结构: \\"Authorization: Bearer {token}\\"",
Name = "Authorization",//jwt默认的参数名称
In = "header",//jwt默认存放Authorization信息的位置(请求头中)
Type = "apiKey"
});//Authorization的设置
});
}
/// <summary>
/// ConfigureSwagger
/// </summary>
/// <param name="app"></param>
public static void ConfigureSwagger(IApplicationBuilder app)
{
app.UseSwagger();
// Enable middleware to serve swagger-ui (HTML, JS, CSS, etc.), specifying the Swagger JSON endpoint.
app.UseSwagger(c =>
{
c.RouteTemplate = "docs/{documentName}/docs.json";//使中间件服务生成Swagger作为JSON端点(此处设置是生成接口文档信息,可以理解为老技术中的webservice的soap协议的信息,暴露出接口信息的地方)
c.PreSerializeFilters.Add((swaggerDoc, httpReq) => swaggerDoc.Info.Description = httpReq.Path);//请求过滤处理
});
app.UseSwaggerUI(c =>
{
c.RoutePrefix = "docs";//设置文档首页根路径
c.SwaggerEndpoint("/docs/v1/docs.json", "V1");//此处配置要和UseSwagger的RouteTemplate匹配
//c.SwaggerEndpoint("/swagger/v1/swagger.json", "V1");//默认终结点
c.InjectStylesheet("/swagger-ui/custom.css");//注入style文件
});
}
}
}
|
swagger过滤器
|
1
2
3
4
5
6
7
8
9
10
11
12
13
14
15
16
17
18
19
20
21
22
23
24
25
26
27
28
29
30
31
32
33
34
35
36
37
38
39
40
41
42
43
44
45
46
47
48
49
50
|
using Microsoft.AspNetCore.Http;
using Swashbuckle.AspNetCore.Swagger;
using Swashbuckle.AspNetCore.SwaggerGen;
using System;
using System.Collections.Generic;
using System.Linq;
using System.Threading.Tasks;
namespace Chaunce.Api.Help
{
/// <summary>
/// swagger文件过滤器
/// </summary>
public class SwaggerFileUploadFilter : IOperationFilter
{
/// <summary>
/// swagger过滤器(此处的Apply会被swagger的每个接口都调用生成文档说明,所以在此处可以对每一个接口进行过滤操作)
/// </summary>
/// <param name="operation"></param>
/// <param name="context"></param>
public void Apply(Operation operation, OperationFilterContext context)
{
if (!context.ApiDescription.HttpMethod.Equals("POST", StringComparison.OrdinalIgnoreCase) &&
!context.ApiDescription.HttpMethod.Equals("PUT", StringComparison.OrdinalIgnoreCase))
{
return;
}
var apiDescription = context.ApiDescription;
var parameters = context.ApiDescription.ParameterDescriptions.Where(n => n.Type == typeof(IFormFileCollection) || n.Type == typeof(IFormFile)).ToList();//parameterDescriptions包含了每个接口所带所有参数信息
if (parameters.Count() <= 0)
{
return;
}
operation.Consumes.Add("multipart/form-data");
foreach (var fileParameter in parameters)
{
var parameter = operation.Parameters.Single(n => n.Name == fileParameter.Name);
operation.Parameters.Remove(parameter);
operation.Parameters.Add(new NonBodyParameter
{
Name = parameter.Name,
In = "formData",
Description = parameter.Description,
Required = parameter.Required,
Type = "file",
//CollectionFormat = "multi"
});
}
}
}
}
|
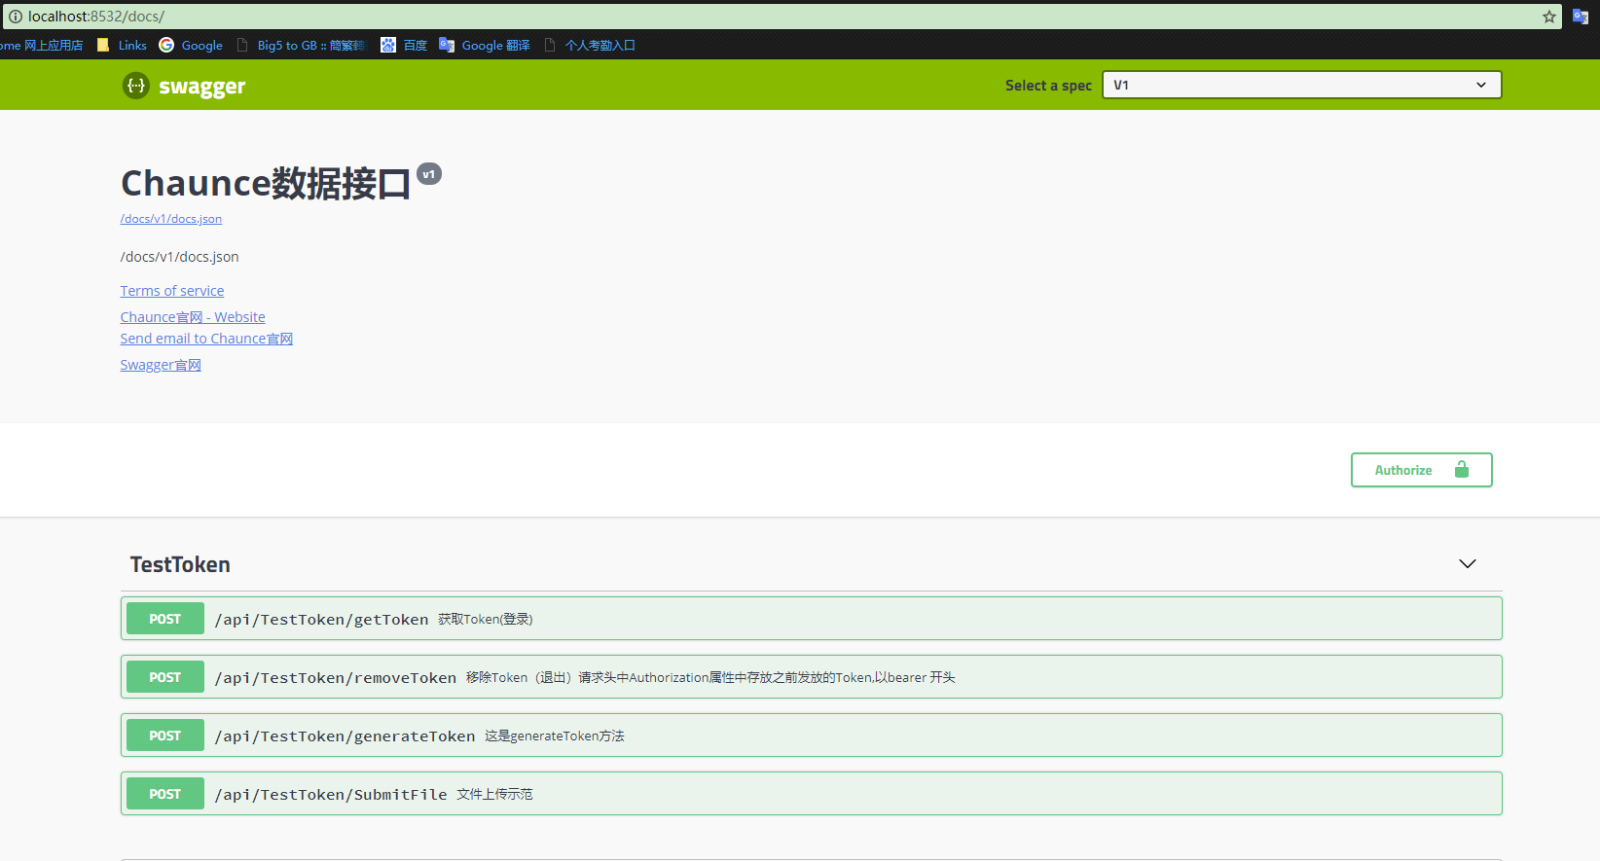
打开浏览器http://localhost:8532/docs/

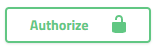
还没有结束,我们看看如何让Jwt的认证信息自动存在请求头免去每次手动塞
点击
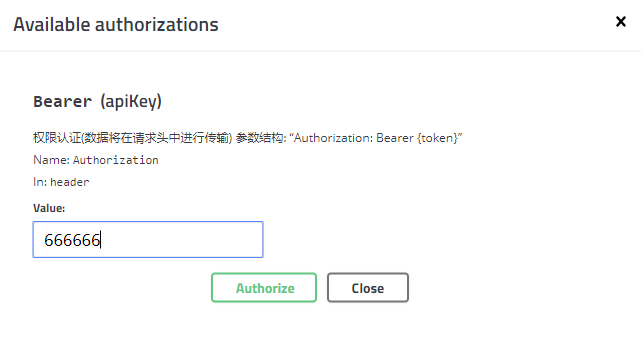
(实际情况是填写的信息格式是:Bearer *************(Bearer与后面信息有一个空格))
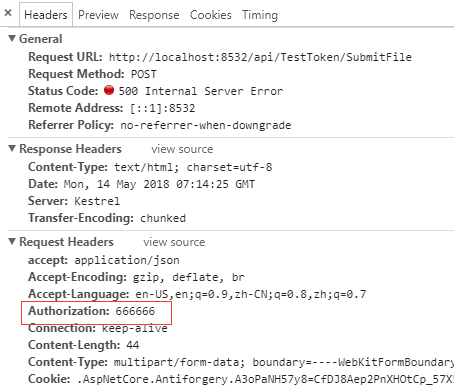
此时随意访问任何api,都会将以上信息自动塞入header中进行请求,如下验证
至此目的都达到了
参考:
http://www.zzvips.com/article/69571.html
https://github.com/domaindrivendev/Swashbuckle
总结
以上所述是小编给大家介绍的swagger上传文件并支持jwt认证的实现方法,希望对大家有所帮助,如果大家有任何疑问请给我留言,小编会及时回复大家的。在此也非常感谢大家对快网idc网站的支持!
原文链接:https://www.cnblogs.com/xiaoliangge/p/9036247.html

相关文章


- 64M VPS建站:能否支持高流量网站运行? 2025-06-10
- 64M VPS建站:怎样选择合适的域名和SSL证书? 2025-06-10
- 64M VPS建站:怎样优化以提高网站加载速度? 2025-06-10
- 64M VPS建站:是否适合初学者操作和管理? 2025-06-10
- ASP.NET自助建站系统中的用户注册和登录功能定制方法 2025-06-10