本文实例讲述了YII Framework框架使用YIIC快速创建YII应用之migrate用法。分享给大家供大家参考,具体如下:
yii migrate
查看帮助
|
1
2
3
4
5
6
7
8
9
10
11
12
13
14
15
16
17
18
19
20
21
22
23
24
25
26
27
28
29
30
31
32
33
34
35
36
37
38
39
|
/*
/www/yii_dev/yii/framework# php yiic migrate help
Error: Unknown action: help
USAGE
yiic migrate [action] [parameter]
DESCRIPTION
This command provides support for database migrations. The optional
'action' parameter specifies which specific migration task to perform.
It can take these values: up, down, to, create, history, new, mark.
If the 'action' parameter is not given, it defaults to 'up'.
Each action takes different parameters. Their usage can be found in
the following examples.
EXAMPLES
* yiic migrate
Applies ALL new migrations. This is equivalent to 'yiic migrate to'.
* yiic migrate create create_user_table
Creates a new migration named 'create_user_table'.
* yiic migrate up 3
Applies the next 3 new migrations.
* yiic migrate down
Reverts the last applied migration.
* yiic migrate down 3
Reverts the last 3 applied migrations.
* yiic migrate to 101129_185401
Migrates up or down to version 101129_185401.
* yiic migrate mark 101129_185401
Modifies the migration history up or down to version 101129_185401.
No actual migration will be performed.
* yiic migrate history
Shows all previously applied migration information.
* yiic migrate history 10
Shows the last 10 applied migrations.
* yiic migrate new
Shows all new migrations.
* yiic migrate new 10
Shows the next 10 migrations that have not been applied.
*/
|
在我们开发程序的过程中,数据库的结构也是不断调整的。我们的开发中要保证代码和数据库库的同步。因为我们的应用离不开数据库。例如: 在开发过程中,我们经常需要增加一个新的表,或者我们后期投入运营的产品,可能需要为某一列添加索引。我们必须保持数据结构和代码的一致性。如果代码和数据库不同步,可能整个系统将无法正常运行。出于这个原因。yii提供了一个数据库迁移工具,可以保持代码和数据库是同步。方便数据库的回滚和更新。
功能正如描述。主要提供了数据库迁移功能。
命令格式
yiic migrate [action] [parameter]
action参数用来制定执行哪一个迁移任务。可以一使用
up, down, to, create, history, new, mark.这些命令
如果没有action参数,默认为up
parameter根据action的不同而有所变化。
上述例子中给出了说明。
官方也给出了详细的例子。
http://www.yiiframework.com/doc/guide/1.1/zh_cn/database.migration#creating-migrations
这里不再详细累述。用到的时候参考使用就可以了。
补充:yii2.0使用migrate创建后台登陆
重新创建一张数据表来完成后台登陆验证
为了大家看得明白,直接贴代码
一、使用Migration创建表admin
console\\migrations\\m130524_201442_init.php
|
1
2
3
4
5
6
7
8
9
10
11
12
13
14
15
16
17
18
19
20
21
22
23
24
25
26
27
28
29
30
31
32
|
use yii\\db\\Schema;
use yii\\db\\Migration;
class m130524_201442_init extends Migration
{
const TBL_NAME = '{{%admin}}';
public function safeUp()
{
$tableOptions = null;
if ($this->db->driverName === 'mysql') {
// http://stackoverflow.com/questions/766809/whats-the-difference-between-utf8-general-ci-and-utf8-unicode-ci
$tableOptions = 'CHARACTER SET utf8 COLLATE utf8_unicode_ci ENGINE=InnoDB';
}
$this->createTable(self::TBL_NAME, [
'id' => Schema::TYPE_PK,
'username' => Schema::TYPE_STRING . ' NOT NULL',
'auth_key' => Schema::TYPE_STRING . '(32) NOT NULL',
'password_hash' => Schema::TYPE_STRING . ' NOT NULL', //密码
'password_reset_token' => Schema::TYPE_STRING,
'email' => Schema::TYPE_STRING . ' NOT NULL',
'role' => Schema::TYPE_SMALLINT . ' NOT NULL DEFAULT 10',
'status' => Schema::TYPE_SMALLINT . ' NOT NULL DEFAULT 10',
'created_at' => Schema::TYPE_INTEGER . ' NOT NULL',
'updated_at' => Schema::TYPE_INTEGER . ' NOT NULL',
], $tableOptions);
$this->createIndex('username', self::TBL_NAME, ['username'],true);
$this->createIndex('email', self::TBL_NAME, ['email'],true);
}
public function safeDown()
{
$this->dropTable(self::TBL_NAME);
}
}
|
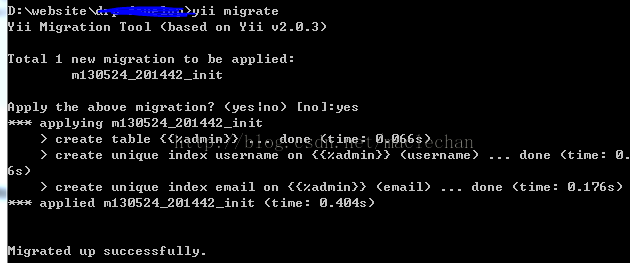
使用命令行来创建admin数据库
1、win7下使用命令:
在项目根目下,右键选择User composer here(前提是安装了全局的composer),
yii migrate
即创建数据表 admin成功
2、linux下命令一样(此处略)
二、使用gii创建模型
此处略,很简单的步聚。
注:把admin模型创在 backend/models下面 (放哪里看个人喜好)
代码如下
|
1
2
3
4
5
6
7
8
9
10
11
12
13
14
15
16
17
18
19
20
21
22
23
24
25
26
27
28
29
30
31
32
33
34
35
36
37
38
39
40
41
42
43
44
45
46
47
48
49
50
51
52
53
54
55
56
57
58
59
60
61
62
63
64
65
66
67
68
69
70
71
72
73
74
75
76
77
78
79
80
81
82
83
84
85
86
87
88
89
90
91
92
93
94
95
96
97
98
99
100
101
102
103
104
105
106
107
108
109
110
111
112
113
114
115
116
117
118
119
120
121
122
123
124
125
126
127
128
129
130
131
132
133
134
135
136
137
138
139
140
141
142
143
144
145
146
147
148
149
150
151
152
153
154
155
156
157
158
159
160
161
162
163
164
165
166
167
168
169
170
171
172
173
174
175
176
177
178
179
180
|
namespace backend\\models;
use Yii;
use yii\\base\\NotSupportedException;
use yii\\behaviors\\TimestampBehavior;
use yii\\db\\ActiveRecord;
use yii\\web\\IdentityInterface;
/**
* This is the model class for table "{{%admin}}".
*
* @property integer $id
* @property string $username
* @property string $auth_key
* @property string $password_hash
* @property string $password_reset_token
* @property string $email
* @property integer $role
* @property integer $status
* @property integer $created_at
* @property integer $updated_at
*/
class AgAdmin extends ActiveRecord implements IdentityInterface
{
const STATUS_DELETED = 0;
const STATUS_ACTIVE = 10;
const ROLE_USER = 10;
const AUTH_KEY = '123456';
/**
* @inheritdoc
*/
public static function tableName()
{
return '{{%admin}}';
}
/**
* @inheritdoc
*/
public function behaviors()
{
return [
TimestampBehavior::className(),
];
}
/**
* @inheritdoc
*/
public function rules()
{
return [
[['username', 'email',], 'required'],
[['username', 'email'], 'string', 'max' => 255],
[['username'], 'unique'],
[['username'], 'match', 'pattern'=>'/^[a-z]\\w*$/i'],
[['email'], 'unique'],
[['email'], 'email'],
['status', 'default', 'value' => self::STATUS_ACTIVE],
['status', 'in', 'range' => [self::STATUS_ACTIVE, self::STATUS_DELETED]],
['role', 'default', 'value' => self::ROLE_USER],
['auth_key', 'default', 'value' => self::AUTH_KEY],
['role', 'in', 'range' => [self::ROLE_USER]],
];
}
/**
* @inheritdoc
*/
public static function findIdentity($id)
{
return static::findOne(['id' => $id, 'status' => self::STATUS_ACTIVE]);
}
/**
* @inheritdoc
*/
public static function findIdentityByAccessToken($token, $type = null)
{
return static::findOne(['access_token' => $token]);
//throw new NotSupportedException('"findIdentityByAccessToken" is not implemented.');
}
/**
* Finds user by username
*
* @param string $username
* @return static|null
*/
public static function findByUsername($username)
{
return static::findOne(['username' => $username, 'status' => self::STATUS_ACTIVE]);
}
/**
* Finds user by password reset token
*
* @param string $token password reset token
* @return static|null
*/
public static function findByPasswordResetToken($token)
{
if (!static::isPasswordResetTokenValid($token)) {
return null;
}
return static::findOne([
'password_reset_token' => $token,
'status' => self::STATUS_ACTIVE,
]);
}
/**
* Finds out if password reset token is valid
*
* @param string $token password reset token
* @return boolean
*/
public static function isPasswordResetTokenValid($token)
{
if (empty($token)) {
return false;
}
$expire = Yii::$app->params['user.passwordResetTokenExpire'];
$parts = explode('_', $token);
$timestamp = (int) end($parts);
return $timestamp + $expire >= time();
}
/**
* @inheritdoc
*/
public function getId()
{
return $this->getPrimaryKey();
}
/**
* @inheritdoc
*/
public function getAuthKey()
{
return $this->auth_key;
}
/**
* @inheritdoc
*/
public function validateAuthKey($authKey)
{
return $this->getAuthKey() === $authKey;
}
/**
* Validates password
*
* @param string $password password to validate
* @return boolean if password provided is valid for current user
*/
public function validatePassword($password)
{
return Yii::$app->security->validatePassword($password, $this->password_hash);
}
/**
* Generates password hash from password and sets it to the model
*
* @param string $password
*/
public function setPassword($password)
{
$this->password_hash = Yii::$app->security->generatePasswordHash($password);
}
/**
* Generates "remember me" authentication key
*/
public function generateAuthKey()
{
$this->auth_key = Yii::$app->security->generateRandomString();
}
/**
* Generates new password reset token
*/
public function generatePasswordResetToken()
{
$this->password_reset_token = Yii::$app->security->generateRandomString() . '_' . time();
}
/**
* Removes password reset token
*/
public function removePasswordResetToken()
{
$this->password_reset_token = null;
}
}
|
三、使用migrate 为后如初使化一个登陆帐号
1、console\\controllers创建InitController.php
|
1
2
3
4
5
6
7
8
9
10
11
12
13
14
15
16
17
18
19
20
21
22
23
24
25
26
27
28
29
30
31
32
33
34
35
|
/**
*
* @author chan <maclechan@qq.com>
*/
namespace console\\controllers;
use backend\\models\\Admin ;
class InitController extends \\yii\\console\\Controller
{
/**
* Create init user
*/
public function actionAdmin()
{
echo "创建一个新用户 ...\\n"; // 提示当前操作
$username = $this->prompt('User Name:'); // 接收用户名
$email = $this->prompt('Email:'); // 接收Email
$password = $this->prompt('Password:'); // 接收密码
$model = new AgAdmin(); // 创建一个新用户
$model->username = $username; // 完成赋值
$model->email = $email;
$model->password = $password;
if (!$model->save()) // 保存新的用户
{
foreach ($model->getErrors() as $error) // 如果保存失败,说明有错误,那就输出错误信息。
{
foreach ($error as $e)
{
echo "$e\\n";
}
}
return 1; // 命令行返回1表示有异常
}
return 0; // 返回0表示一切OK
}
}
|
2、使用命令:
在项目根目下,右键选择User composer here(前提是安装了全局的composer),
yii init/admin
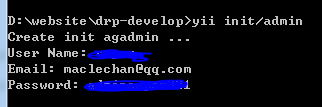
到此,打开数据表看下,己经有了数据。
四、后台登陆验证
1、backend\\controllers\\SiteController.php 里actionLogin方法不用变
2、把common\\models\\LoginForm.php复制到backend\\models只要把LoginForm.php里面的方法getUser()修改一个单词即可,如下
|
1
2
3
4
5
6
7
|
public function getUser()
{
if ($this->_user === false) {
$this->_user = Admin::findByUsername($this->username);
}
return $this->_user;
}
|
3、backend\\config\\main.php 只要修改
|
1
2
3
4
|
'user' => [
'identityClass' => 'backend\\models\\Admin',
'enableAutoLogin' => true,
],
|

相关文章


- 64M VPS建站:能否支持高流量网站运行? 2025-06-10
- 64M VPS建站:怎样选择合适的域名和SSL证书? 2025-06-10
- 64M VPS建站:怎样优化以提高网站加载速度? 2025-06-10
- 64M VPS建站:是否适合初学者操作和管理? 2025-06-10
- ASP.NET自助建站系统中的用户注册和登录功能定制方法 2025-06-10