微信大家基本上都用过,今天要做的就是微信的聊天工具条。聊天工具条还是比较复杂的,其中包括发送表情,发送文字,发送图片,发送声音,拍照等等功能,下面给出发送录音,文字,表情的代码,其他的和这几样类似。还是那句话百字不如一图,先来几张效果图吧。
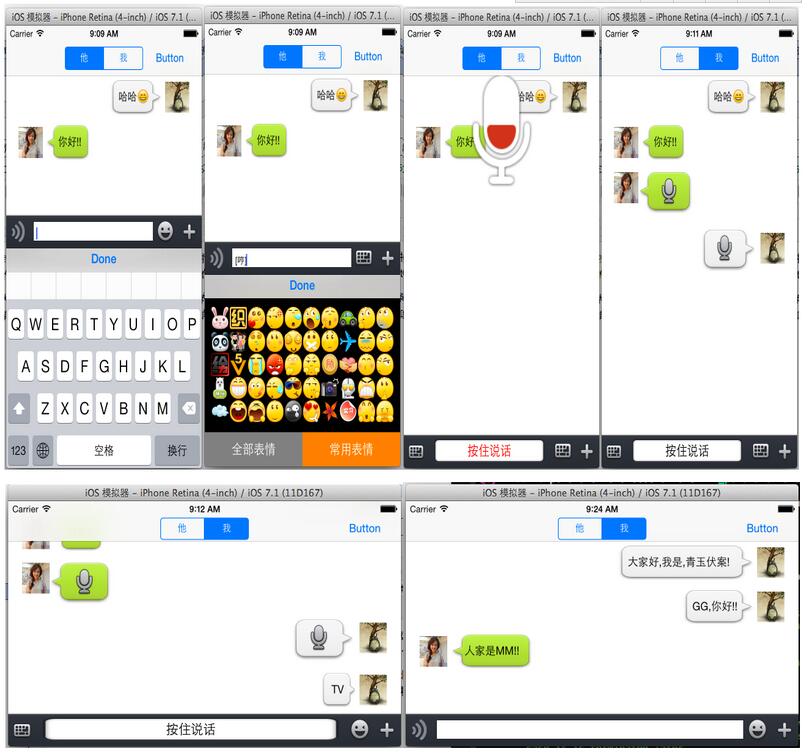
在封装聊天工具条的的时候表情键盘是之前封装好的,所以拿过来就可以用的啦。因为不管是工具条还是表情键盘都是用约束来控件大小的,所以横屏也是没问题的,在大屏手机上也是没问题的。下面将会一步步讲解如何封装下面的聊天工具条。主要是对工具条的封装,表情键盘在这就不做讲解了。
一、toolview预留的接口
在封装toolview中主要用到block回调,读者可以根据自己的个人习惯来选择是block回调,还是委托回调或者是目标动作回调(笔者更喜欢block回调),下面的代码是toolview给调用者提供的接口
|
1
2
3
4
5
6
7
8
9
10
11
12
13
14
15
16
17
18
19
20
21
22
23
24
25
26
27
28
29
30
31
32
33
34
35
36
37
38
39
40
41
42
43
44
45
46
|
//
// toolview.h
// mecromessage
//
// created by (青玉伏案)on 14-9-22.
// copyright (c) 2014年 mrli. all rights reserved.
//
#import <uikit/uikit.h>
//定义block类型把toolview中textview中的文字传入到controller中
typedef void (^mytextblock) (nsstring *mytext);
//录音时的音量
typedef void (^audiovolumeblock) (cgfloat volume);
//录音存储地址
typedef void (^audiourlblock) (nsurl *audiourl);
//改变根据文字改变textview的高度
typedef void (^contentsizeblock)(cgsize contentsize);
//录音取消的回调
typedef void (^cancelrecordblock)(int flag);
@interface toolview : uiview<uitextviewdelegate,avaudiorecorderdelegate>
//设置mytextblock
-(void) setmytextblock:(mytextblock)block;
//设置声音回调
-(void) setaudiovolumeblock:(audiovolumeblock) block;
//设置录音地址回调
-(void) setaudiourlblock:(audiourlblock) block;
-(void)setcontentsizeblock:(contentsizeblock) block;
-(void)setcancelrecordblock:(cancelrecordblock)block;
-(void) changefunctionheight: (float) height;
@end
|
二、初始化toolview中所需的控件
1.为了更好的封装我们的组件,在.h中预留接口,在toolview.m的延展中添加我们要使用的组件(私有属性),延展代码如下:
|
1
2
3
4
5
6
7
8
9
10
11
12
13
14
15
16
17
18
19
20
21
22
23
24
25
26
27
28
29
30
31
32
33
34
35
36
37
38
39
40
41
42
43
44
45
46
47
48
49
50
51
52
53
54
55
|
@interface toolview()
//最左边发送语音的按钮
@property (nonatomic, strong) uibutton *voicechangebutton;
//发送语音的按钮
@property (nonatomic, strong) uibutton *sendvoicebutton;
//文本视图
@property (nonatomic, strong) uitextview *sendtextview;
//切换键盘
@property (nonatomic, strong) uibutton *changekeyboardbutton;
//more
@property (nonatomic, strong) uibutton *morebutton;
//键盘坐标系的转换
@property (nonatomic, assign) cgrect endkeyboardframe;
//表情键盘
@property (nonatomic, strong) functionview *functionview;
//more
@property (nonatomic, strong) moreview *moreview;
//数据model
@property (strong, nonatomic) imagemodelclass *imagemode;
@property (strong, nonatomic)historyimage *tempimage;
//传输文字的block回调
@property (strong, nonatomic) mytextblock textblock;
//contentsinz
@property (strong, nonatomic) contentsizeblock sizeblock;
//传输volome的block回调
@property (strong, nonatomic) audiovolumeblock volumeblock;
//传输录音地址
@property (strong, nonatomic) audiourlblock urlblock;
//录音取消
@property (strong, nonatomic) cancelrecordblock cancelblock;
//添加录音功能的属性
@property (strong, nonatomic) avaudiorecorder *audiorecorder;
@property (strong, nonatomic) nstimer *timer;
@property (strong, nonatomic) nsurl *audioplayurl;
@end
|
2.接受相应的block回调,把block传入toolview中,代码如下:
|
1
2
3
4
5
6
7
8
9
10
11
12
13
14
15
16
17
18
19
20
21
22
23
24
|
-(void)setmytextblock:(mytextblock)block
{
self.textblock = block;
}
-(void)setaudiovolumeblock:(audiovolumeblock)block
{
self.volumeblock = block;
}
-(void)setaudiourlblock:(audiourlblock)block
{
self.urlblock = block;
}
-(void)setcontentsizeblock:(contentsizeblock)block
{
self.sizeblock = block;
}
-(void)setcancelrecordblock:(cancelrecordblock)block
{
self.cancelblock = block;
}
|
3.控件的初始化,纯代码添加toolview中要用到的组件(分配内存,配置相应的属性),因为是自定义组件的封装,所以我们的storyboard就用不上啦,添加控件的代码如下:
|
1
2
3
4
5
6
7
8
9
10
11
12
13
14
15
16
17
18
19
20
21
22
23
24
25
26
27
28
29
30
31
32
33
34
35
36
37
38
39
40
41
42
43
44
45
46
47
48
49
50
51
52
53
54
55
56
57
58
59
60
61
62
63
64
65
66
67
68
69
70
71
72
73
74
75
76
77
|
//控件的初始化
-(void) addsubview
{
self.voicechangebutton = [[uibutton alloc] initwithframe:cgrectzero];
[self.voicechangebutton setimage:[uiimage imagenamed:@"chat_bottom_voice_press.png"] forstate:uicontrolstatenormal];
[self.voicechangebutton addtarget:self action:@selector(tapvoicechangebutton:) forcontrolevents:uicontroleventtouchupinside];
[self addsubview:self.voicechangebutton];
self.sendvoicebutton = [[uibutton alloc] initwithframe:cgrectzero];
[self.sendvoicebutton setbackgroundimage:[uiimage imagenamed:@"chat_bottom_textfield.png"] forstate:uicontrolstatenormal];
[self.sendvoicebutton settitlecolor:[uicolor blackcolor] forstate:uicontrolstatenormal];
[self.sendvoicebutton settitle:@"按住说话" forstate:uicontrolstatenormal];
[self.sendvoicebutton addtarget:self action:@selector(tapsendvoicebutton:) forcontrolevents:uicontroleventtouchupinside];
self.sendvoicebutton.hidden = yes;
[self addsubview:self.sendvoicebutton];
self.sendtextview = [[uitextview alloc] initwithframe:cgrectzero];
self.sendtextview.delegate = self;
[self addsubview:self.sendtextview];
self.changekeyboardbutton = [[uibutton alloc] initwithframe:cgrectzero];
[self.changekeyboardbutton setimage:[uiimage imagenamed:@"chat_bottom_smile_nor.png"] forstate:uicontrolstatenormal];
[self.changekeyboardbutton addtarget:self action:@selector(tapchangekeyboardbutton:) forcontrolevents:uicontroleventtouchupinside];
[self addsubview:self.changekeyboardbutton];
self.morebutton = [[uibutton alloc] initwithframe:cgrectzero];
[self.morebutton setimage:[uiimage imagenamed:@"chat_bottom_up_nor.png"] forstate:uicontrolstatenormal];
[self.morebutton addtarget:self action:@selector(tapmorebutton:) forcontrolevents:uicontroleventtouchupinside];
[self addsubview:self.morebutton];
[self adddone];
//实例化functionview
self.functionview = [[functionview alloc] initwithframe:cgrectmake(0, 0, 320, 216)];
self.functionview.backgroundcolor = [uicolor blackcolor];
//设置资源加载的文件名
self.functionview.plistfilename = @"emoticons";
__weak __block toolview *copy_self = self;
//获取图片并显示
[self.functionview setfunctionblock:^(uiimage *image, nsstring *imagetext)
{
nsstring *str = [nsstring stringwithformat:@"%@%@",copy_self.sendtextview.text, imagetext];
copy_self.sendtextview.text = str;
//把使用过的图片存入sqlite
nsdata *imagedata = uiimagepngrepresentation(image);
[copy_self.imagemode save:imagedata imagetext:imagetext];
}];
//给sendtextview添加轻击手势
uitapgesturerecognizer *tapgesture = [[uitapgesturerecognizer alloc] initwithtarget:self action:@selector(tapgesture:)];
[self.sendtextview addgesturerecognizer:tapgesture];
//给sendvoicebutton添加长按手势
uilongpressgesturerecognizer *longpress = [[uilongpressgesturerecognizer alloc] initwithtarget:self action:@selector(sendvoicebuttonlongpress:)];
//设置长按时间
longpress.minimumpressduration = 0.2;
[self.sendvoicebutton addgesturerecognizer:longpress];
//实例化moreview
self.moreview = [[moreview alloc] initwithframe:cgrectmake(0, 0, 0, 0)];
self.moreview.backgroundcolor = [uicolor blackcolor];
[self.moreview setmoreblock:^(nsinteger index) {
nslog(@"moreindex = %d",(int)index);
}];
}
|
4.给我们的控件添加相应的约束,为了适合不同的屏幕,所以自动布局是少不了的。当然啦给控件添加约束也必须是手写代码啦,添加约束的代码如下:
|
1
2
3
4
5
6
7
8
9
10
11
12
13
14
15
16
17
18
19
20
21
22
23
24
25
26
27
28
29
30
31
32
33
34
35
36
37
38
39
40
41
42
43
44
45
46
47
48
49
50
51
52
53
|
//给控件加约束
-(void)addconstraint
{
//给voicebutton添加约束
self.voicechangebutton.translatesautoresizingmaskintoconstraints = no;
nsarray *voiceconstrainth = [nslayoutconstraint constraintswithvisualformat:@"h:|-5-[_voicechangebutton(30)]" options:0 metrics:0 views:nsdictionaryofvariablebindings(_voicechangebutton)];
[self addconstraints:voiceconstrainth];
nsarray *voiceconstraintv = [nslayoutconstraint constraintswithvisualformat:@"v:|-8-[_voicechangebutton(30)]" options:0 metrics:0 views:nsdictionaryofvariablebindings(_voicechangebutton)];
[self addconstraints:voiceconstraintv];
//给morebutton添加约束
self.morebutton.translatesautoresizingmaskintoconstraints = no;
nsarray *morebuttonh = [nslayoutconstraint constraintswithvisualformat:@"h:[_morebutton(30)]-5-|" options:0 metrics:0 views:nsdictionaryofvariablebindings(_morebutton)];
[self addconstraints:morebuttonh];
nsarray *morebuttonv = [nslayoutconstraint constraintswithvisualformat:@"v:|-8-[_morebutton(30)]" options:0 metrics:0 views:nsdictionaryofvariablebindings(_morebutton)];
[self addconstraints:morebuttonv];
//给changekeyboardbutton添加约束
self.changekeyboardbutton.translatesautoresizingmaskintoconstraints = no;
nsarray *changekeyboardbuttonh = [nslayoutconstraint constraintswithvisualformat:@"h:[_changekeyboardbutton(33)]-43-|" options:0 metrics:0 views:nsdictionaryofvariablebindings(_changekeyboardbutton)];
[self addconstraints:changekeyboardbuttonh];
nsarray *changekeyboardbuttonv = [nslayoutconstraint constraintswithvisualformat:@"v:|-5-[_changekeyboardbutton(33)]" options:0 metrics:0 views:nsdictionaryofvariablebindings(_changekeyboardbutton)];
[self addconstraints:changekeyboardbuttonv];
//给文本框添加约束
self.sendtextview.translatesautoresizingmaskintoconstraints = no;
nsarray *sendtextviewconstrainth = [nslayoutconstraint constraintswithvisualformat:@"h:|-45-[_sendtextview]-80-|" options:0 metrics:0 views:nsdictionaryofvariablebindings(_sendtextview)];
[self addconstraints:sendtextviewconstrainth];
nsarray *sendtextviewconstraintv = [nslayoutconstraint constraintswithvisualformat:@"v:|-10-[_sendtextview]-10-|" options:0 metrics:0 views:nsdictionaryofvariablebindings(_sendtextview)];
[self addconstraints:sendtextviewconstraintv];
//语音发送按钮
self.sendvoicebutton.translatesautoresizingmaskintoconstraints = no;
nsarray *sendvoicebuttonconstrainth = [nslayoutconstraint constraintswithvisualformat:@"h:|-50-[_sendvoicebutton]-90-|" options:0 metrics:0 views:nsdictionaryofvariablebindings(_sendvoicebutton)];
[self addconstraints:sendvoicebuttonconstrainth];
nsarray *sendvoicebuttonconstraintv = [nslayoutconstraint constraintswithvisualformat:@"v:|-6-[_sendvoicebutton]-6-|" options:0 metrics:0 views:nsdictionaryofvariablebindings(_sendvoicebutton)];
[self addconstraints:sendvoicebuttonconstraintv];
}
|
5.因为我们要发送录音,所以对音频部分的初始化是少不了的,以下代码是对音频的初始化
|
1
2
3
4
5
6
7
8
9
10
11
12
13
14
15
16
17
18
19
20
21
22
23
24
25
26
27
28
29
30
31
32
33
34
35
36
37
38
39
40
41
42
43
44
45
46
47
48
49
50
51
52
53
54
|
//录音部分初始化
-(void)audioinit
{
nserror * err = nil;
avaudiosession *audiosession = [avaudiosession sharedinstance];
[audiosession setcategory :avaudiosessioncategoryplayandrecord error:&err];
if(err){
nslog(@"audiosession: %@ %d %@", [err domain], [err code], [[err userinfo] description]);
return;
}
[audiosession setactive:yes error:&err];
err = nil;
if(err){
nslog(@"audiosession: %@ %d %@", [err domain], [err code], [[err userinfo] description]);
return;
}
//通过可变字典进行配置项的加载
nsmutabledictionary *setaudiodic = [[nsmutabledictionary alloc] init];
//设置录音格式(aac格式)
[setaudiodic setvalue:@(kaudioformatmpeg4aac) forkey:avformatidkey];
//设置录音采样率(hz) 如:avsampleratekey==8000/44100/96000(影响音频的质量)
[setaudiodic setvalue:@(44100) forkey:avsampleratekey];
//设置录音通道数1 or 2
[setaudiodic setvalue:@(1) forkey:avnumberofchannelskey];
//线性采样位数 8、16、24、32
[setaudiodic setvalue:@16 forkey:avlinearpcmbitdepthkey];
//录音的质量
[setaudiodic setvalue:@(avaudioqualityhigh) forkey:avencoderaudioqualitykey];
nsstring *strurl = [nssearchpathfordirectoriesindomains(nsdocumentdirectory, nsuserdomainmask, yes) lastobject];
nsstring *filename = [nsstring stringwithformat:@"%ld", (long)[[nsdate date] timeintervalsince1970]];
nsurl *url = [nsurl fileurlwithpath:[nsstring stringwithformat:@"%@/%@.aac", strurl, filename]];
_audioplayurl = url;
nserror *error;
//初始化
self.audiorecorder = [[avaudiorecorder alloc]initwithurl:url settings:setaudiodic error:&error];
//开启音量检测
self.audiorecorder.meteringenabled = yes;
self.audiorecorder.delegate = self;
}
|
6.添加键盘回收键done
|
1
2
3
4
5
6
7
8
9
10
11
12
13
|
//给键盘添加done键
-(void) adddone
{
//textview的键盘定制回收按钮
uitoolbar * toolbar = [[uitoolbar alloc]initwithframe:cgrectmake(0, 0, 320, 30)];
uibarbuttonitem * item1 = [[uibarbuttonitem alloc]initwithbarbuttonsystemitem:uibarbuttonsystemitemdone target:self action:@selector(tapdone:)];
uibarbuttonitem * item2 = [[uibarbuttonitem alloc]initwithbarbuttonsystemitem:uibarbuttonsystemitemflexiblespace target:nil action:nil];
uibarbuttonitem * item3 = [[uibarbuttonitem alloc]initwithbarbuttonsystemitem:uibarbuttonsystemitemflexiblespace target:nil action:nil];
toolbar.items = @[item2,item1,item3];
self.sendtextview.inputaccessoryview =toolbar;
}
|
三.编写控件的回调方法
控件添加好以后下面要添加触发控件要干的事情:
1.从最复杂的开始,长按发送录音的按钮时,会录音。松开收时会发送(在发送时要判断音频的时间,太小不允许发送)。录音时上滑取消录音(删除录音文件)。主要是给录音按钮加了一个longpress手势,根据手势的状态来做不同的事情。关于手势的内容请参考之前的博客:(ios开发之手势识别),下面是录音业务逻辑的实现(个人在coding的时候,感觉这一块是工具条中最复杂的部分),代码如下:
|
1
2
3
4
5
6
7
8
9
10
11
12
13
14
15
16
17
18
19
20
21
22
23
24
25
26
27
28
29
30
31
32
33
34
35
36
37
38
39
40
41
42
43
44
45
46
47
48
49
50
51
52
53
54
55
56
57
58
59
60
61
62
63
64
65
66
67
68
69
70
71
72
73
74
75
76
77
78
79
80
81
82
83
84
85
86
87
88
89
90
91
92
|
//长按手势触发的方法
-(void)sendvoicebuttonlongpress:(id)sender
{
static int i = 1;
if ([sender iskindofclass:[uilongpressgesturerecognizer class]]) {
uilongpressgesturerecognizer * longpress = sender;
//录音开始
if (longpress.state == uigesturerecognizerstatebegan)
{
i = 1;
[self.sendvoicebutton settitlecolor:[uicolor redcolor] forstate:uicontrolstatenormal];
//录音初始化
[self audioinit];
//创建录音文件,准备录音
if ([self.audiorecorder preparetorecord])
{
//开始
[self.audiorecorder record];
//设置定时检测音量变化
_timer = [nstimer scheduledtimerwithtimeinterval:0.05 target:self selector:@selector(detectionvoice) userinfo:nil repeats:yes];
}
}
//取消录音
if (longpress.state == uigesturerecognizerstatechanged)
{
cgpoint piont = [longpress locationinview:self];
nslog(@"%f",piont.y);
if (piont.y < -20)
{
if (i == 1) {
[self.sendvoicebutton setbackgroundimage:[uiimage imagenamed:@"chat_bottom_textfield.png"] forstate:uicontrolstatenormal];
[self.sendvoicebutton settitlecolor:[uicolor blackcolor] forstate:uicontrolstatenormal];
//删除录制文件
[self.audiorecorder deleterecording];
[self.audiorecorder stop];
[_timer invalidate];
uialertview *alter = [[uialertview alloc] initwithtitle:@"提示" message:@"录音取消" delegate:nil cancelbuttontitle:@"取消" otherbuttontitles: nil];
[alter show];
//去除图片用的
self.cancelblock(1);
i = 0;
}
}
}
if (longpress.state == uigesturerecognizerstateended) {
if (i == 1)
{
nslog(@"录音结束");
[self.sendvoicebutton setbackgroundimage:[uiimage imagenamed:@"chat_bottom_textfield.png"] forstate:uicontrolstatenormal];
[self.sendvoicebutton settitlecolor:[uicolor blackcolor] forstate:uicontrolstatenormal];
double ctime = self.audiorecorder.currenttime;
if (ctime > 1)
{
//如果录制时间<2 不发送
nslog(@"发出去");
self.urlblock(self.audioplayurl);
}
else
{
//删除记录的文件
[self.audiorecorder deleterecording];
uialertview *alter = [[uialertview alloc] initwithtitle:@"提示" message:@"录音时间太短!" delegate:nil cancelbuttontitle:@"取消" otherbuttontitles: nil];
[alter show];
self.cancelblock(1);
}
[self.audiorecorder stop];
[_timer invalidate];
}
}
}
}
|
2.下面的代码是检测音量的变化,用于根据音量变化图片,代码如下:
|
1
2
3
4
5
6
7
8
9
10
11
12
|
//录音的音量探测
- (void)detectionvoice
{
[self.audiorecorder updatemeters];//刷新音量数据
//获取音量的平均值 [recorder averagepowerforchannel:0];
//音量的最大值 [recorder peakpowerforchannel:0];
cgfloat lowpassresults = pow(10, (0.05 * [self.audiorecorder peakpowerforchannel:0]));
//把声音的音量传给调用者
self.volumeblock(lowpassresults);
}
|
3.轻击输入框时,切换到系统键盘,代码如下:
|
1
2
3
4
5
6
7
8
9
10
11
12
13
14
15
16
17
|
//轻击sendtext切换键盘
-(void)tapgesture:(uitapgesturerecognizer *) sender
{
if ([self.sendtextview.inputview isequal:self.functionview])
{
self.sendtextview.inputview = nil;
[self.changekeyboardbutton setimage:[uiimage imagenamed:@"chat_bottom_smile_nor.png"] forstate:uicontrolstatenormal];
[self.sendtextview reloadinputviews];
}
if (![self.sendtextview isfirstresponder])
{
[self.sendtextview becomefirstresponder];
}
}
|
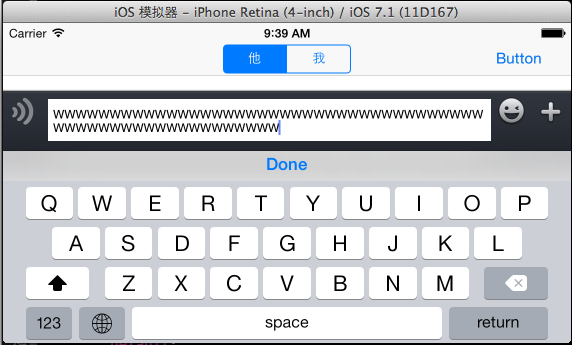
4.通过输入框的文字多少改变toolview的高度,因为输入框的约束是加在toolview上的,所以需要把输入框的contentsize通过block传到toolview的调用者上,让toolview的父视图来改变toolview的高度,从而sendtextview的高度也会随着改变的,下面的代码是把contentsize交给父视图:代码如下:
|
1
2
3
4
5
6
7
|
//通过文字的多少改变toolview的高度
-(void)textviewdidchange:(uitextview *)textview
{
cgsize contentsize = self.sendtextview.contentsize;
self.sizeblock(contentsize);
}
|
效果如下,文字多时textview的高度也会增大:
5.点击最左边的按钮触发的事件(切换文本输入框和录音按钮),代码如下:
|
1
2
3
4
5
6
7
8
9
10
11
12
13
14
15
16
17
18
19
20
21
22
23
24
25
|
//切换声音按键和文字输入框
-(void)tapvoicechangebutton:(uibutton *) sender
{
if (self.sendvoicebutton.hidden == yes)
{
self.sendtextview.hidden = yes;
self.sendvoicebutton.hidden = no;
[self.voicechangebutton setimage:[uiimage imagenamed:@"chat_bottom_keyboard_nor.png"] forstate:uicontrolstatenormal];
if ([self.sendtextview isfirstresponder]) {
[self.sendtextview resignfirstresponder];
}
}
else
{
self.sendtextview.hidden = no;
self.sendvoicebutton.hidden = yes;
[self.voicechangebutton setimage:[uiimage imagenamed:@"chat_bottom_voice_press.png"] forstate:uicontrolstatenormal];
if (![self.sendtextview isfirstresponder]) {
[self.sendtextview becomefirstresponder];
}
}
}
|
6.点击return发送文字(通过block回调传入到父视图上),代码如下:
|
1
2
3
4
5
6
7
8
9
10
11
12
13
14
15
|
//发送信息(点击return)
- (bool)textview:(uitextview *)textview shouldchangetextinrange:(nsrange)range replacementtext:(nsstring *)text
{
if ([text isequaltostring:@"\\n"])
{
//通过block回调把text的值传递到controller中共
self.textblock(self.sendtextview.text);
self.sendtextview.text = @"";
return no;
}
return yes;
}
|
7.录音按钮本身要做的事情(在longpress没有被触发时调用)代码如下:
|
1
2
3
4
5
6
7
8
|
//发送声音按钮回调的方法
-(void)tapsendvoicebutton:(uibutton *) sender
{
nslog(@"sendvoicebutton");
//点击发送按钮没有触发长按手势要做的事儿
uialertview *alter = [[uialertview alloc] initwithtitle:@"提示" message:@"按住录音" delegate:nil cancelbuttontitle:@"取消" otherbuttontitles: nil];
[alter show];
}
|
8.调用表情键盘:
|
1
2
3
4
5
6
7
8
9
10
11
12
13
14
15
16
17
18
19
20
21
22
23
24
25
26
27
28
29
30
31
32
33
34
|
//变成表情键盘
-(void)tapchangekeyboardbutton:(uibutton *) sender
{
if ([self.sendtextview.inputview isequal:self.functionview])
{
self.sendtextview.inputview = nil;
[self.changekeyboardbutton setimage:[uiimage imagenamed:@"chat_bottom_smile_nor.png"] forstate:uicontrolstatenormal];
[self.sendtextview reloadinputviews];
}
else
{
self.sendtextview.inputview = self.functionview;
[self.changekeyboardbutton setimage:[uiimage imagenamed:@"chat_bottom_keyboard_nor.png"] forstate:uicontrolstatenormal];
[self.sendtextview reloadinputviews];
}
if (![self.sendtextview isfirstresponder])
{
[self.sendtextview becomefirstresponder];
}
if (self.sendtextview.hidden == yes) {
self.sendtextview.hidden = no;
self.sendvoicebutton.hidden = yes;
[self.voicechangebutton setimage:[uiimage imagenamed:@"chat_bottom_voice_press.png"] forstate:uicontrolstatenormal];
}
}
|
以上就是toolview的所有封装代码,至于在controller中如何使用他来发送消息,如何定义聊天cell,如何处理录音文件,聊天时的气泡是如何实现的等功能,在以后的文章中会继续讲解,希望大家继续关注。

相关文章


- ASP.NET自助建站系统的域名绑定与解析教程 2025-06-10
- 个人服务器网站搭建:如何选择合适的服务器提供商? 2025-06-10
- ASP.NET自助建站系统中如何实现多语言支持? 2025-06-10
- 64M VPS建站:如何选择最适合的网站建设平台? 2025-06-10
- ASP.NET本地开发时常见的配置错误及解决方法? 2025-06-10