本文实例为大家分享了ios书架效果的具体实现代码,供大家参考,具体内容如下
一、效果图
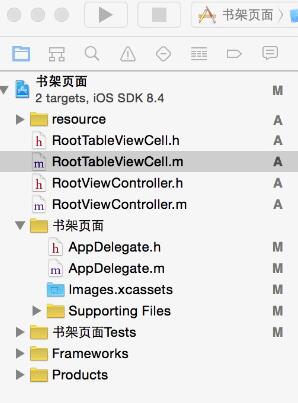
二、工程图
三、代码
rootviewcontroller.h
?
|
1
2
3
4
5
6
7
8
9
10
|
#import <uikit/uikit.h>
@interface rootviewcontroller : uiviewcontroller
<uitableviewdatasource,uitableviewdelegate>
{
nsmutablearray * dataarray;
uitableview * mytableview;
}
@end
|
rootviewcontroller.m
?
|
1
2
3
4
5
6
7
8
9
10
11
12
13
14
15
16
17
18
19
20
21
22
23
24
25
26
27
28
29
30
31
32
33
34
35
36
37
38
39
40
41
42
43
44
45
46
47
48
49
50
51
52
53
54
55
56
57
58
59
60
61
62
63
64
65
66
67
68
69
70
71
72
73
74
75
76
77
78
79
80
81
82
83
84
85
|
#import "rootviewcontroller.h"
//cell
#import "roottableviewcell.h"
@interface rootviewcontroller ()
@end
@implementation rootviewcontroller
- (id)initwithnibname:(nsstring *)nibnameornil bundle:(nsbundle *)nibbundleornil
{
self = [super initwithnibname:nibnameornil bundle:nibbundleornil];
if (self) {
// custom initialization
}
return self;
}
- (void)viewdidload
{
[super viewdidload];
// do any additional setup after loading the view.
//初始化背景图
[self initbackgroundview];
}
#pragma -mark -functions
-(void)initbackgroundview
{
self.title=@"书架页面";
dataarray=[[nsmutablearray alloc]initwithobjects:@"1",@"2",@"3",@"4",@"5",@"6",@"7",@"8",@"9", nil];
mytableview = [[uitableview alloc]initwithframe:cgrectmake(0, 0, 320, 416) style:uitableviewstyleplain];
mytableview.delegate = self;
mytableview.datasource = self;
[self.view addsubview:mytableview];
}
#pragma -mark -uitableviewdelegate
-(nsinteger)tableview:(uitableview *)tableview numberofrowsinsection:(nsinteger)section
{
return 3;
}
-(cgfloat)tableview:(uitableview *)tableview heightforrowatindexpath:(nsindexpath *)indexpath
{
return 376/3;
}
-(uitableviewcell*)tableview:(uitableview *)tableview cellforrowatindexpath:(nsindexpath *)indexpath
{
roottableviewcell * cell = [tableview dequeuereusablecellwithidentifier:@"id"];
if(cell == nil)
{
cell =[[roottableviewcell alloc]initwithstyle:uitableviewcellstylevalue1 reuseidentifier:@"id"];
}
cell.tag = indexpath.row;
[cell.bookleft addtarget:self action:@selector(buttonclick:) forcontrolevents:uicontroleventtouchupinside];
[cell.bookmiddle addtarget:self action:@selector(buttonclick:) forcontrolevents:uicontroleventtouchupinside];
[cell.bookright addtarget:self action:@selector(buttonclick:) forcontrolevents:uicontroleventtouchupinside];
[cell.bookleft setbackgroundimage:[uiimage imagenamed:[nsstring stringwithformat:@"%@.jpg",[dataarray objectatindex:indexpath.row*3]]] forstate:uicontrolstatenormal];
[cell.bookmiddle setbackgroundimage:[uiimage imagenamed:[nsstring stringwithformat:@"%@.jpg",[dataarray objectatindex:indexpath.row*3+1]]] forstate:uicontrolstatenormal];
[cell.bookright setbackgroundimage:[uiimage imagenamed:[nsstring stringwithformat:@"%@.jpg",[dataarray objectatindex:indexpath.row*3+2]]] forstate:uicontrolstatenormal];
nslog(@"--celll.tag--%ld",cell.tag);
return cell;
}
#pragma -mark -doclickactions
-(void)buttonclick:(uibutton*)btn
{
roottableviewcell * cell = (roottableviewcell *)[[btn superview] superview];
nsindexpath * path = [mytableview indexpathforcell:cell];
nslog(@"--点击图片的时候,所在的坐标-(%ld,%ld)--",path.row,btn.tag);
}
- (void)didreceivememorywarning
{
[super didreceivememorywarning];
// dispose of any resources that can be recreated.
}
@end
|
roottableviewcell.h
?
|
1
2
3
4
5
6
7
|
#import <uikit/uikit.h>
@interface roottableviewcell : uitableviewcell
@property(nonatomic,strong) uibutton * bookleft;
@property(nonatomic,strong) uibutton * bookmiddle;
@property(nonatomic,strong) uibutton * bookright;
@end
|
roottableviewcell.m
?
|
1
2
3
4
5
6
7
8
9
10
11
12
13
14
15
16
17
18
19
20
21
22
23
24
25
26
27
28
29
30
31
32
33
34
35
|
#import "roottableviewcell.h"
@implementation roottableviewcell
@synthesize bookleft;
@synthesize bookmiddle;
@synthesize bookright;
- (id)initwithstyle:(uitableviewcellstyle)style reuseidentifier:(nsstring *)reuseidentifier
{
self = [super initwithstyle:style reuseidentifier:reuseidentifier];
if (self) {
// initialization code
uiimageview * imageview= [[uiimageview alloc]initwithframe:cgrectmake(0, 0, 320, 416/3)];
imageview.image = [uiimage imagenamed:@"bookshelfcell.png"];
[self addsubview:imageview];
bookleft = [uibutton buttonwithtype:uibuttontypecustom];
bookleft.frame = cgrectmake(10, 10, 280/3, 376/3-20);
bookleft.tag = 1;
bookmiddle = [uibutton buttonwithtype:uibuttontypecustom];
bookmiddle.frame = cgrectmake(20+280/3, 10, 280/3, 376/3-20);
bookmiddle.tag = 2;
bookright = [uibutton buttonwithtype:uibuttontypecustom];
bookright.frame = cgrectmake(30+280/3*2, 10, 280/3, 376/3-20);
bookright.tag = 3;
[self addsubview:bookleft];
[self addsubview:bookmiddle];
[self addsubview:bookright];
}
return self;
}
|
以上就是本文的全部内容,希望对大家的学习有所帮助,也希望大家多多支持快网idc。
相关文章
猜你喜欢
- 64M VPS建站:能否支持高流量网站运行? 2025-06-10
- 64M VPS建站:怎样选择合适的域名和SSL证书? 2025-06-10
- 64M VPS建站:怎样优化以提高网站加载速度? 2025-06-10
- 64M VPS建站:是否适合初学者操作和管理? 2025-06-10
- ASP.NET自助建站系统中的用户注册和登录功能定制方法 2025-06-10
TA的动态
- 2025-07-10 怎样使用阿里云的安全工具进行服务器漏洞扫描和修复?
- 2025-07-10 怎样使用命令行工具优化Linux云服务器的Ping性能?
- 2025-07-10 怎样使用Xshell连接华为云服务器,实现高效远程管理?
- 2025-07-10 怎样利用云服务器D盘搭建稳定、高效的网站托管环境?
- 2025-07-10 怎样使用阿里云的安全组功能来增强服务器防火墙的安全性?
快网idc优惠网
QQ交流群
您的支持,是我们最大的动力!
热门文章
-
2025-05-26 66
-
2025-05-27 61
-
2025-05-25 86
-
解决SpringMvc后台接收json数据中文乱码问题的几种方法
2025-05-29 43 -
2025-05-29 13
热门评论


