

关于uitoolbar
toolbar工具栏是视图view的属性,可以在工具栏上添加工具栏按钮bar button item(可以是自定义的custom、也可以是系统自带的barbuttonsystemitem ),视图控制器可以通过工具栏项对视图中内容进行操作。
注意事项:
在导航栏控制器中会有一个uitoolbar实例,但默认是隐藏的,如果需要显示,需要通过这个方法将其打开:

在这里需要注意的是,与uinavigationbar类似,导航控制器拥有且只拥有一个uitoolbar实例,但uitoolbar拥有的uibarbuttonitem实例,是由视图控制器进行管理的,如下所示:

工具栏风格:
|
1
2
3
4
5
6
|
typedef ns_enum(nsinteger, uibarstyle) {
uibarstyledefault = 0, //默认风格,蓝色文字
uibarstyleblack = 1, //黑色背景,褐色文字
uibarstyleblackopaque = 1, // 纯黑色背景,白色文字
uibarstyleblacktranslucent = 2, // 透明黑色背景,白色文字
};
|
属性:
|
1
2
3
4
5
|
@property(nonatomic) uibarstyle barstyle; //工具栏风格,默认为蓝色
@property(nonatomic,copy) nsarray *items; //工具栏中的按钮单元,uibarbuttonitem
@property(nonatomic,assign,getter=istranslucent) bool translucent //是否透明
@property(nonatomic,retain) uicolor *tintcolor; //按钮颜色
@property(nonatomic,retain) uicolor *bartintcolor; //工具栏颜色
|
方法:
※设置工具栏中的按钮单元
|
1
|
- (void)setitems:(nsarray *)items animated:(bool)animated;
|
※设置工具栏的背景图像
– (void)setbackgroundimage:(uiimage *)backgroundimage fortoolbarposition:(uibarposition)toporbottom barmetrics:(uibarmetrics)barmetrics;
– (uiimage *)backgroundimagefortoolbarposition:(uibarposition)toporbottom barmetrics:(uibarmetrics)barmetrics;
※设置工具栏的阴影图像
– (void)setshadowimage:(uiimage *)shadowimage fortoolbarposition:(uibarposition)toporbottom;
※获取工具栏的阴影图像
– (uiimage *)shadowimagefortoolbarposition:(uibarposition)toporbottom ;
tool bar方式切换视图
1、创建工程:
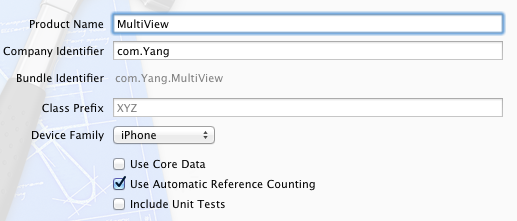
运行xcode,新建一个empty application,名称为multiview,其他设置如下图:
2、创建3个view controller:
依次选择file — new — new file,打开如下窗口:
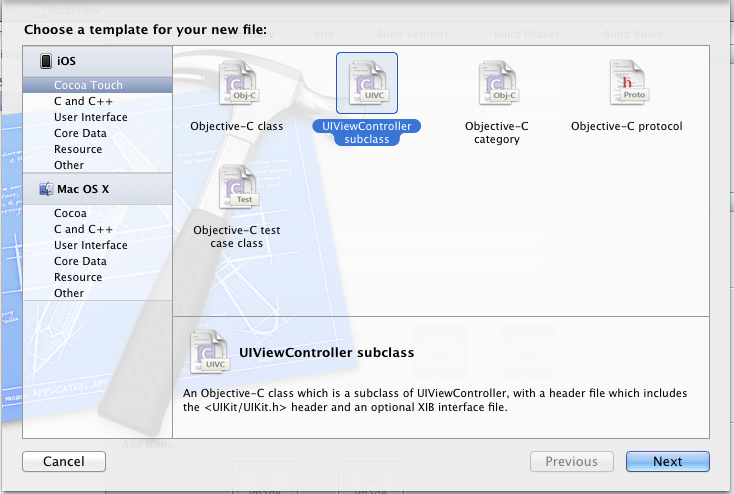
找到uiviewcontroller subclass并单击next,打开下面的窗口:

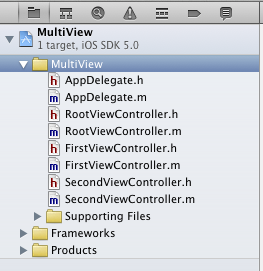
输入名称rootviewcontroller,并且保证subclass of选择uiviewcontroller,下面的两个选框都不选;按照同样的步骤新建两个view controller,名称分别是firstviewcontroller和secondviewcontroller。建好后,在project navigation中显示文件如下:
3、为三个view controller创建.xib文件:
依次选择file — new — new file,打开如下窗口:

在左边选user interface,右边选view,单击next,在新窗口中的device family中选择iphone,单击next,打开如下窗口:

输入名称rootview,单击create,创建了一个.xib文件。用同样的方法再创建两个.xib,名称分别是firstview和secondview。
4、修改app delegate:
4.1 单击appdelegate.h,在其中添加代码,在@interface之前添加@class rootviewcontroller;在@end之前添加@property (strong, nonatomic) rootviewcontroller *rootviewcontroller;添加之后的代码如下:
|
1
2
3
4
5
6
|
#import <uikit/uikit.h>
@class rootviewcontroller;
@interface appdelegate : uiresponder <uiapplicationdelegate>
@property (strong, nonatomic) uiwindow *window;
@property (strong, nonatomic) rootviewcontroller *rootviewcontroller;
@end
|
4.2 单击appdelegate.m,修改其代码。在@implementation之前添加#import "rootviewcontroller.h",在@implementation之后添加@synthesize rootviewcontroller;然后修改didfinishlaunchingwithoptions方法如下:
|
1
2
3
4
5
6
7
8
9
10
11
12
13
14
|
- (bool)application:(uiapplication *)application didfinishlaunchingwithoptions:(nsdictionary *)launchoptions
{
self.window = [[uiwindow alloc] initwithframe:[[uiscreen mainscreen] bounds]];
// override point for customization after application launch.
self.rootviewcontroller = [[rootviewcontroller alloc] initwithnibname:@"rootview" bundle:nil];
uiview *rootview = self.rootviewcontroller.view;
cgrect rootviewframe = rootview.frame;
rootviewframe.origin.y += [uiapplication sharedapplication].statusbarframe.size.height;
rootview.frame = rootviewframe;
[self.window addsubview:rootview];
self.window.backgroundcolor = [uicolor whitecolor];
[self.window makekeyandvisible];
return yes;
}
|
①
这行代码用于从rootview.xib文件中初始化rootviewcontroller,注意initwithnibname:@"rootview"中不要后缀名.xib
②
使得rootviewcontroller的视图不会被状态栏挡住
5、修改rootviewcontroller.h:
单击rootviewcontroller.h,在其中添加两个属性和一个方法,如下:
|
1
2
3
4
5
6
7
8
|
#import <uikit/uikit.h>
@class firstviewcontroller;
@class secondviewcontroller;
@interface rootviewcontroller : uiviewcontroller
@property (strong, nonatomic) firstviewcontroller *firstviewcontroller;
@property (strong, nonatomic) secondviewcontroller *secondviewcontroller;
- (ibaction)switchviews:(id)sender;
@end
|
6、打开rootview.xib,在坐边选择file's owner,在右边打开identity inspector,在class下拉菜单选择rootviewcontroller:
这样,我们 就可以从rootview.xib文件向rootviewcontroller创建outlet和action了。
7、为rootview.xib添加工具栏:打开rootview.xib,拖一个tool bar到视图上,双击tool bar上的按钮,修改其名称为switch views:

8、添加action映射:
选中switch views按钮,按住control,拖到file's owner,松开鼠标后选择switchviews方法:

9、选择file's owner,按住control键,拖到view,松开鼠标,选择view:

10、修改rootviewcontroller.m:
打开rootviewcontroller.m文件,在@implementation之前添加代码:
|
1
2
|
#import "firstviewcontroller.h"
#import "secondviewcontroller.h"
|
在@implementation之后添加代码:
|
1
2
|
@synthesize firstviewcontroller;
@synthesize secondviewcontroller;
|
接下来修改viewdidload方法,这个方法默认是被注释掉的,先去掉其周围的注释符,然后修改其代码如下:
|
1
2
3
4
5
6
|
- (void)viewdidload
{
self.firstviewcontroller = [[firstviewcontroller alloc] initwithnibname:@"firstview" bundle:nil];
[self.view insertsubview: firstviewcontroller.view atindex:0];
[super viewdidload];
}
|
添加switchviews方法:
|
1
2
3
4
5
6
7
8
9
10
11
12
13
14
15
16
|
- (ibaction)switchviews:(id)sender {
if (self.secondviewcontroller.view.superview == nil) {
if (self.secondviewcontroller == nil) {
self.secondviewcontroller = [[secondviewcontroller alloc] initwithnibname:@"secondview" bundle:nil];
}
[firstviewcontroller.view removefromsuperview];
[self.view insertsubview:self.secondviewcontroller.view atindex:0];
} else {
if (self.firstviewcontroller == nil) {
self.firstviewcontroller =
[[firstviewcontroller alloc] initwithnibname:@"firstview" bundle:nil];
}
[secondviewcontroller.view removefromsuperview];
[self.view insertsubview:self.firstviewcontroller.view atindex:0];
}
}
|
修改didreceivememorywarning方法:
|
1
2
3
4
5
6
7
8
9
|
- (void)didreceivememorywarning
{
[super didreceivememorywarning];
if (self.firstviewcontroller.view.superview == nil) {
self.firstviewcontroller = nil;
} else {
self.secondviewcontroller = nil;
}
}
|
11、打开firstview.xib文件,选择左边的file's owner,然后在identity inspector中选择class为firstviewcontroller;然后按住control键从file's owner图标拖到view,在弹出的菜单选择view。为secondview.xib进行同样的操作,不过class选择为secondviewcontroller。
12、打开firstview.xib文件,选择view,打开attribute inspector,进行如下设置:

对secondview.xib进行同样设置,不过背景颜色设成红色。
13、此时运行程序,你会看见刚启动的时候,程序显示的绿色背景,轻触switch views按钮后,背景变成了红色。不断轻触按钮,背景不断变换。
14、添加切换背景的动画效果:
打开rootviewcontroller.m,修改其中的switchviews方法如下:
|
1
2
3
4
5
6
7
8
9
10
11
12
13
14
15
16
17
18
19
20
21
|
- (ibaction)switchviews:(id)sender {
[uiview beginanimations:@"view flip" context:nil];
[uiview setanimationduration:1.25];
[uiview setanimationcurve:uiviewanimationcurveeaseinout];
if (self.secondviewcontroller.view.superview == nil) {
if (self.secondviewcontroller == nil) {
self.secondviewcontroller = [[secondviewcontroller alloc] initwithnibname:@"secondview" bundle:nil];
}
[uiview setanimationtransition: uiviewanimationtransitionflipfromright forview:self.view cache:yes];
[self.firstviewcontroller.view removefromsuperview];
[self.view insertsubview:self.secondviewcontroller.view atindex:0];
} else {
if (self.firstviewcontroller == nil) {
self.firstviewcontroller = [[firstviewcontroller alloc] initwithnibname:@"firstview" bundle:nil];
}
[uiview setanimationtransition: uiviewanimationtransitioncurlup forview:self.view cache:yes];
[self.secondviewcontroller.view removefromsuperview];
[self.view insertsubview:self.firstviewcontroller.view atindex:0];
}
[uiview commitanimations];
}
|
注意四个表示切换效果的常量:
|
1
2
3
4
|
uiviewanimationtransitionflipfromleft
uiviewanimationtransitionflipfromright
uiviewanimationtransitioncurldown
uiviewanimationtransitioncurlup
|
分别表示从左翻转、从右翻转、向下卷、向上卷。
运行后翻页效果如下:


相关文章


- ASP.NET自助建站系统的数据库备份与恢复操作指南 2025-06-10
- 个人网站服务器域名解析设置指南:从购买到绑定全流程 2025-06-10
- 个人网站搭建:如何挑选具有弹性扩展能力的服务器? 2025-06-10
- 个人服务器网站搭建:如何选择适合自己的建站程序或框架? 2025-06-10
- 64M VPS建站:能否支持高流量网站运行? 2025-06-10


