在没有步入正文之前先给大家展示下效果图,如果大家觉得很满意请继续往下阅读全文。

大家可以看到这个界面很简单,其实就是uitableview的布局,但是难点是在于如何从网上下载这些图片,下载之后应如何进行存储!
我们一步一步进行解析,先从单线程(主线程)进行多图片下载我们布局上的文字及图片的地址从plist文件中进行读取
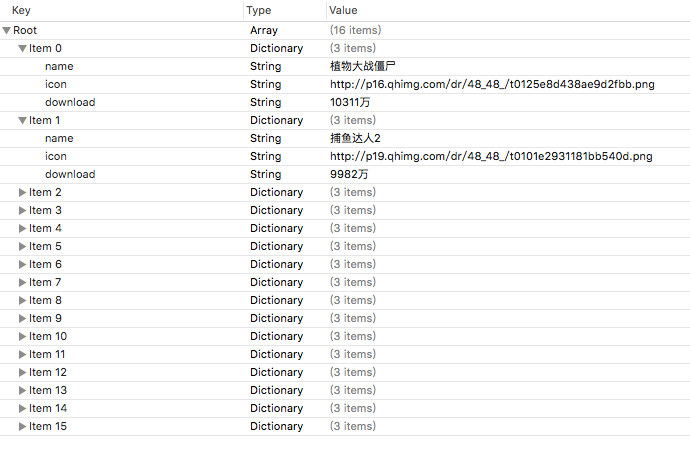
根据结构,我们自定义一个数据模型文件
ddzapp.h
?
|
1
2
3
4
5
6
7
8
9
10
|
#import <foundation/foundation.h>
@interface ddzapp : nsobject
//图标
@property (nonatomic,strong) nsstring *icon;
//名字
@property (nonatomic,strong) nsstring *name;
//下载量
@property (nonatomic,strong) nsstring *download;
+ (instancetype)appwithdict:(nsdictionary *)dict;
@end
|
ddzapp.m
?
|
1
2
3
4
5
6
7
8
|
#import "ddzapp.h"
@implementation ddzapp
+ (instancetype)appwithdict:(nsdictionary *)dict {
ddzapp *app = [[self alloc] init];
[app setvaluesforkeyswithdictionary:dict];
return app;
}
@end
|
以下的都是视图控制器中的代码
viewcontroller.m
1.
?

|
1
2
3
4
5
6
|
@interface viewcontroller ()
//所有数据
@property (nonatomic,strong)nsarray *apps;
//内存缓存图片
@property (nonatomic,strong)nsmutabledictionary *imgcache;
@end
|
第一个属性用于存储读取plist文件中的内容,设置为属性保存起来,就可以不用重复读取
第二个属性用于保存从网上下载下来的图片,也是为了不用重复读取
2.
?
|
1
2
3
4
5
6
7
8
9
10
11
12
13
14
15
16
17
18
19
20
21
22
|
@implementation viewcontroller
//读取数据
- (nsarray *)apps {
if (!_apps) {
//从plist文件中读取数据
nsarray *dictarray = [nsarray arraywithcontentsoffile:[[nsbundle mainbundle] pathforresource:@"apps.plist" oftype:nil]];
nsmutablearray *apparray = [nsmutablearray array];
for (nsdictionary *dict in dictarray) {
[apparray addobject:[ddzapp appwithdict:dict]];
}
_apps = apparray;
}
return _apps;
}
//缓存图片
- (nsmutabledictionary *)imgcache {
if (!_imgcache) {
//初始化
_imgcache = [nsmutabledictionary dictionary];
}
return _imgcache;
}
|
这两个方法都是为了初始化刚才的两个属性
3.
?
|
1
2
3
4
5
6
7
8
9
10
11
12
13
14
15
16
17
18
19
20
21
22
23
24
25
26
27
28
29
30
31
32
33
34
35
36
37
38
39
40
41
42
|
#pragma mark - 数据源方法
- (nsinteger)tableview:(uitableview *)tableview numberofrowsinsection:(nsinteger)section {
return self.apps.count;
}
- (uitableviewcell *)tableview:(uitableview *)tableview cellforrowatindexpath:(nsindexpath *)indexpath {
static nsstring *id = @"app";
uitableviewcell *cell = [tableview dequeuereusablecellwithidentifier:id];
ddzapp *app = self.apps[indexpath.row];
cell.textlabel.text = app.name;
cell.detailtextlabel.text = app.download;
//先从内存中取出图片
uiimage *image = self.imgcache[app.icon];
if (image) {
cell.imageview.image = image;
}else {
//内存中没有图片
//将图片文件数据写入到沙盒中
nsstring *cachespath = [nssearchpathfordirectoriesindomains(nscachesdirectory, nsuserdomainmask, yes) firstobject];
//获得文件名
nsstring *filename = [app.icon lastpathcomponent];
//计算出文件的全路径
nsstring *file = [cachespath stringbyappendingpathcomponent:filename];
//加载沙盒的文件数据
nsdata *data = [nsdata datawithcontentsoffile:file];
//判断沙盒中是否有图片
if (data) {
//直接加载沙盒中图片
cell.imageview.image = [uiimage imagewithdata:data];
//存到字典(内存)中
self.imgcache[app.icon] = cell.imageview.image;
}else {
//下载图片
data = [nsdata datawithcontentsofurl:[nsurl urlwithstring:app.icon]];
cell.imageview.image = [uiimage imagewithdata:data];
//存到内存中
self.imgcache[app.icon] = cell.imageview.image;
//将图片数据写入到沙盒中
[data writetofile:file atomically:yes];
}
}
return cell;
}
|
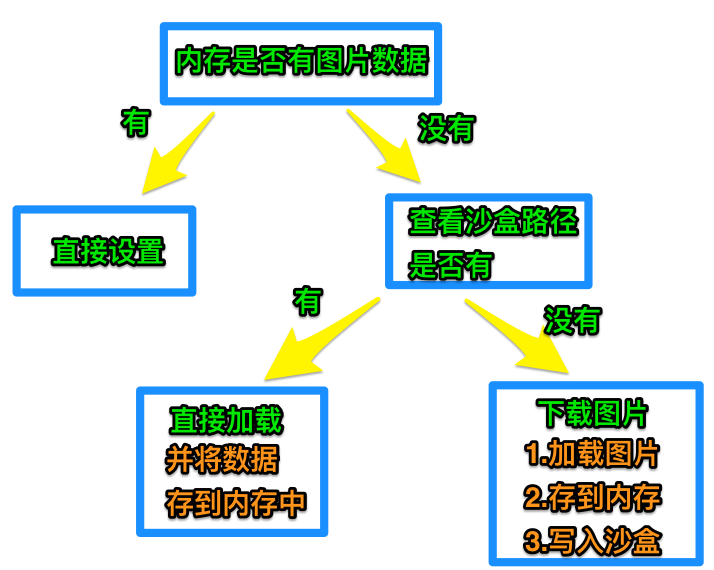
这两个方法是uitableview必须要实现的方法
第一个是返回数据量,没什么好说的
第二个是绑定数据
具体的流程看下图
以上内容针对ios多线程实现多图片下载(一)的相关介绍,希望对大家有所帮助,下篇文章继续给大家介绍ios多线程实现多图片下载(二),感兴趣的朋友请持续关注。

相关文章


猜你喜欢
- 个人服务器网站搭建:如何选择合适的服务器提供商? 2025-06-10
- ASP.NET自助建站系统中如何实现多语言支持? 2025-06-10
- 64M VPS建站:如何选择最适合的网站建设平台? 2025-06-10
- ASP.NET本地开发时常见的配置错误及解决方法? 2025-06-10
- ASP.NET自助建站系统的数据库备份与恢复操作指南 2025-06-10