先来看一下效果图
分析一下:
2、然后是需要画文字
3、文字是截取的字符串的一部分
4、不同的字符串,圆形的背景色是不一样的
5、对于中英文同样处理,英文的一个字符和中文的一个汉字同样算作一个字符
6、文字总是居中显示
好 有了这样几点 我们就可以开始画图了
看一下最终实现的效果图
首先 ,我们需要自定义一个view当做自定义头像,在view的drawrect方法中进行图像的绘制
?
|
1
2
3
4
5
6
7
8
9
10
11
12
13
14
15
|
@interface roundheadview()
@property (nonatomic, copy) nsstring *title;//需要绘制的标题
@property (nonatomic, assign) cgfloat colorpoint;//用户后面计算颜色的随机值
//设置文字
- (void)settitle:(nsstring *)title;
@end
@implementation roundheadview
-(instancetype)initwithframe:(cgrect)frame{
self = [super initwithframe:frame];
if (self) {
self.backgroundcolor = [uicolor clearcolor];
}
return self;
}
@end
|
首先画一个带有背景颜色的圆形
?
|
1
2
3
4
5
6
7
8
9
10
11
12
13
|
-(void)drawrect:(cgrect)rect{
//一个不透明类型的quartz 2d绘画环境,相当于一个画布,你可以在上面任意绘画
cgcontextref context = uigraphicsgetcurrentcontext();
[self caculatecolor];//计算颜色
/*画圆*/
cgcontextsetrgbfillcolor (context,_colorpoint, 0.5, 0.5, 1.0);//设置填充颜色 颜色这里随机设置的,后面会根据文字来计算颜色
//填充圆,无边框
cgcontextaddarc(context, self.frame.size.width/2.0, self.frame.size.width/2.0, self.frame.size.width/2.0, 0, 2*m_pi, 0); //添加一个圆
cgcontextdrawpath(context, kcgpathfill);//绘制填充
}
|

接下来 我们来画文字
首先需要计算一下文字的尺寸
将文字设置进来
?
|
1
2
3
4
|
- (void)settitle:(nsstring *)title{
_title = [[self substringwithlendth:2 string:title] copy];
[self setneedsdisplay];//调用这个方法 进行重新绘制 view会重新调用drawrect方法
}
|
截取文字
?
|
1
2
3
4
5
6
7
8
9
10
11
12
13
14
15
16
17
18
19
20
21
22
23
24
25
26
27
|
/**
截取字符串,截取字符串最开始的两个 汉子和英文一样处理
@param length 截取的字符长度(汉子和英文同样计算)
@param string 需要截取的字符串
@return 返回截取的字符串
*/
-(nsstring *)substringwithlendth:(int)length string:(nsstring *)string{
nsstring *copystr = [string copy];
nsmutablestring *realstr = [[nsmutablestring alloc] init];
for(int i = 0; i < copystr.length; i++){
if(length == 0){
break;
}
unichar ch = [copystr characteratindex:0];
if (0x4e00 < ch && ch < 0x9fff)//如何判断是汉字
{
//如果是汉子需要做其他处理 可以在这里做处理
}
//若为汉字
[realstr appendstring:[copystr substringwithrange:nsmakerange(i,1)]];
length = length - 1;
}
return realstr;
}
|
?
|
1
2
3
4
5
6
7
8
9
10
11
12
13
14
|
/**
计算文字的尺寸,在绘制图像时,保证文字总是处于图像的正中
文字的尺寸可以自己计算 这里定义的是 宽度的1/3 我看使用起来比较合适 当然
你可以自己定义的
@return 文字的宽高
*/
- (cgsize)caculatelablesize{
uilabel *lable = [[uilabel alloc] initwithframe:cgrectzero];
lable.font = [uifont fontwithname:@"arial-boldmt" size:self.frame.size.width/3.0];
lable.text = self.title;
[lable sizetofit];
cgsize size = lable.frame.size;
return size;
}
|
最后得到了 需要绘制在图像上的title
还需要做一步处理 就是根据文字的拼音或者其他的什么东西 来定义图像的背景色 我这里就用拼音了
首先需要做的是获取拼音
?
|
1
2
3
4
5
6
7
8
9
10
11
|
/**
获取汉子拼音
@param originalstr 原始中文字符
@return 汉子的全拼
*/
- (nsstring *)pinyin: (nsstring *)originalstr{
nsmutablestring *str = [originalstr mutablecopy];
cfstringtransform(( cfmutablestringref)str, null, kcfstringtransformmandarinlatin, no);
cfstringtransform((cfmutablestringref)str, null, kcfstringtransformstripdiacritics, no);
return [str stringbyreplacingoccurrencesofstring:@" " withstring:@""];
}
|
根据拼音计算颜色,随即一个颜色 这个方法 我自己瞎想的 一个颜色 当然你可以自己定义一个方法来计算颜色
?

|
1
2
3
4
5
6
7
8
9
10
11
12
13
14
15
16
17
18
19
20
21
22
23
24
25
26
27
28
|
/**
随机一个颜色
填充圆形头像的底色
根据字符的拼音计算出的颜色
*/
- (void)caculatecolor{
if (_title.length == 0) {
return;
}
if (_title.length>1) {
nsstring *firststr = [_title substringwithrange:nsmakerange(0,1)];
nsstring *secondstr = [_title substringwithrange:nsmakerange(1, 1)];
nsstring *firstpinyin = [self pinyin:firststr];
nsstring *secondpinyin = [self pinyin:secondstr];
nsuinteger count = firstpinyin.length+secondpinyin.length;
if (count>10) {
count-=10;
self.colorpoint = count/10.0;
}else{
self.colorpoint = count/10.0;
}
}else{
nsstring *firststr = [_title substringwithrange:nsmakerange(0,1)];
nsstring *firstpinyin = [self pinyin:firststr];
nsuinteger count = firstpinyin.length;
self.colorpoint = count/10.0;
}
}
|
需要的 我们都处理好了 这下可以直接画文字了 还是在drawrect方法中
?
|
1
2
3
4
5
6
7
8
9
10
11
12
13
14
15
16
17
18
19
20
21
22
23
|
-(void)drawrect:(cgrect)rect{
//一个不透明类型的quartz 2d绘画环境,相当于一个画布,你可以在上面任意绘画
cgcontextref context = uigraphicsgetcurrentcontext();
[self caculatecolor];//计算颜色
/*画圆*/
cgcontextsetrgbfillcolor (context,_colorpoint, 0.5, 0.5, 1.0);//设置填充颜色
// cgcontextsetrgbstrokecolor(context,red,green,blue,1.0);//画笔线的颜色
//填充圆,无边框
cgcontextaddarc(context, self.frame.size.width/2.0, self.frame.size.width/2.0, self.frame.size.width/2.0, 0, 2*m_pi, 0); //添加一个圆
cgcontextdrawpath(context, kcgpathfill);//绘制填充
/*写文字*/
// cgcontextsetrgbfillcolor (context, 1, 0, 0, 1.0);//设置填充颜色
nsdictionary* dic = [nsdictionary dictionarywithobjectsandkeys:[uifont fontwithname:@"arial-boldmt" size:self.frame.size.width/3.0], nsfontattributename,[uicolor whitecolor],nsforegroundcolorattributename, nil];
cgsize size = [self caculatelablesize];
cgfloat x = (self.frame.size.width-size.width)/2.0;
cgfloat y = (self.frame.size.height-size.height)/2.0;
[self.title drawinrect:cgrectmake(x, y, self.frame.size.width, self.frame.size.width) withattributes:dic];
}
|
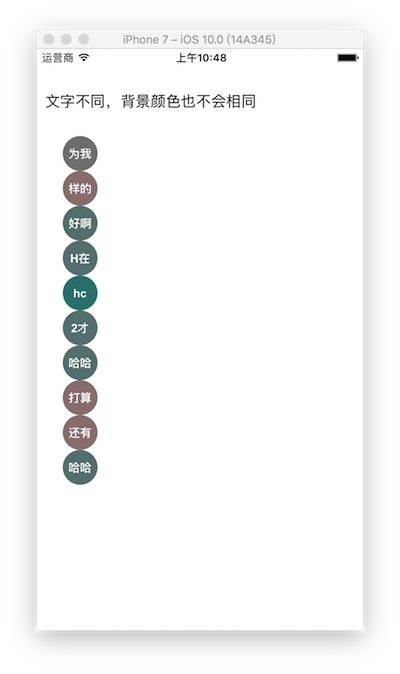
测试一下
?
|
1
2
3
4
5
6
7
8
9
|
uilabel *label = [[uilabel alloc] initwithframe:cgrectmake(10, 50, 300, 20)];
label.text = @"文字不同,背景颜色也不会相同";
[self.view addsubview:label];
nsarray *strs = @[@"为我",@"样的",@"好啊",@"h在",@"hc",@"2才",@"哈哈",@"打算打算打算的",@"还有人v",@"哈哈"];
for (int i=0; i<10; i++) {
roundheadview *head = [[roundheadview alloc] initwithframe:cgrectmake(30, 100+(40*i), 40, 40)];
[head settitle:strs[i]];
[self.view addsubview:head];
}
|
总结
好了,到这就大功告成了,大家都学会了吗?希望本文的内容对各位ios开发者们能有所帮助,如果有疑问大家可以留言交流。谢谢大家对快网idc的支持。

相关文章


猜你喜欢
- ASP.NET自助建站系统中的用户注册和登录功能定制方法 2025-06-10
- ASP.NET自助建站系统的域名绑定与解析教程 2025-06-10
- 个人服务器网站搭建:如何选择合适的服务器提供商? 2025-06-10
- ASP.NET自助建站系统中如何实现多语言支持? 2025-06-10
- 64M VPS建站:如何选择最适合的网站建设平台? 2025-06-10