这个博客申请了有一段时间了,觉得好像是该写点什么了。这篇文章主要是关于一些xib的简单的用法,希望可以帮助到刚刚使用xib的新手们。
用来描述软件界面的文件。
如果没有xib,所有的界面都需要通过代码来手动创建。
有了xib以后,可以在xib中进行可视化开发,然后加载xib文件的时候,系统自动生成对应的代码来创建界面。
与xib类似的还有storyboard文件。xib和storyboard的比较,一个轻量级一个重量级。
共同点:
都用来描述软件界面。都用interface builder工具来编辑
不同点:
xib是轻量级的,用来描述局部的ui界面
storyboard是重量级的,用来描述整个软件的多个界面,并且能展示多个界面之间的跳转关系
二、xib的简单使用
1.建立xib文件
建立的xib文件命名为appxib.xib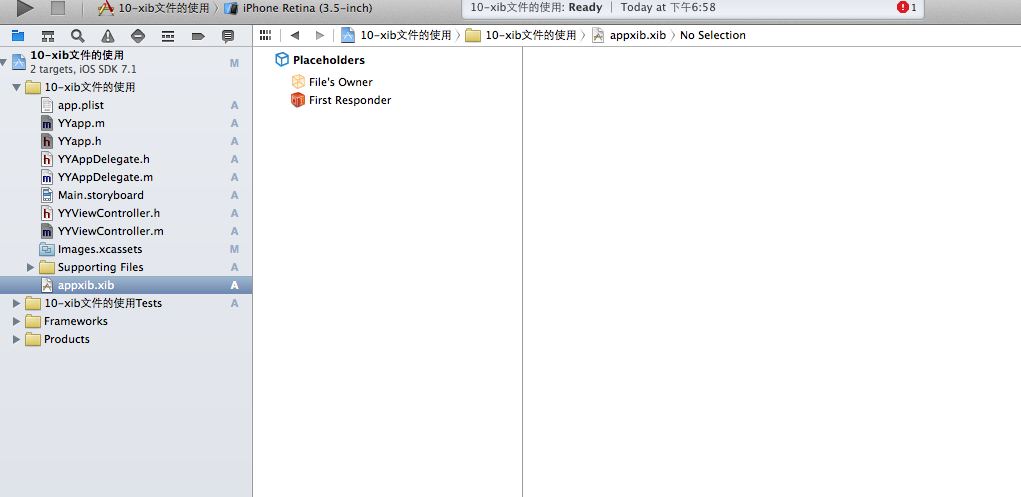
2.对xib进行设置
根据程序的需要,这里把view调整为自由布局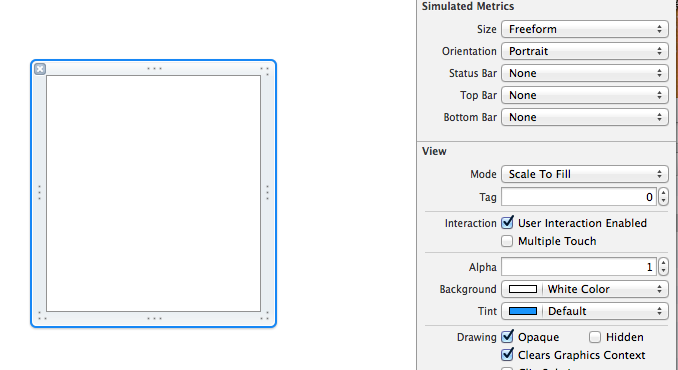
建立view模型(设置长宽等参数)
调整布局和内部的控件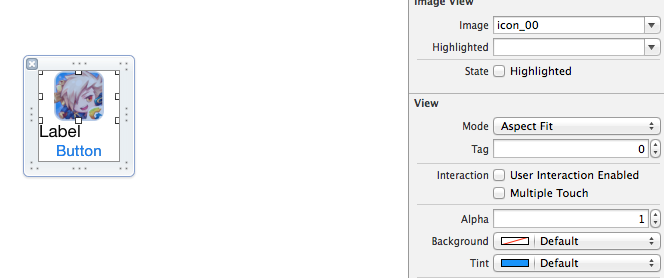
完成后的单个view

3.使用xib文件的代码示例
yyviewcontroller.m文件代码如下:
|
1
2
3
4
5
6
7
8
9
10
11
12
13
14
15
16
17
18
19
20
21
22
23
24
25
26
27
28
29
30
31
32
33
34
35
36
37
38
39
40
41
42
43
44
45
46
47
48
49
50
51
52
53
54
55
56
57
58
59
60
61
62
63
64
65
66
67
68
69
70
71
72
73
74
75
76
77
78
79
80
81
82
83
84
85
86
87
88
89
90
91
92
93
94
|
//
// yyviewcontroller.m
// 10-xib文件的使用
//
// created by apple on 14-5-24.
// copyright (c) 2014年 itcase. all rights reserved.
//
#import "yyviewcontroller.h"
#import "yyapp.h"
@interface yyviewcontroller ()
@property(nonatomic,strong)nsarray *app;
@end
@implementation yyviewcontroller
//1.加载数据信息
-(nsarray *)app
{
if (!_app) {
nsstring *path=[[nsbundle mainbundle]pathforresource:@"app.plist" oftype:nil];
nsarray *temparray=[nsarray arraywithcontentsoffile:path];
//字典转模型
nsmutablearray *arraym=[nsmutablearray array ];
for (nsdictionary *dict in temparray) {
[arraym addobject:[yyapp appwithdict:dict]];
}
_app=arraym;
}
return _app;
}
//创建界面原型
- (void)viewdidload
{
[super viewdidload];
nslog(@"%d",self.app.count);
//九宫格布局
int totalloc=3;
cgfloat appvieww=80;
cgfloat appviewh=90;
cgfloat margin=(self.view.frame.size.width-totalloc*appvieww)/(totalloc+1);
int count=self.app.count;
for (int i=0; i<count; i++) {
int row=i/totalloc;
int loc=i%totalloc;
cgfloat appviewx=margin + (margin +appvieww)*loc;
cgfloat appviewy=margin + (margin +appviewh)*row;
yyapp *app=self.app[i];
//拿出xib视图
nsarray *apparray= [[nsbundle mainbundle]loadnibnamed:@"appxib" owner:nil options:nil];
uiview *appview=[apparray firstobject];
//加载视图
appview.frame=cgrectmake(appviewx, appviewy, appvieww, appviewh);
uiimageview *appviewimg=(uiimageview *)[appview viewwithtag:1];
appviewimg.image=app.image;
uilabel *appviewlab=(uilabel *)[appview viewwithtag:2];
appviewlab.text=app.name;
uibutton *appviewbtn=(uibutton *)[appview viewwithtag:3];
[appviewbtn addtarget:self action:@selector(appviewbtnclick:) forcontrolevents:uicontroleventtouchupinside];
appviewbtn.tag=i;
[self.view addsubview:appview];
}
}
/**按钮的点击事件*/
-(void)appviewbtnclick:(uibutton *)btn
{
yyapp *apps=self.app[btn.tag];
uilabel *showlab=[[uilabel alloc]initwithframe:cgrectmake(60, 450, 200, 20)];
[showlab settext:[nsstring stringwithformat: @"%@下载成功",apps.name]];
[showlab setbackgroundcolor:[uicolor lightgraycolor]];
[self.view addsubview:showlab];
showlab.alpha=1.0;
//简单的动画效果
[uiview animatewithduration:2.0 animations:^{
showlab.alpha=0;
} completion:^(bool finished) {
[showlab removefromsuperview];
}];
}
@end
|
三、对xib进行连线示例
1.连线示例
新建一个xib对应的视图类,继承自uiview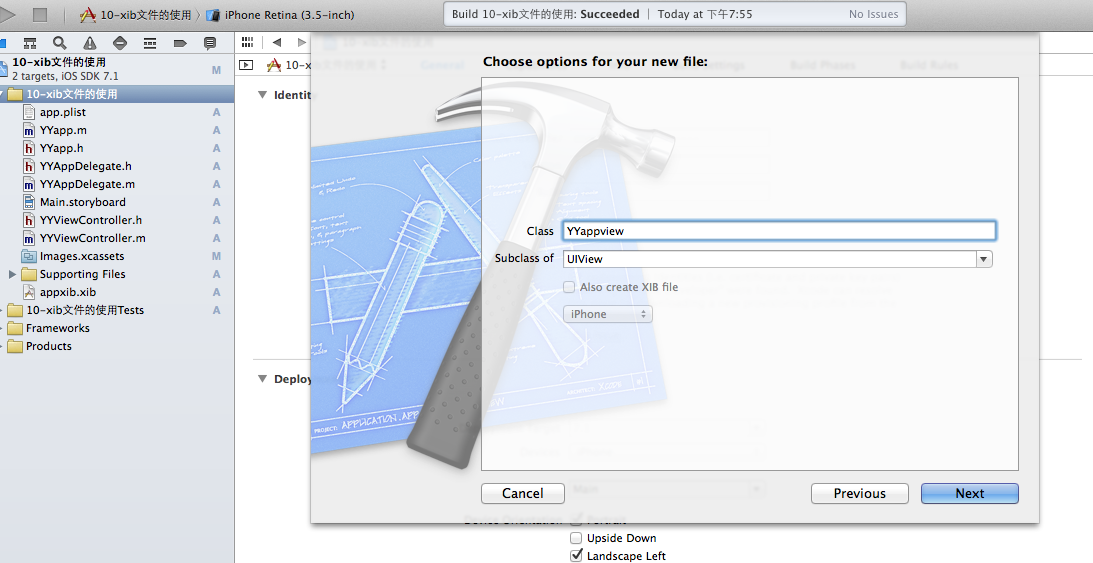
在xib界面右上角与新建的视图类进行关联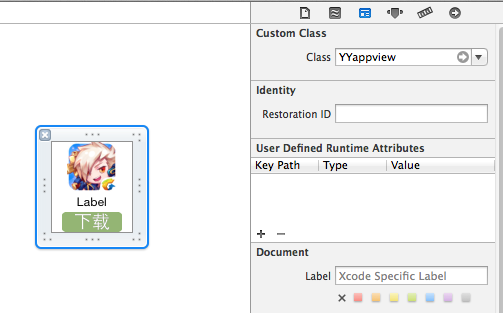
把xib和视图类进行连线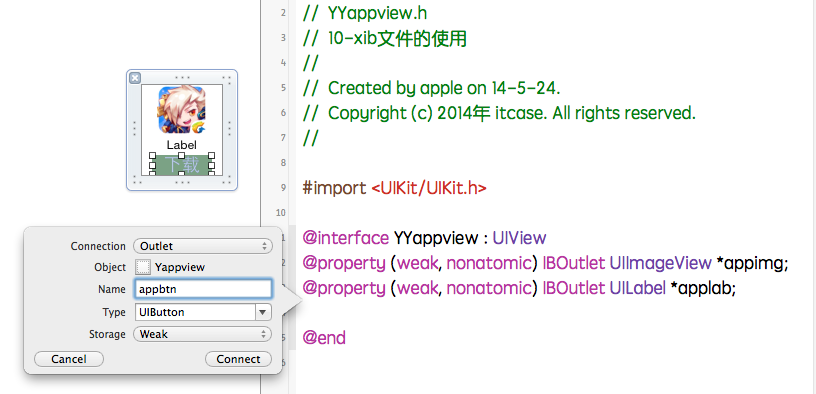
注意:在使用中把weak改成为强引用。否则…
2.连线后的代码示例
yyviewcontroller.m文件代码如下:
|
1
2
3
4
5
6
7
8
9
10
11
12
13
14
15
16
17
18
19
20
21
22
23
24
25
26
27
28
29
30
31
32
33
34
35
36
37
38
39
40
41
42
43
44
45
46
47
48
49
50
51
52
53
54
55
56
57
58
59
60
61
62
63
64
65
66
67
68
69
70
71
72
73
74
75
76
77
78
79
80
81
82
83
84
85
86
87
88
89
90
91
92
93
94
95
|
//
// yyviewcontroller.m
// 10-xib文件的使用
//
// created by apple on 14-5-24.
// copyright (c) 2014年 itcase. all rights reserved.
//
#import "yyviewcontroller.h"
#import "yyapp.h"
#import "yyappview.h"
@interface yyviewcontroller ()
@property(nonatomic,strong)nsarray *app;
@end
@implementation yyviewcontroller
//1.加载数据信息
-(nsarray *)app
{
if (!_app) {
nsstring *path=[[nsbundle mainbundle]pathforresource:@"app.plist" oftype:nil];
nsarray *temparray=[nsarray arraywithcontentsoffile:path];
//字典转模型
nsmutablearray *arraym=[nsmutablearray array ];
for (nsdictionary *dict in temparray) {
[arraym addobject:[yyapp appwithdict:dict]];
}
_app=arraym;
}
return _app;
}
//创建界面原型
- (void)viewdidload
{
[super viewdidload];
nslog(@"%d",self.app.count);
//九宫格布局
int totalloc=3;
cgfloat appvieww=80;
cgfloat appviewh=90;
cgfloat margin=(self.view.frame.size.width-totalloc*appvieww)/(totalloc+1);
int count=self.app.count;
for (int i=0; i<count; i++) {
int row=i/totalloc;
int loc=i%totalloc;
cgfloat appviewx=margin + (margin +appvieww)*loc;
cgfloat appviewy=margin + (margin +appviewh)*row;
yyapp *app=self.app[i];
//拿出xib视图
nsarray *apparray= [[nsbundle mainbundle]loadnibnamed:@"appxib" owner:nil options:nil];
//注意这里的类型名!
//uiview *appview=[apparray firstobject];
yyappview *appview=[apparray firstobject];
//加载视图
appview.frame=cgrectmake(appviewx, appviewy, appvieww, appviewh);
[self.view addsubview:appview];
appview.appimg.image=app.image;
appview.applab.text=app.name;
appview.appbtn.tag=i;
[ appview.appbtn addtarget:self action:@selector(appviewbtnclick:) forcontrolevents:uicontroleventtouchupinside];
}
}
/**按钮的点击事件*/
-(void)appviewbtnclick:(uibutton *)btn
{
yyapp *apps=self.app[btn.tag];
uilabel *showlab=[[uilabel alloc]initwithframe:cgrectmake(60, 450, 200, 20)];
[showlab settext:[nsstring stringwithformat: @"%@下载成功",apps.name]];
[showlab setbackgroundcolor:[uicolor lightgraycolor]];
[self.view addsubview:showlab];
showlab.alpha=1.0;
//简单的动画效果
[uiview animatewithduration:2.0 animations:^{
showlab.alpha=0;
} completion:^(bool finished) {
[showlab removefromsuperview];
}];
}
@end
|
yyappview.h文件代码(已经连线)
|
1
2
3
4
5
6
7
|
#import <uikit/uikit.h>
@interface yyappview : uiview
@property (strong, nonatomic) iboutlet uiimageview *appimg;
@property (strong, nonatomic) iboutlet uilabel *applab;
@property (strong, nonatomic) iboutlet uibutton *appbtn;
@end
|
以上就是本文的全部内容,希望对大家的学习有所帮助,也希望大家多多支持快网idc。
相关文章
- ASP.NET自助建站系统的域名绑定与解析教程 2025-06-10
- 个人服务器网站搭建:如何选择合适的服务器提供商? 2025-06-10
- ASP.NET自助建站系统中如何实现多语言支持? 2025-06-10
- 64M VPS建站:如何选择最适合的网站建设平台? 2025-06-10
- ASP.NET本地开发时常见的配置错误及解决方法? 2025-06-10
- 2025-07-10 怎样使用阿里云的安全工具进行服务器漏洞扫描和修复?
- 2025-07-10 怎样使用命令行工具优化Linux云服务器的Ping性能?
- 2025-07-10 怎样使用Xshell连接华为云服务器,实现高效远程管理?
- 2025-07-10 怎样利用云服务器D盘搭建稳定、高效的网站托管环境?
- 2025-07-10 怎样使用阿里云的安全组功能来增强服务器防火墙的安全性?
快网idc优惠网
QQ交流群
-
2025-06-04 96
-
2025-06-05 42
-
2025-05-29 96
-
使用Visual Studio 2010/2013编译V8引擎步骤分享
2025-05-27 90 -
2025-05-25 50


