一、了解cgcontextref
首先需要对 cgcontextref 了解, 作者有机会再进行下详细讲解, 这篇中简单介绍下, 方便后文阅读理解. 先了解 cgcontextref 坐标系
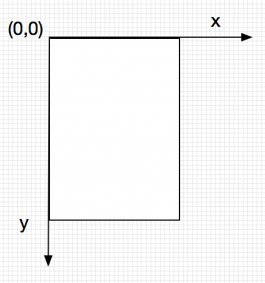
坐标系
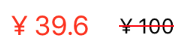
举例说明 : 对于 商城类app 有很多原价, 现价对比 .那 原件的横线怎么画, 就可以用cgcontextref
?
|
1
2
3
4
5
6
7
8
9
10
11
12
13
14
15
16
17
18
|
- (void)drawrect:(cgrect)rect {
// drawing code
[super drawrect:rect];
// 获取文本
cgcontextref context = uigraphicsgetcurrentcontext();
// 设置起始点坐标 (x轴: 0 . y轴: 控件高度一半)
cgcontextmovetopoint(context, 0, rect.size.height * 0.5);
// 设置直线连接点 (x轴:控件全长. y轴:控件高度一半 )
cgcontextaddlinetopoint(context, rect.size.width, rect.size.height * 0.5);
//设置颜色 宽度
[[uicolor redcolor] set];
cgcontextsetlinewidth(context, 1);
cgcontextstrokepath(context);
}
|
说明 : 从上面例子可以看到 是由两点确定一条直线.
二、自定义uilabel
进入正文. 控件可以自定义 uiview . 作者为了简单直接 自定义uilabel.
?
|
1
2
3
|
customlabel *customlabel = [[customlabel alloc] initwithframe:cgrectmake(0, 200, 400, 500)];
[self.view addsubview:view];
view.backgroundcolor = [uicolor orangecolor];
|
首先 .h文件
.h文件没什么说的, 定义的 字符串一会再解释说明
?
|
1
2
3
4
5
6
7
|
#import <uikit/uikit.h>
@interface customlabel : uilabel
@property (nonatomic, copy) nsstring *fillcolorstr;
@end
|
.m文件
我们用 – (void)drawrect:(cgrect)rect; 绘制 圆角箭头
?
|
1
2
3
4
5
6
7
8
9
10
11
12
13
14
15
16
17
18
19
20
21
22
23
24
25
26
27
28
29
30
31
32
33
34
35
36
37
38
39
40
41
42
43
44
45
46
47
48
49
50
51
52
53
54
55
56
57
58
59
60
61
62
63
64
65
66
|
#import "customlabel.h"
@implementation customlabel
- (instancetype)initwithframe:(cgrect)frame
{
self = [super initwithframe:frame];
if (self) {
// 自定义你需要的属性
}
return self;
}
// 主要讲解
- (void)drawrect:(cgrect)rect {
// 随便设置个 长宽
float w = rect.size.width - 20;
float h = rect.size.height - 20;
// 获取文本
cgcontextref context = uigraphicsgetcurrentcontext();
// 设置 边线宽度
cgcontextsetlinewidth(context, 0.2);
//边框颜色
cgcontextsetstrokecolorwithcolor(context, [uicolor graycolor].cgcolor);
//矩形填充颜色
cgcontextsetfillcolorwithcolor(context, [uicolor cyancolor].cgcolor);
/** 先介绍 cgcontextaddarctopoint 参数
* cgcontextref : 为获取的文本
* x1, y1 : 第一点
* x2, y2 : 第二点
* radius : 圆角弧度
* 说明 : 两点连线 如同矢量线, 有方向性.
*/
// [开始点] 坐标从左上角开始 (6, 0)
cgcontextmovetopoint(context, 6, 0);
// 设置 第一点 第二点 弧度. 详解 : [开始点]到[第一点], 确定一条直线 (6, 0) -> (w, 0); [第一点]到[第二点]确定一条直线(w, 0)->(w, 10)
// 两条线连接与方向 为直角 设置弧度
cgcontextaddarctopoint(context, w, 0, w, 10, 6); // 右上角圆弧设置完
// 现在 [开始点] 坐标变为 (w, 10). 第一条线(w, 10) -> (w , h) ; 第二条线(w, h) -> (w - 10, h).
cgcontextaddarctopoint(context, w , h , w - 10, h, 6); // 右下角圆弧设置完
// 现在 [开始点] 坐标变为 (w - 10, h) . 由 (w - 10, h) -> (30, h) 向左画直线
cgcontextaddlinetopoint(context, 30, h ); // 向左画线
// 现在 [开始点] 坐标变为 (30, h). 由(30, h) -> (25, h + 8) 向左下画直线
cgcontextaddlinetopoint(context, 25, h + 8); // 左下直线
// 现在 [开始点] 坐标变为 (25, h + 8). 由 (25, h + 8)-> (20, h) 向左上画直线
cgcontextaddlinetopoint(context, 20, h ); // 左上直线
// 现在 [开始点] 坐标变为 (20, h ). 第一条线(20, h)-> (0, h) ; 第二条线(0, h)->(0, h - 10)
cgcontextaddarctopoint(context, 0, h, 0, h - 10, 6); // 左下角圆弧设置完
// 现在 [开始点] 坐标变为 (0, h - 10 ). 第一条线(0, h - 10)-> (0, 0) ; 第二条线(0, 0)->(6, 0)
// 说明: 最开始设置的坐标点为(6, 0) 不为(0, 0). 就是为了最后可以连接上, 不然 画的线不能连接上 , 读者可自行试验
cgcontextaddarctopoint(context, 0, 0, 6, 0, 6); // 左上角圆弧设置完
cgcontextdrawpath(context, kcgpathfillstroke); //根据坐标绘制路径
}
|
三、简单封装
看到上面 你可以画出 圆角箭头矩形
还记得 .h 中 定义的属性 fillcolorstr, 可以进行调用, 随意更改填充颜色, 圆弧角度等.
仅简单封装下 (读者自行严谨封装)
?

|
1
2
3
4
5
6
7
8
9
10
11
12
13
14
15
16
17
18
19
20
21
22
23
24
25
26
27
28
29
30
31
32
33
34
35
36
37
38
39
40
41
42
43
44
45
46
47
48
49
50
51
52
53
54
55
56
57
58
|
- (void)drawrect:(cgrect)rect {
// 默认圆角角度
float r = 4;
// 居中偏移量(箭头高度)
float offset = 5;
// 设置 箭头位置
float positionnum = 20;
// 定义坐标点 移动量
float changenum = r + offset;
// 设置画线 长 宽
float w = self.frame.size.width ;
float h = self.frame.size.height;
// 获取文本
cgcontextref context = uigraphicsgetcurrentcontext();
// 设置 边线宽度
cgcontextsetlinewidth(context, 0.2);
//边框颜色
cgcontextsetstrokecolorwithcolor(context, [uicolor graycolor].cgcolor);
//矩形填充颜色
if ([self.fillcolorstr isequaltostring:@"fillcolorchange"]) {
cgcontextsetfillcolorwithcolor(context, [uicolor bluecolor].cgcolor);
}else{
cgcontextsetfillcolorwithcolor(context, [uicolor redcolor].cgcolor);
}
cgcontextmovetopoint(context, r, offset); // 开始坐标左边开始
cgcontextaddarctopoint(context, w, offset, w, changenum, r); // 右上角角度
cgcontextaddarctopoint(context, w , h - offset, w - changenum, h - offset, r); // 右下角角度
cgcontextaddlinetopoint(context, positionnum + 10, h - offset); // 向左划线
cgcontextaddlinetopoint(context, positionnum + 5, h); // 向下斜线
cgcontextaddlinetopoint(context, positionnum, h - offset); // 向上斜线
cgcontextaddarctopoint(context, 0, h - offset, 0, h - changenum, r); // 左下角角度
cgcontextaddarctopoint(context, 0, offset, r, offset, r); // 左上角角度
cgcontextdrawpath(context, kcgpathfillstroke); //根据坐标绘制路径
/** 父类调用 放在画完边线 后. 不然 设置的文字会被覆盖 */
[super drawrect:rect];
}
// 当 要改变填充颜色 可以进行调用改变
-(void)setfillcolorstr:(nsstring *)fillcolorstr{
_fillcolorstr = fillcolorstr;
// 调用- (void)drawrect:(cgrect)rect; 重绘填充颜色
[self setneedsdisplay];
}
|
将控件颜色 设置为透明, 一个 自定义的提示框完成. 作者仅提供一种方法, 读者也可用 uibezierpath等 去实现.
四、补充说明
有人说 直接用图片实现, 都可以 , 看工程需求. 此文主要聊的是
用 – (void)drawrect:(cgrect)rect; 绘制 圆角箭头
介绍cgcontextaddarctopoint的使用
对用图片实现 , 形变问题.
uiimage 类提供
?
|
1
|
(uiimage*)stretchableimagewithleftcapwidth:(nsinteger)leftcapwidth topcapheight;
|
简单说明下
图片为 100 * 56 像素
?
|
1
2
3
4
5
6
7
8
9
10
11
12
|
uiimage *tempimage = [uiimage imagenamed:@"tip.png"];
/** 说明 : 创建一个内容可拉伸,边角不拉伸的图片, 单位为像素
* leftcapwidth: 左边不拉伸区域的宽度
* topcapheight: 上面不拉伸区域高度
* 之后沿此区域 横纵拉伸, 边角不变
*/
tempimage = [tempimage stretchableimagewithleftcapwidth:80 topcapheight:20];
uiimageview *imgview=[[uiimageview alloc]initwithimage:tempimage];
imgview.frame = cgrectmake(100, 100, 200, 56);
[self. view addsubview:imgview];
|
拉伸后与原图对比

总结
以上就是这篇文章的全部内容了,希望本文的内容对各位ios开发者们能有所帮助,如果有疑问大家可以留言交流。

相关文章


猜你喜欢
- 64M VPS建站:怎样优化以提高网站加载速度? 2025-06-10
- 64M VPS建站:是否适合初学者操作和管理? 2025-06-10
- ASP.NET自助建站系统中的用户注册和登录功能定制方法 2025-06-10
- ASP.NET自助建站系统的域名绑定与解析教程 2025-06-10
- 个人服务器网站搭建:如何选择合适的服务器提供商? 2025-06-10