先上效果图:
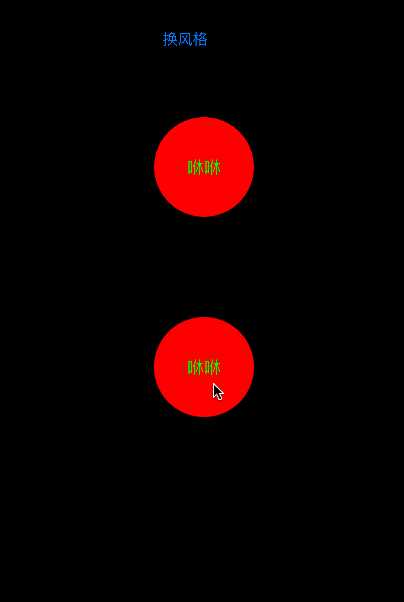
圆形
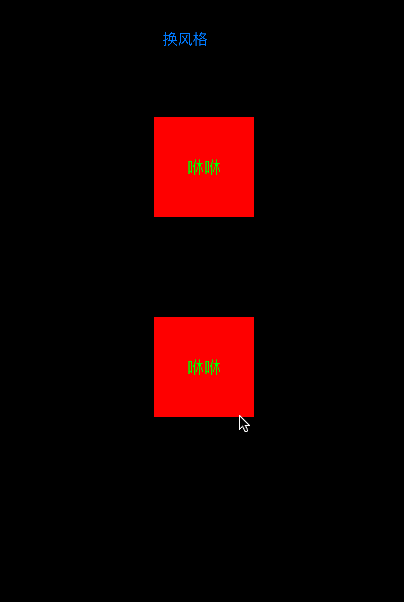
方形
思路分析:
这四种风格其实就是两种, 一种是动画效果在视图view的内部, 另一种是在视图的外部! 我们可以尝试封装自定义 view 设置相关属性去实现这两个风格. 点击时候触及动画, 说明要在这个 view 上添加手势! 分析动画效果其实是两种, 第一种是视图的比例由小到大,第二种是动画显示效果是渐渐变暗! 那么我们可以把两种效果写到一个动画组中!还有一个问题是效果的形状, 也就是 layer 动画展示的形状有方形有圆形, 这个形状就需要我们思考如何去绘制和判断!
代码分析:
首先要创建自定义一个 view 类去实现点击有动画的效果! 因为分析有两种风格(在外在内)的动画, 因此要在. h 文件中声明属性去接收外界告知的风格! 我们还可以添加一些供外界修改的值, 比如动画的边界粗细, 填充颜色, 动画时间等等这里我用一个颜色举例! 外界可提供一个颜色, 怎么用具体代码中有!
|
1
2
3
4
5
6
7
8
9
10
11
12
|
typedef ns_enum(nsuinteger, flashbuttontype){
# 风格定义一个枚举类型的去表示 分别是代表动画在里面和外面 (便于理解)
ddflashbuttoninner = 0,
ddflashbuttonouter = 1
};
# 定义的两个属性
@property (strong, nonatomic) uicolor *flashcolor;
@property (assign, nonatomic) flashbuttontype buttontype;
# 写这个方法可以对 view 的子视图上的子控件进行操作, 可以不把子控件都暴露出去
- (void)settext:(nsstring *)text withtextcolor:(uicolor *)textcolor;
|
第 2 步: 在初始化方法中,我们可以给这个 view 加一些子视图比如 uilabel 去显示一些想表达的文字(这里还可以写个方法去改变 label上 text 的属性,)! 还需要给 view 添加点击手势!
|
1
2
3
4
5
6
7
8
9
10
11
12
13
14
15
16
|
- (instancetype) initwithframe:(cgrect)frame{
if (self = [super initwithframe:frame]) {
# 创建手势 并添加到 view 上
uitapgesturerecognizer *tap = [[uitapgesturerecognizer alloc] initwithtarget:self action:@selector(didtap:)];
[self addgesturerecognizer:tap];
self.textlabel = [[uilabel alloc] initwithframe:self.bounds];
self.textlabel.backgroundcolor = [uicolor clearcolor];
[self.textlabel settextalignment:nstextalignmentcenter];
[self addsubview:self.textlabel];
self.backgroundcolor = [uicolor cyancolor];
# 给一个默认的风格 不设置就是代表 动画在里面
self.buttontype = ddflashbuttoninner;
}
return self;
}
|
第 3 步: 可以给子控件给一些属性 这里有 label 还写了个方法
|
1
2
3
4
5
6
7
8
9
10
11
12
|
- (void)settext:(nsstring *)text withtextcolor:(uicolor *)textcolor
{
# 就是给 label 赋外界传来的值 若有其他的控件可以改一些参数用此方法
if (text)
{
[self.textlabel settext:text];
}
if (textcolor)
{
[self.textlabel settextcolor:textcolor];
}
}
|
第 4 步: 根据风格的不同我们要控制动画展示的范围, 也就是加入动画在内部就不能超过 view 的范围
|
1
2
3
4
5
6
7
8
9
10
11
12
13
|
# 这里就是重写了buttontype setter方法,同时判断一下风格根据风格选择是否把超过视图 view 的部分裁剪掉
- (void)setbuttontype:(flashbuttontype)buttontype
{
_buttontype = buttontype;
if (buttontype == ddflashbuttoninner)
{
// 内容和子视图是夹在视图的边界内 ( 只允许 view范围内有子视图和类容可以显示 )
self.clipstobounds = 1;
}else
{// 外面可以显示
self.clipstobounds = 0;
}
}
|
第 5 步: 准备工作做好后, 一个思路就是去写点击事件, 需要什么就去创建什么! 这先去思考点击事件中需要的东西, 都满足之后再去写完善点击事件! 动画效果首先需要动画, 另外还需要能添加动画的 layer;首先写个得到动画的方法!
|
1
2
3
4
5
6
7
8
9
10
11
12
13
14
15
16
17
18
19
20
21
22
23
24
25
26
27
28
|
- (caanimationgroup *)createflashanimationwisthscale:(cgfloat)scale
duration:(cgfloat)duratiton
{
# 创建按比例收缩变大的动画
// 指定要在渲染动画性能时的关键路径 也就是图形转换的方式 这里是按收缩比例 这里也可以不用.scale 因为我们初始值设置是根据catransform3d
cabasicanimation *scaleannimation = [cabasicanimation animationwithkeypath:@"transform.scale"];
// 动画开始点
// 这个动画效果初值 就是本身的原始的位置
scaleannimation.fromvalue = [nsvalue valuewithcatransform3d:catransform3didentity];
// 等价 scaleannimation.fromvalue = [nsvalue valuewithcatransform3d:catransform3dmakescale(1, 1, 1)];
// 动画结束点
// 在 x 轴和 y 轴的变化比例
scaleannimation.tovalue = [nsvalue valuewithcatransform3d:(catransform3dmakescale(scale, scale, 1))];
# 创建透明度变换的动画
cabasicanimation *alphaanimation = [cabasicanimation animationwithkeypath:@"opacity"];
alphaanimation.fromvalue = @1;
alphaanimation.tovalue = @0;
# 创建动画组把上面两个动画加进去
caanimationgroup *animation = [caanimationgroup new];
animation.animations = @[scaleannimation,alphaanimation];
// 动画效果 (节奏, timing function的会被用于变化起点和终点之间的插值计算.形象点说是timing function决定了动画运行的节奏(pacing),比如是均匀变化(相同时间变化量相同),先快后慢,先慢后快还是先慢再快再慢.)
animation.timingfunction = [camediatimingfunction functionwithname:kcamediatimingfunctioneaseineaseout];
# 返回我们想要的动画效果组
return animation;
}
|
第 6 步: 得到一个cashapelayer 类型的图层(因为要结合贝塞尔曲线得到形状路径), 画一个形状那么就需要有位置
|
1
2
3
4
5
6
7
8
9
10
11
12
13
14
15
16
17
18
19
20
21
22
23
24
25
26
27
28
29
30
31
32
33
34
35
36
|
- (cashapelayer *)creatcircleshapwithpostion:(cgpoint)position
pathrect:(cgrect)rect
radius:(cgfloat)radius
{
cashapelayer *circleshap = [cashapelayer layer];
// 从贝塞尔曲线取到形状
circleshap.path = [uibezierpath bezierpathwithroundedrect:frame cornerradius:radius].cgpath;
// 虽然得到了形状, 但是并没有得到具体的 frame(bounds) 也就是实际上并没有范围 只是可以展现动画的效果 那么锚点其实就是设置的位置点
circleshap.position = position;
if (self.buttontype == ddflashbuttoninner)
{
# 在这里设置 frame 就是为了满足我们想要的锚点位置让动画效果动起来, 下面也一样, 可以不设置试试效果就明白了!
// circleshap.bounds = cgrectmake(0, 0, radius *2, radius *2);
circleshap.frame = cgrectmake(position.x-radius, position.y-radius, radius*2, radius*2);
// 线宽
circleshap.linewidth = 1;
// 填充的颜色 不设置默认就给黄色
circleshap.fillcolor = self.flashcolor ? self.flashcolor.cgcolor:[uicolor yellowcolor].cgcolor;
}else
{
circleshap.frame = self.bounds;
// 线宽
circleshap.linewidth = 5;
circleshap.fillcolor = [uicolor clearcolor].cgcolor;
// 边缘线的颜色 不设置就默认给个紫色
circleshap.strokecolor = self.flashcolor ? self.flashcolor.cgcolor:[uicolor purplecolor].cgcolor;
}
// 不透明度 要设置成透明的 不然内部风格的时候会画出来图案点点
circleshap.opacity = 0;
return circleshap;
}
|
第 7 步 : 把点击的事件完成就 ok 了
|
1
2
3
4
5
6
7
8
9
10
11
12
13
14
15
16
17
18
19
20
21
22
23
24
25
26
27
28
29
30
31
|
- (void)didtap:(uitapgesturerecognizer *)tapgesture
{
// 获取点击点的位置
cgpoint taplocation = [tapgesture locationinview:self];
// 定义一个图层 下面分情况去给予不同形状
cashapelayer *circleshape = nil;
// 默认一个变化比例 1 倍
cgfloat scale = 1.0f;
// 获取 view 的宽和高
cgfloat width = self.bounds.size.width, height = self.bounds.size.height;
if (self.buttontype == ddflashbuttoninner)
{
# 这里就是在视图内部效果, 就是以点击的点为圆心 画一个小圆(这里是半径为1) 然后让它动画起来 (不断的变大并变透明) 所以放大倍数只要能到最大的变就行了 不一定非要这样写, 你开心就好!
cgfloat biggeredge = width > height ? width :height;
cgfloat radius = 1
scale = biggeredge / radius + 0.5;
# 调用方法获得图层 锚点位置就是点击的位置
circleshape = [self creatcircleshapwithpostion:cgpointmake(taplocation.x , taplocation.y ) pathrect:cgrectmake(0, 0, radius * 2, radius * 2) radius:radius];
}else
{
# 这个是外部动画效果 设置能放大5.5倍
scale = 5.5f;
# 锚点位置在 view 的中心 这个图层和 view 是一样的形状范围
circleshape = [self creatcircleshapwithpostion:cgpointmake(width /2 , height / 2) pathrect:self.bounds radius:self.layer.cornerradius];
}
// view图层 上添加 有形状的自定义图层
[self.layer addsublayer:circleshape];
# 给自定义图层添加动画
[circleshape addanimation:[self createflashanimationwisthscale:scale duration:1.0f] forkey:nil];
}
|
最后说一句: 用的时候在 viewcontroller 中引入, 创建自定义的 view 实例对象, 改变传入的风格和颜色就可以展示效果了!
ios基础-动画效果的总结–(calayer — 粉骨碎身全不怕,要留清白在人间!<小拳石>动画的思维导图基础知识:ios能够实现动画的方式:(如上图)uiview基础实现方式一uiview基础实现方式二coreanimation实现方式动画的效果简述:传达状态提高用户对直接操作的感知帮助用户可视化操作的结果uiview的基础动画:uikit直接将动画继承到uiview类中,当内部的一些属性发生改变时,uiview将为这些改变提供动画支持.执行动画的工作由uiview类自动完成,但希望在…

相关文章


- ASP.NET自助建站系统的数据库备份与恢复操作指南 2025-06-10
- 个人网站服务器域名解析设置指南:从购买到绑定全流程 2025-06-10
- 个人网站搭建:如何挑选具有弹性扩展能力的服务器? 2025-06-10
- 个人服务器网站搭建:如何选择适合自己的建站程序或框架? 2025-06-10
- 64M VPS建站:能否支持高流量网站运行? 2025-06-10