在ios开发过程中有的时候会需要用到渐变的颜色,这篇文章总结了三种方法来实现,有需要的朋友们下面来一起看看吧。
一、cagradientlayer实现渐变
cagradientlayer是calayer的一个特殊子类,用于生成颜色渐变的图层,使用较为方便
下面介绍下它的相关属性:
startpoint&endpoint 颜色渐变的方向,范围在(0,0)与(1.0,1.0)之间,如(0,0)(1.0,0)代表水平方向渐变,(0,0)(0,1.0)代表竖直方向渐变
|
1
2
3
4
5
6
7
|
cagradientlayer *gradientlayer = [cagradientlayer layer];
gradientlayer.colors = @[(__bridge id)[uicolor redcolor].cgcolor, (__bridge id)[uicolor yellowcolor].cgcolor, (__bridge id)[uicolor bluecolor].cgcolor];
gradientlayer.locations = @[@0.3, @0.5, @1.0];
gradientlayer.startpoint = cgpointmake(0, 0);
gradientlayer.endpoint = cgpointmake(1.0, 0);
gradientlayer.frame = cgrectmake(0, 100, 300, 100);
[self.view.layer addsublayer:gradientlayer];
|
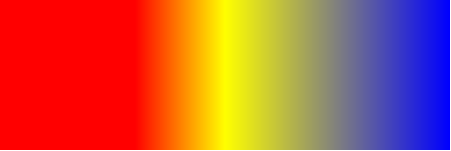
cagradientlayer实现渐变标间简单直观,但存在一定的局限性,比如无法自定义整个渐变区域的形状,如环形、曲线形的渐变。
二、core graphics相关方法实现渐变
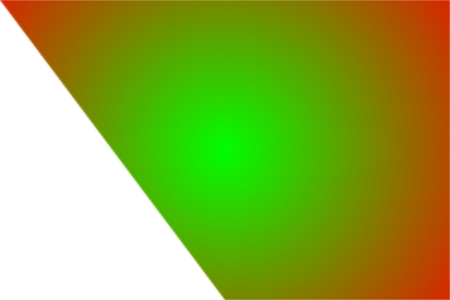
ios core graphics中有两个方法用于绘制渐变颜色,cgcontextdrawlineargradient可以用于生成线性渐变,cgcontextdrawradialgradient用于生成圆半径方向颜色渐变。函数可以自定义path,无论是什么形状都可以,原理都是用来做clip,所以需要在cgcontextclip函数前调用cgcontextaddpath函数把cgpathref加入到context中。
另外一个需要注意的地方是渐变的方向,方向是由两个点控制的,点的单位就是坐标。因此需要正确从cgpathref中找到正确的点,方法当然有很多种看具体实现,本例中,我就是简单得通过调用cgpathgetboundingbox函数,返回cgpathref的矩形区域,然后根据这个矩形取两个点,读者可以根据自行需求修改具体代码。
1-> 线性渐变
|
1
2
3
4
5
6
7
8
9
10
11
12
13
14
15
16
17
18
19
20
21
22
23
24
25
26
27
28
29
30
31
32
33
34
35
36
37
38
39
40
41
42
43
44
45
46
47
48
49
50
51
52
53
54
55
56
57
58
59
60
61
|
- (void)drawlineargradient:(cgcontextref)context
path:(cgpathref)path
startcolor:(cgcolorref)startcolor
endcolor:(cgcolorref)endcolor
{
cgcolorspaceref colorspace = cgcolorspacecreatedevicergb();
cgfloat locations[] = { 0.0, 1.0 };
nsarray *colors = @[(__bridge id) startcolor, (__bridge id) endcolor];
cggradientref gradient = cggradientcreatewithcolors(colorspace, (__bridge cfarrayref) colors, locations);
cgrect pathrect = cgpathgetboundingbox(path);
//具体方向可根据需求修改
cgpoint startpoint = cgpointmake(cgrectgetminx(pathrect), cgrectgetmidy(pathrect));
cgpoint endpoint = cgpointmake(cgrectgetmaxx(pathrect), cgrectgetmidy(pathrect));
cgcontextsavegstate(context);
cgcontextaddpath(context, path);
cgcontextclip(context);
cgcontextdrawlineargradient(context, gradient, startpoint, endpoint, 0);
cgcontextrestoregstate(context);
cggradientrelease(gradient);
cgcolorspacerelease(colorspace);
}
- (void)viewdidload
{
[super viewdidload];
// do any additional setup after loading the view.
//创建cgcontextref
uigraphicsbeginimagecontext(self.view.bounds.size);
cgcontextref gc = uigraphicsgetcurrentcontext();
//创建cgmutablepathref
cgmutablepathref path = cgpathcreatemutable();
//绘制path
cgrect rect = cgrectmake(0, 100, 300, 200);
cgpathmovetopoint(path, null, cgrectgetminx(rect), cgrectgetminy(rect));
cgpathaddlinetopoint(path, null, cgrectgetmidx(rect), cgrectgetmaxy(rect));
cgpathaddlinetopoint(path, null, cgrectgetwidth(rect), cgrectgetmaxy(rect));
cgpathclosesubpath(path);
//绘制渐变
[self drawlineargradient:gc path:path startcolor:[uicolor greencolor].cgcolor endcolor:[uicolor redcolor].cgcolor];
//注意释放cgmutablepathref
cgpathrelease(path);
//从context中获取图像,并显示在界面上
uiimage *img = uigraphicsgetimagefromcurrentimagecontext();
uigraphicsendimagecontext();
uiimageview *imgview = [[uiimageview alloc] initwithimage:img];
[self.view addsubview:imgview];
}
|

2-> 圆半径方向渐变
|
1
2
3
4
5
6
7
8
9
10
11
12
13
14
15
16
17
18
19
20
21
22
23
24
25
26
27
28
29
30
31
32
33
34
35
36
37
38
39
40
41
42
43
44
45
46
47
48
49
50
51
52
53
54
55
56
57
58
59
60
61
62
|
- (void)drawradialgradient:(cgcontextref)context
path:(cgpathref)path
startcolor:(cgcolorref)startcolor
endcolor:(cgcolorref)endcolor
{
cgcolorspaceref colorspace = cgcolorspacecreatedevicergb();
cgfloat locations[] = { 0.0, 1.0 };
nsarray *colors = @[(__bridge id) startcolor, (__bridge id) endcolor];
cggradientref gradient = cggradientcreatewithcolors(colorspace, (__bridge cfarrayref) colors, locations);
cgrect pathrect = cgpathgetboundingbox(path);
cgpoint center = cgpointmake(cgrectgetmidx(pathrect), cgrectgetmidy(pathrect));
cgfloat radius = max(pathrect.size.width / 2.0, pathrect.size.height / 2.0) * sqrt(2);
cgcontextsavegstate(context);
cgcontextaddpath(context, path);
cgcontexteoclip(context);
cgcontextdrawradialgradient(context, gradient, center, 0, center, radius, 0);
cgcontextrestoregstate(context);
cggradientrelease(gradient);
cgcolorspacerelease(colorspace);
}
- (void)viewdidload
{
[super viewdidload];
// do any additional setup after loading the view.
//创建cgcontextref
uigraphicsbeginimagecontext(self.view.bounds.size);
cgcontextref gc = uigraphicsgetcurrentcontext();
//创建cgmutablepathref
cgmutablepathref path = cgpathcreatemutable();
//绘制path
cgrect rect = cgrectmake(0, 100, 300, 200);
cgpathmovetopoint(path, null, cgrectgetminx(rect), cgrectgetminy(rect));
cgpathaddlinetopoint(path, null, cgrectgetmidx(rect), cgrectgetmaxy(rect));
cgpathaddlinetopoint(path, null, cgrectgetwidth(rect), cgrectgetmaxy(rect));
cgpathaddlinetopoint(path, null, cgrectgetwidth(rect), cgrectgetminy(rect));
cgpathclosesubpath(path);
//绘制渐变
[self drawradialgradient:gc path:path startcolor:[uicolor greencolor].cgcolor endcolor:[uicolor redcolor].cgcolor];
//注意释放cgmutablepathref
cgpathrelease(path);
//从context中获取图像,并显示在界面上
uiimage *img = uigraphicsgetimagefromcurrentimagecontext();
uigraphicsendimagecontext();
uiimageview *imgview = [[uiimageview alloc] initwithimage:img];
[self.view addsubview:imgview];
}
|
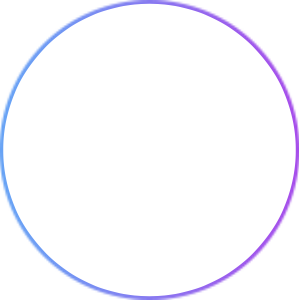
三、以cashapelayer作为layer的mask属性
calayer的mask属性可以作为遮罩让layer显示mask遮住(非透明)的部分;cashapelayer为calayer的子类,通过path属性可以生成不同的形状,将cashapelayer对象用作layer的mask属性的话,就可以生成不同形状的图层。
1、生成一个imageview(也可以为layer),image的属性为颜色渐变的图片
2、生成一个cashapelayer对象,根据path属性指定所需的形状
3、将cashapelayer对象赋值给imageview的mask属性
|
1
2
3
4
5
6
7
8
9
10
11
12
13
14
15
16
17
18
19
20
21
22
23
24
25
26
27
28
29
30
31
32
33
34
35
36
37
38
39
40
41
42
43
|
- (void)viewdidload
{
[super viewdidload];
[self.view addsubview:self.firstcircle];
_firstcircle.frame = cgrectmake(0, 0, 200, 200);
_firstcircle.center = cgpointmake(cgrectgetwidth(self.view.bounds) / 2.0, cgrectgetheight(self.view.bounds) / 2.0);
cgfloat firscirclewidth = 5;
self.firstcircleshapelayer = [self generateshapelayerwithlinewidth:firscirclewidth];
_firstcircleshapelayer.path = [self generatebezierpathwithcenter:cgpointmake(100, 100) radius:100].cgpath;
_firstcircle.layer.mask = _firstcircleshapelayer;
}
- (cashapelayer *)generateshapelayerwithlinewidth:(cgfloat)linewidth
{
cashapelayer *waveline = [cashapelayer layer];
waveline.linecap = kcalinecapbutt;
waveline.linejoin = kcalinejoinround;
waveline.strokecolor = [uicolor redcolor].cgcolor;
waveline.fillcolor = [[uicolor clearcolor] cgcolor];
waveline.linewidth = linewidth;
waveline.backgroundcolor = [uicolor clearcolor].cgcolor;
return waveline;
}
- (uibezierpath *)generatebezierpathwithcenter:(cgpoint)center radius:(cgfloat)radius
{
uibezierpath *circlepath = [uibezierpath bezierpathwitharccenter:center radius:radius startangle:0 endangle:2*m_pi clockwise:no];
return circlepath;
}
- (uiimageview *)firstcircle
{
if (!_firstcircle) {
self.firstcircle = [[uiimageview alloc] initwithimage:[uiimage imagenamed:@"circlebackground"]];
_firstcircle.layer.maskstobounds = yes;
_firstcircle.alpha = 1.0;
}
return _firstcircle;
}
|
总结
以上就是这篇文章的全部内容了,希望本文的内容对各位ios开发者们能有所帮助,如果有疑问大家可以留言交流。

相关文章


- ASP.NET本地开发时常见的配置错误及解决方法? 2025-06-10
- ASP.NET自助建站系统的数据库备份与恢复操作指南 2025-06-10
- 个人网站服务器域名解析设置指南:从购买到绑定全流程 2025-06-10
- 个人网站搭建:如何挑选具有弹性扩展能力的服务器? 2025-06-10
- 个人服务器网站搭建:如何选择适合自己的建站程序或框架? 2025-06-10