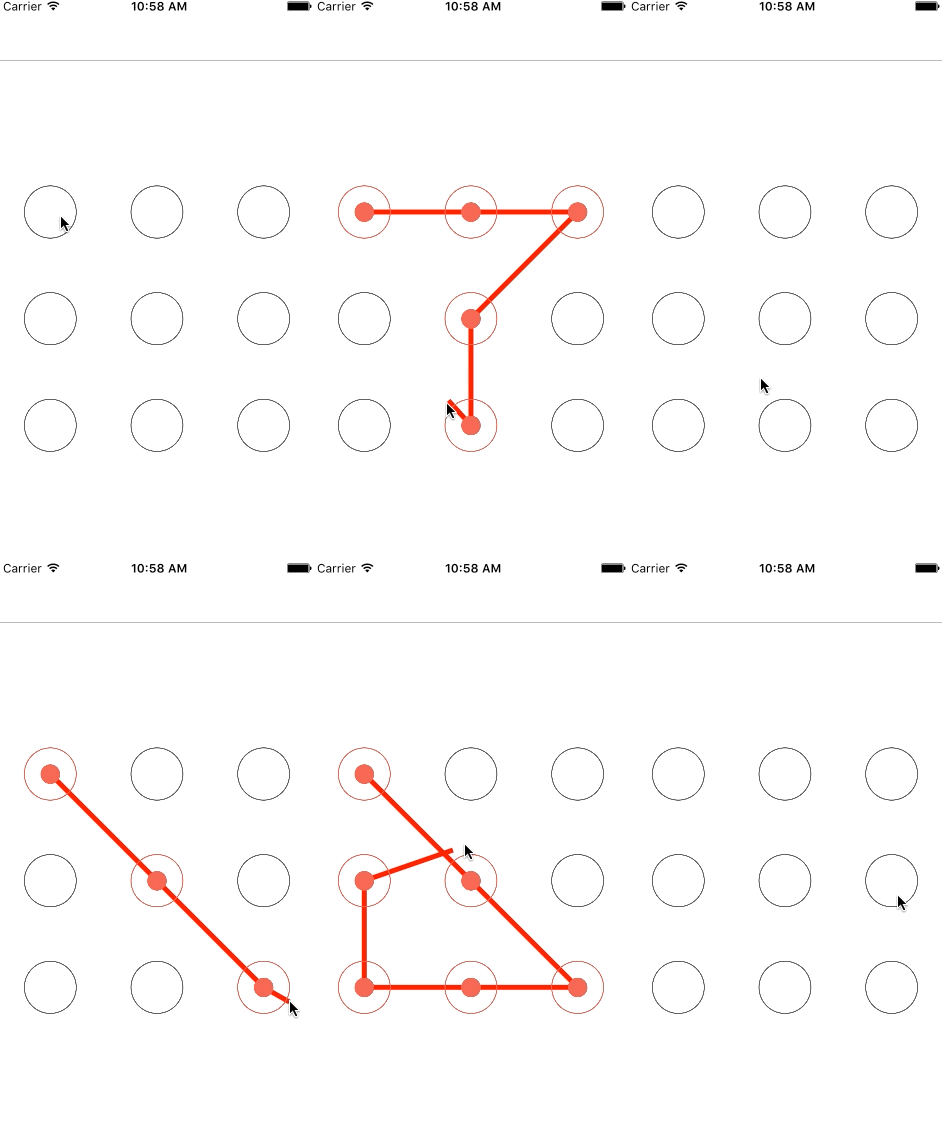
本次讲的手势密码,是在九个按键上实现的,这里讲的是手势密码的基本实现和效果
同样先上效果图
其实就是对画图功能的一个实现,再加上手势操作结合起来。
屏幕宽度高度,方便下面操作,不做解释
?
|
1
2
|
#define ScreenHeight [[UIScreen mainScreen] bounds].size.height
#define ScreenWidth [[UIScreen mainScreen] bounds].size.width
|
控制器.m文件
这里的imageView是用来装手势画图之后的image,看后面就清楚了
?
|
1
2
3
4
5
|
@property (nonatomic,strong)NSMutableArray *buttonArr;//全部手势按键的数组
@property (nonatomic,strong)NSMutableArray *selectorArr;//选中手势按键的数组
@property (nonatomic,assign)CGPoint startPoint;//记录开始选中的按键坐标
@property (nonatomic,assign)CGPoint endPoint;//记录结束时的手势坐标
@property (nonatomic,strong)UIImageView *imageView;//画图所需
|
?
|
1
2
3
4
5
6
7
|
-(NSMutableArray *)selectorArr
{
if (!_selectorArr) {
_selectorArr = [[NSMutableArray alloc]init];
}
return _selectorArr;
}
|
添加九个按键,设置状态图片,实际开发中一般有三种状态,即默认,选中正确和选择错误,错误一般指的是我们要记录下用户的手势密码,需要用户。
画出两次相同的手势密码才能保存,若两次输入不一致,就是错误状态的一种,当然还包括其它的,不多说了。
这里要强调
btn.userInteractionEnabled = NO;
这句的重要性,如果不关闭按键的用户交互,下面的UITouch则无法在按键中触发,所以这里必须关闭
?
|
1
2
3
4
5
6
7
8
9
10
11
12
13
14
15
16
17
18
19
20
21
22
23
24
25
|
- (void)viewDidLoad {
[super viewDidLoad];
self.view.backgroundColor = [UIColor whiteColor];
if (!_buttonArr) {
_buttonArr = [[NSMutableArray alloc]initWithCapacity:9];
}
self.imageView = [[UIImageView alloc]initWithFrame:CGRectMake(0, 0, ScreenWidth, ScreenHeight)];
[self.view addSubview:self.imageView];
for (int i=0; i<3; i++) {
for (int j=0; j<3; j++) {
UIButton *btn = [UIButton buttonWithType:UIButtonTypeCustom];
btn.frame = CGRectMake(ScreenWidth/12+ScreenWidth/3*j, ScreenHeight/3+ScreenWidth/3*i, ScreenWidth/6, ScreenWidth/6);
[btn setImage:[UIImage imageNamed:@"pbg"] forState:UIControlStateNormal];
[btn setImage:[UIImage imageNamed:@"pbg01"] forState:UIControlStateHighlighted];
btn.userInteractionEnabled = NO;
[self.buttonArr addObject:btn];
[self.imageView addSubview:btn];
}
}
}
|
这个方法就是实现画图的方法
?
|
1
2
3
4
5
6
7
8
9
10
11
12
13
14
15
16
17
18
19
20
21
22
23
24
25
26
|
-(UIImage *)drawLine{
UIImage *image = nil;
UIColor *col = [UIColor colorWithRed:1 green:0 blue:0 alpha:1];
UIGraphicsBeginImageContext(self.imageView.frame.size);//设置画图的大小为imageview的大小
CGContextRef context = UIGraphicsGetCurrentContext();
CGContextSetLineWidth(context, 5);
CGContextSetStrokeColorWithColor(context, col.CGColor);
CGContextMoveToPoint(context, self.startPoint.x, self.startPoint.y);//设置画线起点
//从起点画线到选中的按键中心,并切换画线的起点
for (UIButton *btn in self.selectorArr) {
CGPoint btnPo = btn.center;
CGContextAddLineToPoint(context, btnPo.x, btnPo.y);
CGContextMoveToPoint(context, btnPo.x, btnPo.y);
}
//画移动中的最后一条线
CGContextAddLineToPoint(context, self.endPoint.x, self.endPoint.y);
CGContextStrokePath(context);
image = UIGraphicsGetImageFromCurrentImageContext();//画图输出
UIGraphicsEndImageContext();//结束画线
return image;
}
|
最后部分是手势,每次在屏幕上点击的时候都会调用的方法
?
|
1
2
3
4
5
6
7
8
9
10
11
12
13
14
15
16
17
18
19
20
21
22
23
24
25
26
27
28
29
30
31
32
33
34
35
36
37
38
39
40
41
42
43
44
45
46
47
48
49
50
51
52
53
54
55
56
57
58
59
60
61
62
|
//开始手势
-(void)touchesBegan:(NSSet<UITouch *> *)touches withEvent:(UIEvent *)event
{
UITouch *touch = [touches anyObject];//保存所有触摸事件
if (touch) {
for (UIButton *btn in self.buttonArr) {
CGPoint po = [touch locationInView:btn];//记录按键坐标
if ([btn pointInside:po withEvent:nil]) {//判断按键坐标是否在手势开始范围内,是则为选中的开始按键
[self.selectorArr addObject:btn];
btn.highlighted = YES;
self.startPoint = btn.center;//保存起始坐标
}
}
}
}
//移动中触发,画线过程中会一直调用画线方法
-(void)touchesMoved:(NSSet<UITouch *> *)touches withEvent:(UIEvent *)event
{
UITouch *touch = [touches anyObject];
if (touch) {
self.endPoint = [touch locationInView:self.imageView];
for (UIButton *btn in self.buttonArr) {
CGPoint po = [touch locationInView:btn];
if ([btn pointInside:po withEvent:nil]) {
BOOL isAdd = YES;//记录是否为重复按键
for (UIButton *seBtn in self.selectorArr) {
if (seBtn == btn) {
isAdd = NO;//已经是选中过的按键,不再重复添加
break;
}
}
if (isAdd) {//未添加的选中按键,添加并修改状态
[self.selectorArr addObject:btn];
btn.highlighted = YES;
}
}
}
}
self.imageView.image = [self drawLine];//每次移动过程中都要调用这个方法,把画出的图输出显示
}
//手势结束触发
-(void)touchesEnded:(NSSet<UITouch *> *)touches withEvent:(UIEvent *)event
{
self.imageView.image = nil;
self.selectorArr = nil;
for (UIButton *btn in self.buttonArr) {
btn.highlighted = NO;
}
}
|
开发中有时需要在最后时把画出的手势密码图显示保留一秒时,不能直接使用上面的画图image输出多一次,因为输出的连最后一条线都画出来了,如果要实现这个保留效果,可以在画线方法里添加一个是否画最后一条线的判断,加个bool传参,在画线结束时再调用这个方法和参数,禁止最后一条线画出来就行了,当然不能在画的过程禁止,而是在结束的时候,不然一条线都画不出的,最后把图片展示多次就行了。
需要的把btn和密码相关联,方法也有很多种,例如给btn设置tag值,把tag对应作为密码保存和验证就行了。
以上就是本文的全部内容,希望对大家的学习有所帮助,也希望大家多多支持快网idc。
相关文章
猜你喜欢
- ASP.NET自助建站系统中如何实现多语言支持? 2025-06-10
- 64M VPS建站:如何选择最适合的网站建设平台? 2025-06-10
- ASP.NET本地开发时常见的配置错误及解决方法? 2025-06-10
- ASP.NET自助建站系统的数据库备份与恢复操作指南 2025-06-10
- 个人网站服务器域名解析设置指南:从购买到绑定全流程 2025-06-10
TA的动态
- 2025-07-10 怎样使用阿里云的安全工具进行服务器漏洞扫描和修复?
- 2025-07-10 怎样使用命令行工具优化Linux云服务器的Ping性能?
- 2025-07-10 怎样使用Xshell连接华为云服务器,实现高效远程管理?
- 2025-07-10 怎样利用云服务器D盘搭建稳定、高效的网站托管环境?
- 2025-07-10 怎样使用阿里云的安全组功能来增强服务器防火墙的安全性?
快网idc优惠网
QQ交流群
您的支持,是我们最大的动力!
热门文章
-
2025-06-04 91
-
2025-05-29 74
-
2025-05-29 87
-
2025-06-04 21
-
2025-06-04 42
热门评论


