前言
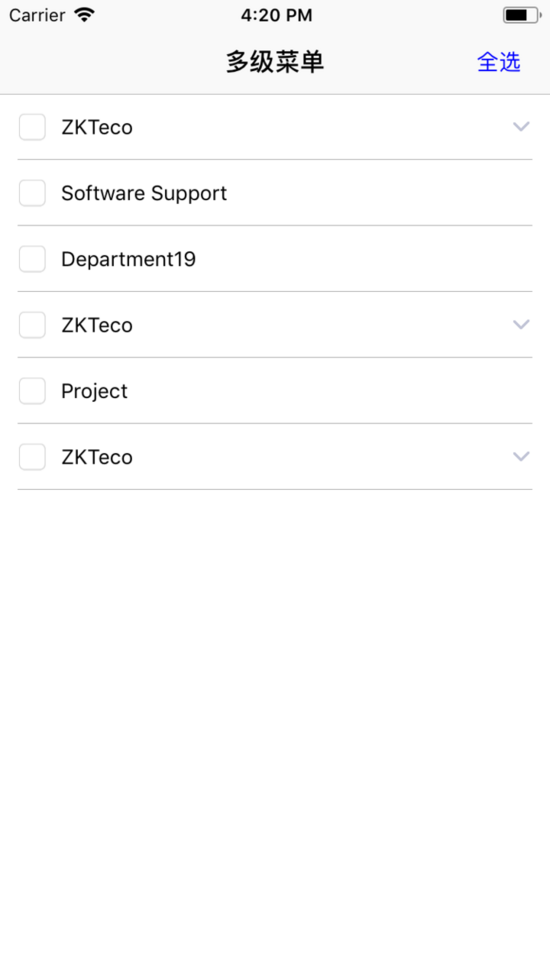
demo地址: https://github.com/963527512/multilayermenu, 如果有更好的办法, 请留言 前段时间在做项目的时候, 遇到了一个n级下拉菜单的需求, 可无限层级的展开和闭合, 下面是效果图

其中每一个uitableviewcell左右两部分拥有不同的功能
- 左半部分我放了一个按钮, 用来控制每个选项的选中状态
- 右半部分控制菜单的展开和闭合
下面是我在做这个功能时的思路, 使用的是mvc
创建控制器, 并添加数据
第一步, 创建一个新的项目, 并添加几个类
ltmenuitemviewcontroller: 继承自uitableviewcontroller, 多层菜单界面
ltmenuitem: 继承自 nsobject, 多层菜单的选项模型, 其中有两个属性
-
name: 选项的名称 -
subs: 选项的子层级数据
|
1
2
3
4
5
6
7
8
|
#import <foundation/foundation.h>
@interface ltmenuitem : nsobject
/** 名字 */
@property (nonatomic, strong) nsstring *name;
/** 子层 */
@property (nonatomic, strong) nsarray<ltmenuitem *> *subs;
@end
|
ltmenuitemcell: 继承自: uitableviewcell, 多层菜单的选项cell 添加数据源文件, 存放的就是需要展示的菜单数据, 项目中应从网络中获取, 这里为了方便, 使用文件的形式
第二步, 在ltmenuitemviewcontroller中, 设置tableview的数据源和cell
效果图如下:
具体代码如下, 其中数组转模型使用的第三方库 mjextension
|
1
2
3
4
5
6
7
8
9
10
11
12
13
14
15
16
17
18
19
20
21
22
23
24
25
26
27
28
29
30
31
32
33
34
35
36
37
38
39
40
41
42
43
44
45
46
47
48
49
50
51
52
53
54
55
56
57
58
59
|
#import "ltmenuitemviewcontroller.h"
#import "ltmenuitem.h"
#import "ltmenuitemcell.h"
#import <mjextension/mjextension.h>
@interface ltmenuitemviewcontroller ()
/** 菜单项 */
@property (nonatomic, strong) nsmutablearray<ltmenuitem *> *menuitems;
@end
@implementation ltmenuitemviewcontroller
static nsstring *ltmenuitemid = @"ltmenuitemcell";
- (void)viewdidload {
[super viewdidload];
[self setup];
[self setuptableview];
}
- (void)didreceivememorywarning {
[super didreceivememorywarning];
// dispose of any resources that can be recreated.
}
#pragma mark - < 基本设置 >
- (void)setup
{
self.title = @"多级菜单";
nsstring *filepath = [[nsbundle mainbundle] pathforresource:@"a" oftype:@"plist"];
nsarray *date = [nsarray arraywithcontentsoffile:filepath];
self.menuitems = [ltmenuitem mj_objectarraywithkeyvaluesarray:date];
self.tableview.separatorstyle = uitableviewcellselectionstylenone;
self.tableview.rowheight = 45;
[self.tableview registerclass:[ltmenuitemcell class] forcellreuseidentifier:ltmenuitemid];
}
#pragma mark - table view data source
- (nsinteger)numberofsectionsintableview:(uitableview *)tableview {
return 1;
}
- (nsinteger)tableview:(uitableview *)tableview numberofrowsinsection:(nsinteger)section {
return self.menuitems.count;
}
- (uitableviewcell *)tableview:(uitableview *)tableview cellforrowatindexpath:(nsindexpath *)indexpath {
ltmenuitemcell *cell = [tableview dequeuereusablecellwithidentifier:ltmenuitemid forindexpath:indexpath];
cell.menuitem = self.menuitems[indexpath.row];
return cell;
}
|
第三步, 设置选项模型, 添加辅助属性
给 ltmenuitem 类添加几个辅助属性, 用于表示选中和展开闭合
-
isselected: 用于表示选项的选中状态 -
isunfold: 用来表示本层级的展开和闭合状态 -
iscanunfold: 用于表示本层级是否能够展开, 只有当subs属性的个数不为0时, 才取值yes -
index: 表示当前的层级, 第一层的值为0
|
1
2
3
4
5
6
7
8
9
10
11
12
13
14
15
16
17
18
|
#import <foundation/foundation.h>
@interface ltmenuitem : nsobject
/** 名字 */
@property (nonatomic, strong) nsstring *name;
/** 子层 */
@property (nonatomic, strong) nsarray<ltmenuitem *> *subs;
#pragma mark - < 辅助属性 >
/** 是否选中 */
@property (nonatomic, assign) bool isselected;
/** 是否展开 */
@property (nonatomic, assign) bool isunfold;
/** 是否能展开 */
@property (nonatomic, assign) bool iscanunfold;
/** 当前层级 */
@property (nonatomic, assign) nsinteger index;
@end
|
|
1
2
3
4
5
6
7
8
9
10
11
12
13
14
15
16
17
18
19
20
|
#import "ltmenuitem.h"
@implementation ltmenuitem
/**
指定subs数组中存放ltmenuitem类型对象
*/
+ (nsdictionary *)mj_objectclassinarray
{
return @{@"subs" : [ltmenuitem class]};
}
/**
判断是否能够展开, 当subs中有数据时才能展开
*/
- (bool)iscanunfold
{
return self.subs.count > 0;
}
@end
|
第四步, 设置展开闭合时, 需要显示的数据
在控制器 ltmenuitemviewcontroller 中, 当前展示的数据是数组 menuitems , 此时并不好控制应该展示在 tableview 中的数据, 所以添加一个新的属性, 用来包含需要展示的数据
|
1
2
3
4
5
6
|
@interface ltmenuitemviewcontroller ()
/** 菜单项 */
@property (nonatomic, strong) nsmutablearray<ltmenuitem *> *menuitems;
/** 当前需要展示的数据 */
@property (nonatomic, strong) nsmutablearray<ltmenuitem *> *latestshowmenuitems;
@end
|
其中 latestshowmenuitems 就是展示在tableview中的数据
使用懒加载, 创建 latestshowmenuitems
|
1
2
3
4
5
6
7
|
- (nsmutablearray<ltmenuitem *> *)latestshowmenuitems
{
if (!_latestshowmenuitems) {
self.latestshowmenuitems = [[nsmutablearray alloc] init];
}
return _latestshowmenuitems;
}
|
修改数据源方法, 使用 latestshowmenuitems 替换 menuitems
|
1
2
3
4
5
6
7
8
9
10
11
12
13
|
#pragma mark - table view data source
- (nsinteger)numberofsectionsintableview:(uitableview *)tableview {
return 1;
}
- (nsinteger)tableview:(uitableview *)tableview numberofrowsinsection:(nsinteger)section {
return self.latestshowmenuitems.count;
}
- (uitableviewcell *)tableview:(uitableview *)tableview cellforrowatindexpath:(nsindexpath *)indexpath {
ltmenuitemcell *cell = [tableview dequeuereusablecellwithidentifier:ltmenuitemid forindexpath:indexpath];
cell.menuitem = self.latestshowmenuitems[indexpath.row];
return cell;
}
|
此时我们只需要控制 latestshowmenuitems 中包含的数据, 就可以控制页面的展示, 而 menuitems 中的数据不需要增加和减少
第五步, 控制 latestshowmenuitems 中数据的方法
现在, latestshowmenuitems 中没有数据, 所以界面初始化后将不会展示任何数据
我们接下来就在 latestshowmenuitems 中添加初始化界面时需要展示的数据, 并设置层级为0
|
1
2
3
4
5
6
7
8
9
10
11
12
13
14
15
16
17
18
19
|
- (void)setuprowcount
{
// 添加需要展示项, 并设置层级, 初始化0
[self setuproucountwithmenuitems:self.menuitems index:0];
}
/**
将需要展示的选项添加到latestshowmenuitems中
*/
- (void)setuproucountwithmenuitems:(nsarray<ltmenuitem *> *)menuitems index:(nsinteger)index
{
for (int i = 0; i < menuitems.count; i++) {
ltmenuitem *item = menuitems[i];
// 设置层级
item.index = index;
// 将选项添加到数组中
[self.latestshowmenuitems addobject:item];
}
}
|
第六步, 通过tableview代理中cell的点击方法, 处理菜单的展开闭合操作
通过 - (void)tableview:(uitableview *)tableview didselectrowatindexpath:(nsindexpath *)indexpath 方法, 处理菜单的展开闭合操作
|
1
2
3
4
5
6
7
8
9
10
11
|
- (void)tableview:(uitableview *)tableview didselectrowatindexpath:(nsindexpath *)indexpath
{
// 取出点击的选项
ltmenuitem *menuitem = self.latestshowmenuitems[indexpath.row];
// 判断是否能够展开, 不能展开立即返回, 不错任何处理
if (!menuitem.iscanunfold) return;
// 设置展开闭合
menuitem.isunfold = !menuitem.isunfold;
// 刷新列表
[self.tableview reloaddata];
}
|
在这里, 根据被点击数据能否展开, 修改了对应的 isunfold 属性, 并刷新界面
但此时由于 latestshowmenuitems 中数据没有数量变化, 所以子层级并不能显示出来
所以我们需要对 latestshowmenuitems 中的数据进行修改
我们在这里修改第五步中的两个方法, 如下所示
|
1
2
3
4
5
6
7
8
9
10
11
12
13
14
15
16
17
18
19
20
21
22
23
24
25
26
27
28
29
30
31
32
|
#pragma mark - < 添加可以展示的选项 >
- (void)setuprowcount
{
// 清空当前所有展示项
[self.latestshowmenuitems removeallobjects];
// 重新添加需要展示项, 并设置层级, 初始化0
[self setuproucountwithmenuitems:self.menuitems index:0];
}
/**
将需要展示的选项添加到latestshowmenuitems中, 此方法使用递归添加所有需要展示的层级到latestshowmenuitems中
@param menuitems 需要添加到latestshowmenuitems中的数据
@param index 层级, 即当前添加的数据属于第几层
*/
- (void)setuproucountwithmenuitems:(nsarray<ltmenuitem *> *)menuitems index:(nsinteger)index
{
for (int i = 0; i < menuitems.count; i++) {
ltmenuitem *item = menuitems[i];
// 设置层级
item.index = index;
// 将选项添加到数组中
[self.latestshowmenuitems addobject:item];
// 判断该选项的是否能展开, 并且已经需要展开
if (item.iscanunfold && item.isunfold) {
// 当需要展开子集的时候, 添加子集到数组, 并设置子集层级
[self setuproucountwithmenuitems:item.subs index:index + 1];
}
}
}
|
在一开始, 先清空 latestshowmenuitems 中的数据, 然后添加第一层数据
在添加第一层数据的时候, 对每一个数据进行判断, 判断是否能展开, 并且是否已经展开
如果展开, 添加子类到数组, 这里用递归层层递进, 最后将每一层子类展开的数据全部添加到 latestshowmenuitems 中, 同时设置了每一层数据的层级属性 index
此时 - (void)tableview:(uitableview *)tableview didselectrowatindexpath:(nsindexpath *)indexpath 方法, 需要做如下修改
|
1
2
3
4
5
6
7
8
9
10
11
12
13
|
- (void)tableview:(uitableview *)tableview didselectrowatindexpath:(nsindexpath *)indexpath
{
// 取出点击的选项
ltmenuitem *menuitem = self.latestshowmenuitems[indexpath.row];
// 判断是否能够展开, 不能展开立即返回, 不错任何处理
if (!menuitem.iscanunfold) return;
// 设置展开闭合
menuitem.isunfold = !menuitem.isunfold;
// 修改latestshowmenuitems中数据
[self setuprowcount];
// 刷新列表
[self.tableview reloaddata];
}
|
这时, 我们已经可以看到界面上有如下效果

第七步, 添加展开闭合的伸缩动画效果
首先添加一个属性 oldshowmenuitems , 用来记录改变前 latestshowmenuitems 中的数据
|
1
2
3
4
5
6
7
8
|
@interface ltmenuitemviewcontroller ()
/** 菜单项 */
@property (nonatomic, strong) nsmutablearray<ltmenuitem *> *menuitems;
/** 当前需要展示的数据 */
@property (nonatomic, strong) nsmutablearray<ltmenuitem *> *latestshowmenuitems;
/** 以前需要展示的数据 */
@property (nonatomic, strong) nsmutablearray<ltmenuitem *> *oldshowmenuitems;
@end
|
修改 - (void)tableview:(uitableview *)tableview didselectrowatindexpath:(nsindexpath *)indexpath 方法, 添加展开动画效果
|
1
2
3
4
5
6
7
8
9
10
11
12
13
14
15
16
17
18
19
20
21
22
23
24
25
26
27
28
29
30
31
32
33
34
35
36
37
38
39
40
41
42
43
44
45
|
- (void)tableview:(uitableview *)tableview didselectrowatindexpath:(nsindexpath *)indexpath
{
ltmenuitem *menuitem = self.latestshowmenuitems[indexpath.row];
if (!menuitem.iscanunfold) return;
// 记录改变之前的数据
self.oldshowmenuitems = [nsmutablearray arraywitharray:self.latestshowmenuitems];
// 设置展开闭合
menuitem.isunfold = !menuitem.isunfold;
// 更新被点击cell的箭头指向
[self.tableview reloadrowsatindexpaths:@[indexpath] withrowanimation:(uitableviewrowanimationautomatic)];
// 设置需要展开的新数据
[self setuprowcount];
// 判断老数据和新数据的数量, 来进行展开和闭合动画
// 定义一个数组, 用于存放需要展开闭合的indexpath
nsmutablearray<nsindexpath *> *indexpaths = @[].mutablecopy;
// 如果 老数据 比 新数据 多, 那么就需要进行闭合操作
if (self.oldshowmenuitems.count > self.latestshowmenuitems.count) {
// 遍历oldshowmenuitems, 找出多余的老数据对应的indexpath
for (int i = 0; i < self.oldshowmenuitems.count; i++) {
// 当新数据中 没有对应的item时
if (![self.latestshowmenuitems containsobject:self.oldshowmenuitems[i]]) {
nsindexpath *subindexpath = [nsindexpath indexpathforrow:i insection:indexpath.section];
[indexpaths addobject:subindexpath];
}
}
// 移除找到的多余indexpath
[self.tableview deleterowsatindexpaths:indexpaths withrowanimation:(uitableviewrowanimationtop)];
}else {
// 此时 新数据 比 老数据 多, 进行展开操作
// 遍历 latestshowmenuitems, 找出 oldshowmenuitems 中没有的选项, 就是需要新增的indexpath
for (int i = 0; i < self.latestshowmenuitems.count; i++) {
if (![self.oldshowmenuitems containsobject:self.latestshowmenuitems[i]]) {
nsindexpath *subindexpath = [nsindexpath indexpathforrow:i insection:indexpath.section];
[indexpaths addobject:subindexpath];
}
}
// 插入找到新添加的indexpath
[self.tableview insertrowsatindexpaths:indexpaths withrowanimation:(uitableviewrowanimationtop)];
}
}
|
通过判断新老数据的数量, 已经对应的位置, 进行删除和插入操作, 就可以添加对应的动画效果
此时, 效果如下:

第八步, 选项的选中效果
我在cell的左半部分添加了一个半个cell宽的透明按钮, 并设置了一个代理方法
当点击透明按钮时, 调用代理方法, 修改cell对应的 ltmenuitem 中 isselected 的值, 来控制选中状态
在控制器中指定代理, 并实现代理方法
|
1
2
3
4
5
6
|
- (uitableviewcell *)tableview:(uitableview *)tableview cellforrowatindexpath:(nsindexpath *)indexpath {
ltmenuitemcell *cell = [tableview dequeuereusablecellwithidentifier:ltmenuitemid forindexpath:indexpath];
cell.menuitem = self.latestshowmenuitems[indexpath.row];
cell.delegate = self;
return cell;
}
|
|
1
2
3
4
5
6
7
|
#pragma mark - < ltmenuitemcelldelegate >
- (void)cell:(ltmenuitemcell *)cell didselectedbtn:(uibutton *)sender
{
cell.menuitem.isselected = !cell.menuitem.isselected;
[self.tableview reloaddata];
}
|
效果如下:
第九步, 使用递归进行 全选和反选 操作
首先我们在导航条右侧添加 全选 按钮, 并实现对应的点击方法
|
1
2
3
4
5
6
7
8
9
10
11
12
13
14
15
16
17
18
19
20
21
22
23
24
25
26
27
|
#pragma mark - < 点击事件 >
- (void)allbtnclick:(uibutton *)sender
{
sender.selected = !sender.selected;
[self selected:sender.selected menuitems:self.menuitems];
}
/**
取消或选择, 某一数值中所有的选项, 包括子层级
@param selected 是否选中
@param menuitems 选项数组
*/
- (void)selected:(bool)selected menuitems:(nsarray<ltmenuitem *> *)menuitems
{
for (int i = 0; i < menuitems.count; i++) {
ltmenuitem *menuitem = menuitems[i];
menuitem.isselected = selected;
if (menuitem.iscanunfold) {
[self selected:selected menuitems:menuitem.subs];
}
}
[self.tableview reloaddata];
}
|
上述的第二个方法, 就是修改对应数组中所有的数据及子集的选中状态
同时修改该cell的代理方法 - (void)cell:(ltmenuitemcell *)cell didselectedbtn:(uibutton *)sender 的实现
|
1
2
3
4
5
6
7
8
9
|
#pragma mark - < ltmenuitemcelldelegate >
- (void)cell:(ltmenuitemcell *)cell didselectedbtn:(uibutton *)sender
{
cell.menuitem.isselected = !cell.menuitem.isselected;
// 修改按钮状态
self.allbtn.selected = no;
[self.tableview reloaddata];
}
|
最终效果如下:

第十步, 使用已选择数据
这里主要是拿到所有已经选中的数据, 并进行操作
我只进行了打印操作, 如果需要, 可以自己修改
首先添加一个属性 selectedmenuitems , 用于存储已选数据
然后通过下列代码可以获取所有已经选中的数据
|
1
2
3
4
5
6
7
8
9
10
11
12
|
@interface ltmenuitemviewcontroller () <ltmenuitemcelldelegate>
/** 菜单项 */
@property (nonatomic, strong) nsmutablearray<ltmenuitem *> *menuitems;
/** 当前需要展示的数据 */
@property (nonatomic, strong) nsmutablearray<ltmenuitem *> *latestshowmenuitems;
/** 以前需要展示的数据 */
@property (nonatomic, strong) nsmutablearray<ltmenuitem *> *oldshowmenuitems;
/** 已经选中的选项, 可用于回调 */
@property (nonatomic, strong) nsmutablearray<ltmenuitem *> *selectedmenuitems;
/** 全选按钮 */
@property (nonatomic, strong) uibutton *allbtn;
@end
|
|
1
2
3
4
5
6
7
8
9
10
11
12
13
14
15
16
17
18
19
20
21
22
23
24
|
#pragma mark - < 选中数据 >
- (void)printselectedmenuitems:(uibutton *)sender
{
[self.selectedmenuitems removeallobjects];
[self departmentswithmenuitems:self.menuitems];
nslog(@"这里是全部选中数据\\n%@", self.selectedmenuitems);
}
/**
获取选中数据
*/
- (void)departmentswithmenuitems:(nsarray<ltmenuitem *> *)menuitems
{
for (int i = 0; i < menuitems.count; i++) {
ltmenuitem *menuitem = menuitems[i];
if (menuitem.isselected) {
[self.selectedmenuitems addobject:menuitem];
}
if (menuitem.subs.count) {
[self departmentswithmenuitems:menuitem.subs];
}
}
}
|
通过递归, 一层层拿到所有已经选择的选项, 并进行打印操作
如果需要另外处理拿到的数据 只需要修改 printselectedmenuitems 方法中的 nslog(@"这里是全部选中数据\\n%@", self.selectedmenuitems); 即可
demo地址: https://github.com/963527512/multilayermenu
以上就是本文的全部内容,希望对大家的学习有所帮助,也希望大家多多支持快网idc。

相关文章


- 64M VPS建站:是否适合初学者操作和管理? 2025-06-10
- ASP.NET自助建站系统中的用户注册和登录功能定制方法 2025-06-10
- ASP.NET自助建站系统的域名绑定与解析教程 2025-06-10
- 个人服务器网站搭建:如何选择合适的服务器提供商? 2025-06-10
- ASP.NET自助建站系统中如何实现多语言支持? 2025-06-10