直接用iphonex截图后是没有圆角和刘海的,就像下面这样。

第一步:截屏
第二步:打开我这个软件,并选取图片库中的那张图
第四步:将做好的图片保存到相册
还需要下边这张刘海的图片
可以上代码了(目前原图是固定的,没有从图片库选取)
?
|
1
2
3
4
5
6
7
8
9
10
11
12
13
14
15
16
17
18
19
20
21
22
23
24
25
26
27
28
29
30
31
32
33
34
35
36
37
38
39
40
41
42
43
44
45
46
47
48
49
50
51
52
53
54
55
56
57
58
59
60
61
62
63
64
65
66
67
68
69
70
71
72
73
74
75
76
77
78
79
80
81
82
83
84
85
86
87
88
89
90
|
//
// viewcontroller.m
// iphonexphotoedit
//
// created by yfc on 2017/12/23.
// copyright © 2017年 yfc. all rights reserved.
//
#import "viewcontroller.h"
#import <assetslibrary/assetslibrary.h>
#import <photos/photos.h>
@interface viewcontroller ()
@end
@implementation viewcontroller
- (void)viewdidload {
[super viewdidload];
uibutton *btn = [[uibutton alloc]init];
btn.frame = cgrectmake(10, 44, 350, 758);
btn.frame = cgrectmake(0, 0, 375, 812);
[btn setbackgroundimage:[uiimage imagenamed:@"img_3655.png"] forstate:uicontrolstatenormal];
//添加圆角
btn.layer.cornerradius = 35 ;
btn.layer.bordercolor = [uicolor blackcolor].cgcolor;
btn.layer.borderwidth = 2;
[self.view addsubview:btn];
btn.backgroundcolor = [uicolor whitecolor];
btn.clipstobounds = yes;
//添加刘海
uiimageview *imageview = [[uiimageview alloc]initwithimage:[uiimage imagenamed:@"liuhai.png"]];
imageview.frame = cgrectmake(70, 0, 222, 28);
[btn addsubview:imageview];
self.view.backgroundcolor = [uicolor clearcolor];
//截图保存到相册
dispatch_after(dispatch_time(dispatch_time_now, (int64_t)(1 * nsec_per_sec)), dispatch_get_main_queue(), ^{
[self savebtnaction:nil];
});
}
-(void)savebtnaction:(uibutton *)sender{
[self requestauthorizationstatus];
}
//查看权限
- (void)requestauthorizationstatus
{
[phphotolibrary requestauthorization:^(phauthorizationstatus status){
dispatch_async(dispatch_get_main_queue(), ^{
switch (status) {
case phauthorizationstatusauthorized:
{
[self cutscreen];
break;
}
default://denied
{
break;
}
}
});
}];
}
//截屏
-(void)cutscreen{
uigraphicsbeginimagecontextwithoptions(self.view.bounds.size, yes, 0.0);
//2.获取当前图形上下文
cgcontextref ctx = uigraphicsgetcurrentcontext();
//3.获取需要截取的view的layer
[self.view.layer renderincontext:ctx];
//4.从当前上下文获取图片
uiimage *image = uigraphicsgetimagefromcurrentimagecontext();
//5.关闭图形上下文
uigraphicsendimagecontext();
//6.把图片保存到相册
uiimagewritetosavedphotosalbum(image, self, @selector(image:didfinishsavingwitherror:contextinfo:), null);
}
//保存成功后回调
-(void)image:(uiimage *)image didfinishsavingwitherror:(nserror *)error contextinfo:(void *)contextinfo{
nsstring *msg = nil;
if (error) {
msg = @"图片保存失败";
}else{
msg = @"图片保存成功";
}
uialertview *alertview = [[uialertview alloc] initwithtitle:@"提示" message:msg delegate:self cancelbuttontitle:@"确定" otherbuttontitles:nil, nil];
[alertview show];
}
@end
|
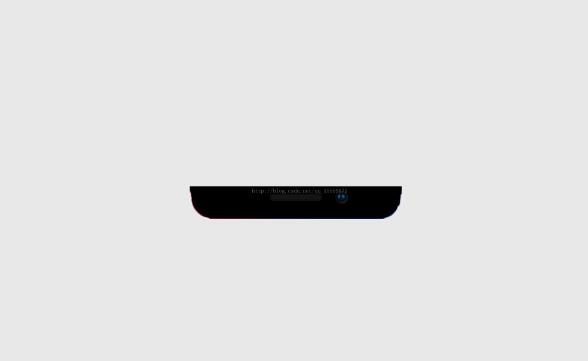
效果图是

以上这篇详谈iphonex截图如何带"刘海"和圆角就是小编分享给大家的全部内容了,希望能给大家一个参考,也希望大家多多支持快网idc。


相关文章


猜你喜欢
- ASP.NET本地开发时常见的配置错误及解决方法? 2025-06-10
- ASP.NET自助建站系统的数据库备份与恢复操作指南 2025-06-10
- 个人网站服务器域名解析设置指南:从购买到绑定全流程 2025-06-10
- 个人网站搭建:如何挑选具有弹性扩展能力的服务器? 2025-06-10
- 个人服务器网站搭建:如何选择适合自己的建站程序或框架? 2025-06-10