简介:
最近花了些时间看了googlemap官方文件并集成到国际版app中,网上关于googlemap for ios的讲解相对android来说少一点,比较有帮助的几乎全是英文文档。下面是我开发过程中遇到的坑、以及采用的解决方法。
集成googlemap步骤:
- 1、cocoapods导入pod 'googlemaps'
- 2、获取api密匙(前提是已经在googlemapsdk中创建好自己的应用)
- 3、配置plist文件搭建定位环境
- 4、调用代理方法实现需求
tips:pod 'googlemaps'、pod 'googleplaces'、pod 'googleplacepicker'这三个框架。(googlemaps:显示基本的定位功能;googleplaces:实现搜索功能,官方文档叫做地点自动完成;googleplacepicker:是实现获取某个poi的的详细信息,比如名字、详细地址、路线等)
景点(poi)包括公园、学校和政府大楼,等等。 另外,如果地图类型为 kgmstypenormal,商家景点默认将显示在地图上。 商家景点表示商店、餐馆和酒店之类的商家。
按照 google places api 中的定义,一个 poi 对应于一个地点。 例如,休闲公园为景点,但喷泉之类的地点通常不属于景点(除非它们具有国家或历史意义)。
配置plist文件:
打开plist的代码源文件,输入:

定位:
一、在appdelegate 头文件 导入框架
#import
二、向您的 application:didfinishlaunchingwithoptions: 方法添加以下内容,使用我们刚才获取到的 api 密钥替代 your_api_key:
[gmsservices provideapikey:@"your_api_key"];
tips:这一步是在启动app的时候,googlemap准备代理工作。
三、在我们需要显示地图的控制器调用api方法
|
1
2
3
4
5
6
|
@property (nonatomic,strong) cllocationmanager *locationmanager;//地图定位对象
@property (nonatomic,strong) gmsmapview *mapview;//地图
@property (nonatomic,strong) gmsmarker *marker;//大头针
@property (nonatomic,strong) gmsplacesclient * placesclient;//可以获取某个地方的信息
//注册的代理
@interface testmapviewcontroller ()
|
tips:这是在控制器.h文件声明的属性。
(一)初始化一个地图对象
gmsmapview:是控制地图的外观类
gmscameraposition:是控制地图要显示的内容类
|
1
2
3
4
5
|
gmscameraposition *camera = [gmscameraposition camerawithlatitude:-23.12960481 longitude:113.30887721 zoom:level];
self.mapview = [gmsmapview mapwithframe:cgrectzero camera:camera];
self.mapview.delegate = self; //注册代理属性
self.mapview.settings.compassbutton = yes;//显示指南针
[self.view addsubview:self.mapview];
|
tips:上面的经纬度可以随便传一个,之后会获取到新的经纬度并更新位置
(二)初始化一个定位管理者对象
|
1
2
3
4
5
6
7
8
|
if (self.locationmanager == nil) {
self.locationmanager = [[cllocationmanager alloc]init];
}
self.locationmanager.delegate = self;
[self.locationmanager requestalwaysauthorization];//授权方式,如果在后台也需要定位,那就选择 requestalwaysauthorization。
self.locationmanager.desiredaccuracy = kcllocationaccuracybest;//最精确的定位
self.locationmanager.distancefilter = kcldistancefilternone; // 默认是kcldistancefilternone,也可以设置其他值,表示用户移动的距离小于该范围内就不会接收到通知
[self.locationmanager startupdatinglocation];
|
tips:cllocationmanager 是负责获取用户行为的类,列如获取用户当前位置信息。更多详细信息请阅览cllocationmanager。里面讲解cllocationmanager的一些应用场景并有代码实例。
运行app:这时候我们会看到并没有实景地图出来,原因是:前面提到的gmscameraposition类,我们并没有在定位成功之后将定位内容赋它。
gmscameraposition类,它是负责显示定位内容的。很重要!
(三)在定位成功的api代理方法中,获取经纬度并转成影像赋值
|
1
2
3
4
5
6
7
8
9
|
- (void)locationmanager:(cllocationmanager *)manager didupdatelocations:(nsarray *)locations{
cllocation *curlocation = [locations lastobject];
// 通过location 或得到当前位置的经纬度
cllocationcoordinate2d curcoordinate2d = curlocation.coordinate;
gmscameraposition *camera = [gmscameraposition camerawithlatitude:curcoordinate2d.latitude longitude:curcoordinate2d.longitude zoom:level];
cllocationcoordinate2d position2d = cllocationcoordinate2dmake(curlocation.coordinate.latitude, curlocation.coordinate.longitude);
self.mapview.camera = camera;//这句话很重要很重要,将我们获取到的经纬度转成影像并赋值给地图的camera属性
[self.locationmanager stopupdatinglocation];//定位成功后停止定位
}
|
tips:locationmanager: didupdatelocations: 代理方法是googlemap 中实现定位成功后回调的代理方法,你可以在这里获取到经纬度。
运行app:这时候地图就出来了
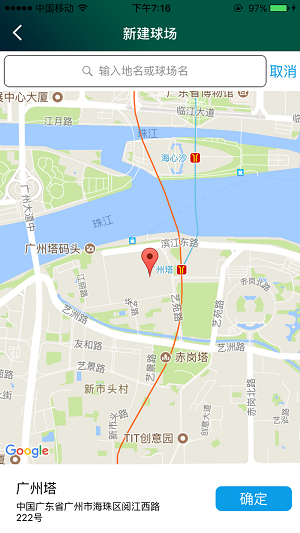
添加大头针
gmsmarker类是负责显示大头针,默认是红色,你可以自定义大头针,用图片或者改变颜色,具体看官方文档gmsmarker。
|
1
2
|
self.marker = [gmsmarker markerwithposition:position2d];
self.marker.map = self.mapview;
|
tips:position2d是在定位成功之后转换得到的cllocationcoordinate2d属性经纬度值。
小坑提示:这时候有可能会出现,定位成功之后出现多个大头针。原因是:进行定位的时候,map获取多个预测位置,从而产生生成多个大头针的现象。解决办法:在每次生成大头针之前先清除之前的那个,只生成最精准的最后一个。
|
1
2
|
[self.marker.map clear];
self.marker.map = nil;
|
反编码(经纬度转成具体位置):
|
1
2
3
4
5
6
7
8
9
10
11
12
|
clgeocoder *geocoder = [[clgeocoder alloc]init];
//反地理编码
[geocoder reversegeocodelocation:curlocation completionhandler:^(nsarray * _nullable placemarks, nserror * _nullable error) {
if (error) {
}else{
clplacemark *placemark = [placemarks objectatindex:0];//第一个位置是最精确的
//赋值详细地址
dlog(@"placemark---路号name:%@-市locality:%@-区sublocality:%@-省administrativearea:%@-路thoroughfare:%@",placemark.name,placemark.locality,placemark.sublocality,placemark.administrativearea,placemark.thoroughfare);
}];
|
这时候就已经可以获取到具体的国家、省、市、区、街道了。
补充:反编码是获取不到poi位置的(我获取不到)。这时候可以使用
|
1
2
3
4
5
6
7
8
9
10
11
12
13
14
15
16
17
18
|
self.placesclient = [gmsplacesclient sharedclient];//获取某个地点的具体信息
[self.placesclient currentplacewithcallback:^(gmsplacelikelihoodlist *likelihoodlist, nserror *error) {
if (error != nil) {
dlog(@"current place error %@", [error localizeddescription]);
return;
}
// for (gmsplacelikelihood *likelihood in likelihoodlist.likelihoods) {
// gmsplace* place = likelihood.place;
// nslog(@"current place name %@ at likelihood %g", place.name, likelihood.likelihood);
// nslog(@"current place address %@", place.formattedaddress);
// nslog(@"current place attributions %@", place.attributions);
// nslog(@"current placeid %@", place.placeid);
// }
//这里就可以获取到poi的名字了
//这里做一些你想做的事
}];
|
点击地图并移动大头针
这里是用到gmsmapviewdelegate的代理回调
回调1:这里是点击地图上的某个点api返回的代理方法,在这个代理方法,你可以获取经纬度去反编译地址
|
1
2
3
4
5
6
7
8
9
10
11
12
13
14
15
16
17
18
19
20
21
22
23
24
25
26
27
28
29
|
- (void)mapview:(gmsmapview *)mapview didtapatcoordinate:(cllocationcoordinate2d)coordinate{
//点击一次先清除上一次的大头针
[self.marker.map clear];
self.marker.map = nil;
// 通过location 或得到当前位置的经纬度
gmscameraposition *camera = [gmscameraposition camerawithlatitude:coordinate.latitude longitude:coordinate.longitude zoom:level];
cllocationcoordinate2d position2d = cllocationcoordinate2dmake(coordinate.latitude,coordinate.longitude);
self.mapview.camera = camera;
//大头针
self.marker = [gmsmarker markerwithposition:position2d];
self.marker.map = self.mapview;
cllocation *curlocation = [[cllocation alloc]initwithlatitude:coordinate.latitude longitude:coordinate.longitude];
clgeocoder *geocoder = [[clgeocoder alloc]init];
//反地理编码
[geocoder reversegeocodelocation:curlocation completionhandler:^(nsarray * _nullable placemarks, nserror * _nullable error) {
if (error) {
dlog(@"error.description:%@",error.description);
}else{
clplacemark *placemark = [placemarks objectatindex:0];
//赋值详细地址
dlog(@"placemark---路号name:%@-市locality:%@-区sublocality:%@-省administrativearea:%@-路thoroughfare:%@",placemark.name,placemark.locality,placemark.sublocality,placemark.administrativearea,placemark.thoroughfare);
}];
}
|
回调2:这里也是点击地图上的某个点api返回的代理方法
|
1
2
3
4
5
|
- (void)mapview:(gmsmapview *)mapview
didtappoiwithplaceid:(nsstring *)placeid
name:(nsstring *)name
location:(cllocationcoordinate2d)location{
}
|
tips:值得注意的,两者的区别是:第二个点击代理方法是当你点击poi的时候才会回调,会返回place的name、id、经纬度;第一个代理方法是只要点击地图任意一个位置就会回调,只会返回经纬度。也就是:每一次的点击,只会执行其中一个代理方法。
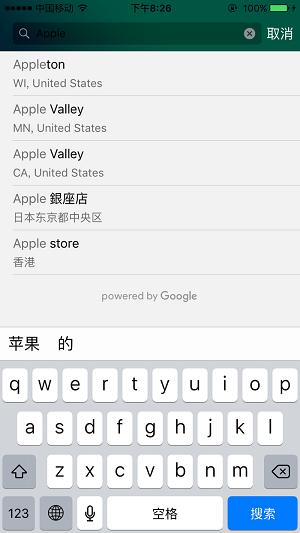
搜索:
搜索功能在官方文档是叫做“自动完成”,即你输入一部分的文本,googlemap会根据你的文本预测出地点并自动填充返回,具体请看官方文档自动完成
效果如图:
这里你需要做的步骤跟做“定位”的一样:
(1)获取apikey
(2) 在application:didfinishlaunchingwithoptions: 注册密匙
1[gmsplacesclient provideapikey:@"your_api_key"];
(3) 创建搜索ui并调用代理方法获取api自动填充的结果数组集
小坑提示: gmsplacesclient跟gmsservices的密匙是不一样的,密匙不对的话,会出现反复调用
viewcontroller:didfailautocompletewitherror:的现象。
tips:搭建搜索ui又几种方式:1)搜索框直接创建在导航栏 2)搜索栏创建在视图顶部 3)自定义。根据你的需求用代码~
(一)这里是第一种方式(搜索框直接创建在导航栏):
|
1
2
3
|
gmsautocompleteviewcontroller *accontroller = [[gmsautocompleteviewcontroller alloc] init];
accontroller.delegate = self;
[self presentviewcontroller:accontroller animated:yes completion:nil];
|
tips:这里就可以直接往搜索框编辑文字,api会直接给你返回搜索结果集合
(二)调用api代理方法:
|
1
2
3
4
5
6
7
8
9
10
11
12
13
14
15
16
17
18
|
// handle the user's selection. 这是用户选择搜索中的某个地址后返回的结果回调方法
- (void)viewcontroller:(gmsautocompleteviewcontroller *)viewcontroller
didautocompletewithplace:(gmsplace *)place {
[self dismissviewcontrolleranimated:yes completion:nil];
[self.marker.map clear];
self.marker.map = nil;
// 通过location 或得到当前位置的经纬度
gmscameraposition *camera = [gmscameraposition camerawithlatitude:place.coordinate.latitude longitude:place.coordinate.longitude zoom:level];
cllocationcoordinate2d position2d = cllocationcoordinate2dmake(place.coordinate.latitude,place.coordinate.longitude);
self.marker = [gmsmarker markerwithposition:position2d];
self.mapview.camera = camera;
self.marker.map = self.mapview;
self.locationlabel.text = place.name;
self.locationdetaillabel.text = place.formattedaddress;
}
|
tips:这个代理方法实现的是,当用户在搜索集中选择了在某一个结果返回地图,并定位添加大头针。
自动填充失败的回调:
|
1
2
3
4
5
6
|
- (void)viewcontroller:(gmsautocompleteviewcontroller *)viewcontroller
didfailautocompletewitherror:(nserror *)error {
[self dismissviewcontrolleranimated:yes completion:nil];
// todo: handle the error.
dlog(@"error: %@", [error description]);
}
|
tips:自动填充失败后你可以在这里做一些事,默认是不管的。
补充:搜索栏的外观是可以自定义的,你可以设置成跟自己的app一样的风格~具体请看设置 ui 控件样式属性
到这里,搜索功能就算完成了。

相关文章


- 64M VPS建站:怎样选择合适的域名和SSL证书? 2025-06-10
- 64M VPS建站:怎样优化以提高网站加载速度? 2025-06-10
- 64M VPS建站:是否适合初学者操作和管理? 2025-06-10
- ASP.NET自助建站系统中的用户注册和登录功能定制方法 2025-06-10
- ASP.NET自助建站系统的域名绑定与解析教程 2025-06-10