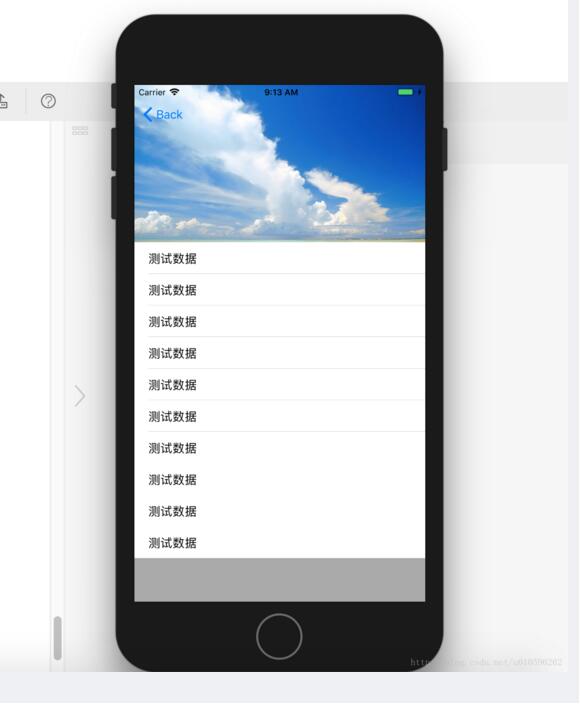
本文实例为大家分享了ios实现头部拉伸效果展示的具体代码,供大家参考,具体内容如下
主要涉及到导航栏透明度、图片拉伸、列表头部等。
- 导航栏透明度的实现。
- 列表拖动距离的监听,及图片放大的实现。
导航透明度的设置
添加系统导航栏的category实现
声明部分:
?

|
1
2
3
|
@interface uinavigationbar (backgroundcolor)
- (void)lt_setbackgroundcolor:(uicolor *)color;
@end
|
实现部分:
?
|
1
2
3
4
5
6
7
8
9
10
11
12
13
14
15
16
17
18
19
20
21
22
23
24
25
26
27
28
|
#import <objc/runtime.h>
@implementation uinavigationbar (backgroundcolor)
static char overlaykey;
- (uiview *)overlay
{
return objc_getassociatedobject(self, &overlaykey);
}
- (void)setoverlay:(uiview *)overlay
{
objc_setassociatedobject(self, &overlaykey, overlay, objc_association_retain_nonatomic);
}
- (void)lt_setbackgroundcolor:(uicolor *)color
{
if (!self.overlay) {
[self setbackgroundimage:[uiimage new] forbarmetrics:uibarmetricsdefault];
// insert an overlay into the view hierarchy
self.overlay = [[uiview alloc] initwithframe:cgrectmake(0, -20, [uiscreen mainscreen].bounds.size.width, self.bounds.size.height + 20)];
self.overlay.autoresizingmask = uiviewautoresizingflexiblewidth|uiviewautoresizingflexibleheight;
[self insertsubview:self.overlay atindex:0];
}
self.overlay.backgroundcolor = color;
}
@end
|
监听列表拖动及实现图片放大
主要是监听滚动的距离(scrollviewdidscroll:方法)
?
|
1
2
3
4
5
6
7
8
9
10
11
12
13
14
15
16
17
18
19
20
21
22
23
24
25
26
27
28
29
30
31
32
33
34
35
36
37
38
39
40
41
42
43
44
45
46
47
48
49
50
51
52
53
54
55
56
57
58
59
60
61
62
63
64
65
66
67
68
69
70
71
72
73
74
75
76
77
78
79
80
81
82
83
84
85
86
87
88
89
90
91
92
93
94
95
96
97
98
99
100
101
102
103
104
105
106
107
|
#import "stretchviewcontroller.h"
#import "uinavigationbar+backgroundcolor.h"
// 背景图片的宽高比例
#define ratio 0.8
@interface stretchviewcontroller () <uitableviewdelegate, uitableviewdatasource>
// 可放大的背景图片
@property (nonatomic, strong) uiimageview *bgview;
// 记录原始大小
@property (assign) cgrect originalframe;
@property (nonatomic, strong) uitableview *tableview;
@end
@implementation stretchviewcontroller
- (void)viewwillappear:(bool)animated
{
[super viewwillappear:animated];
//[self.navigationcontroller setnavigationbarhidden:yes animated:animated];
//self.navigationcontroller.navigationbar.tintcolor = [uicolor whitecolor];
//self.navigationcontroller.navigationbar.bartintcolor = [uicolor clearcolor];
//self.navigationcontroller.navigationbar.backgroundcolor = [uicolor clearcolor];
// 设置导航栏底部分割线为透明
[self.navigationcontroller.navigationbar setshadowimage:[uiimage new]];
}
- (void)viewdidload {
[super viewdidload];
// 设置全透明
[self.navigationcontroller.navigationbar lt_setbackgroundcolor:[[uicolor greencolor] colorwithalphacomponent:0]];
// do any additional setup after loading the view.
self.view.backgroundcolor = [uicolor lightgraycolor];
self.bgview = [[uiimageview alloc] initwithframe:cgrectmake(0, 0, self.view.bounds.size.width, self.view.bounds.size.width*ratio)];
self.bgview.image = [uiimage imagenamed:@"bg-mine"];
self.originalframe = self.bgview.frame;
[self.view addsubview:self.bgview];
self.tableview = [[uitableview alloc] initwithframe:cgrectmake(0, 64, self.view.bounds.size.width, self.view.bounds.size.height-64) style:uitableviewstyleplain];
self.tableview.backgroundcolor = [uicolor clearcolor];
self.tableview.showsverticalscrollindicator = no;
self.tableview.delegate = self;
self.tableview.datasource = self;
// 1. contentinset
//table.contentinset = uiedgeinsetsmake(160, 0, 0, 0);
// 2. heatview
uiview *headview = [[uiview alloc] initwithframe:cgrectmake(0, 0, self.view.bounds.size.width, 160)];
headview.backgroundcolor = [uicolor clearcolor];
self.tableview.tableheaderview = headview;
[self.view addsubview:self.tableview];
}
- (nonnull uitableviewcell *)tableview:(nonnull uitableview *)tableview cellforrowatindexpath:(nonnull nsindexpath *)indexpath {
uitableviewcell *cell = [tableview dequeuereusablecellwithidentifier:@"cellidentifier"];
if (cell == nil) {
cell = [[uitableviewcell alloc] initwithstyle:uitableviewcellstylevalue1 reuseidentifier:@"cellidentifier"];
}
cell.textlabel.text = @"测试数据";
return cell;
}
- (nsinteger)tableview:(nonnull uitableview *)tableview numberofrowsinsection:(nsinteger)section {
return 10;
}
- (void)scrollviewdidscroll:(uiscrollview *)scrollview
{
cgfloat yoffset = scrollview.contentoffset.y; // 向上滑动,offset是增加的;向下滑动,是减少的
if (yoffset < 160) { // 当滑动到导航栏底部时
cgfloat coloralpha = yoffset/160;
// self.navigationcontroller.navigationbar.backgroundcolor = [[uicolor whitecolor] colorwithalphacomponent:coloralpha];
[self.navigationcontroller.navigationbar lt_setbackgroundcolor:[[uicolor whitecolor] colorwithalphacomponent:coloralpha]];
} else { // 超过导航栏底部了
[self.navigationcontroller.navigationbar lt_setbackgroundcolor:[uicolor whitecolor]];
}
// 往上滑动效果、处理放大效果
if (yoffset > 0) {
self.bgview.frame = ({
cgrect frame = self.bgview.frame;
frame.origin.y = self.originalframe.origin.y - yoffset;
frame;
});
} else { // 往下移动,放大效果
self.bgview.frame = ({
cgrect frame = self.originalframe;
frame.size.height = self.originalframe.size.height - yoffset;
frame.size.width = frame.size.height/ratio;
//
frame.origin.x = self.originalframe.origin.x - (frame.size.width - self.originalframe.size.width)/2;
frame;
});
}
}
@end
|
以上是对系统原生的导航栏进行透明度设置。
也可进行自定义视图设置为导航栏
效果如下:
以上就是本文的全部内容,希望对大家的学习有所帮助,也希望大家多多支持快网idc。

相关文章


猜你喜欢
- 64M VPS建站:是否适合初学者操作和管理? 2025-06-10
- ASP.NET自助建站系统中的用户注册和登录功能定制方法 2025-06-10
- ASP.NET自助建站系统的域名绑定与解析教程 2025-06-10
- 个人服务器网站搭建:如何选择合适的服务器提供商? 2025-06-10
- ASP.NET自助建站系统中如何实现多语言支持? 2025-06-10