滚动视图分页
uiscrollview的pagingenabled属性用于控制是否按分页进行滚动。在一些应用中会应用到这一个特性,最典型的就是手机桌面的应用图标列表。这些界面中往往每一页功能都比较独立,系统也提供了uipageviewcontroller来实现这种分页滚动的功能。
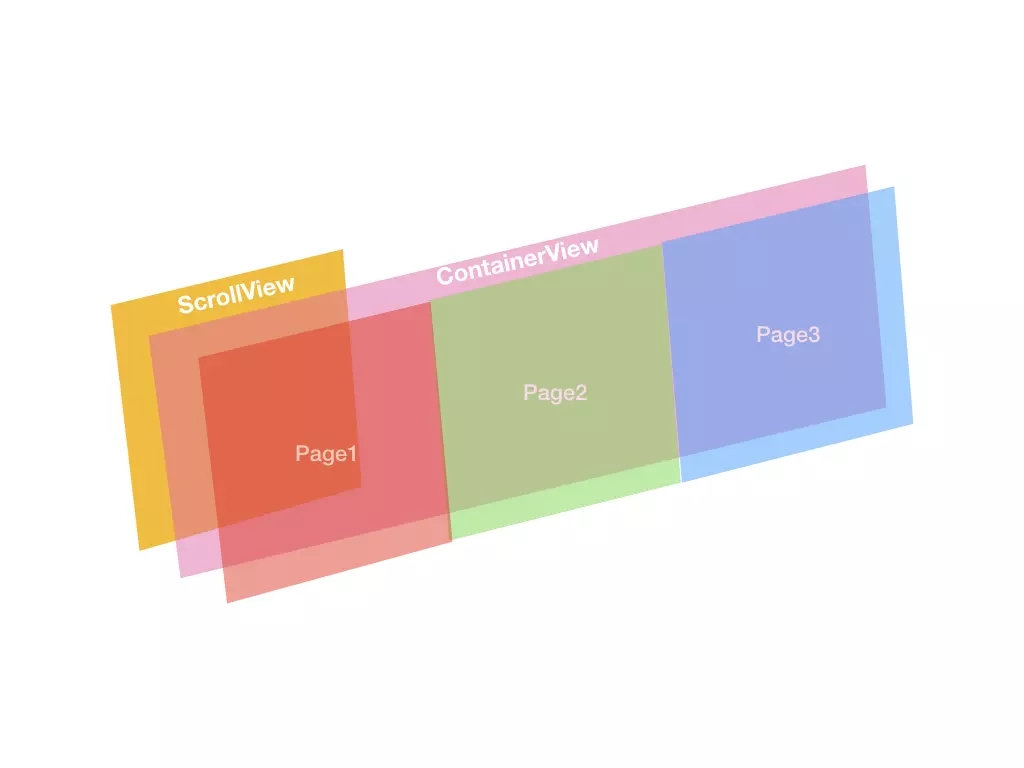
实现分页滚动的ui实现一般是最外层一个uiscrollview。然后uiscrollview里面是一个总体的容器视图containerview。容器视图添加n个页视图,对于水平分页滚动来说容器视图的高度和滚动视图一样,而宽度则是滚动视图的宽度乘以页视图的数量,页视图的尺寸则和滚动视图保持一致,对于垂直分页滚动来说容器视图的宽度和滚动视图一样,而高度则是滚动视图的高度乘以页视图的数量,页视图的尺寸则和滚动视图保持一致。每个页视图中在添加各自的条目视图。
整体效果图如下:
autolayout实现分页滚动的方法
根据上面的ui结构这里用autolayout的代码来实现水平分页的滚动。这里的约束设置代码是ios9以后提供的相关api。
|
1
2
3
4
5
6
7
8
9
10
11
12
13
14
15
16
17
18
19
20
21
22
23
24
25
26
27
28
29
30
31
32
33
34
35
36
37
38
39
40
41
42
43
44
45
46
47
48
49
50
51
52
53
54
55
56
57
58
|
- (void)loadview {
uiscrollview *scrollview = [[uiscrollview alloc] init];
if (@available(ios 11.0, *)) {
scrollview.contentinsetadjustmentbehavior = uiscrollviewcontentinsetadjustmentnever;
} else {
// fallback on earlier versions
}
scrollview.pagingenabled = yes;
scrollview.backgroundcolor = [uicolor whitecolor];
self.view = scrollview;
//建立容器视图
uiview *containerview = [uiview new];
containerview.translatesautoresizingmaskintoconstraints = no;
[scrollview addsubview:containerview];
//设置容器的四个边界和滚动视图保持一致的约束。
[containerview.leftanchor constraintequaltoanchor:scrollview.leftanchor].active = yes;
[containerview.topanchor constraintequaltoanchor:scrollview.topanchor].active = yes;
[containerview.rightanchor constraintequaltoanchor:scrollview.rightanchor].active = yes;
[containerview.bottomanchor constraintequaltoanchor:scrollview.bottomanchor].active = yes;
//容器视图的高度和滚动视图保持一致。
[containerview.heightanchor constraintequaltoanchor:scrollview.heightanchor].active = yes;
//添加页视图
nsarray<uicolor*> *colors = @[[uicolor redcolor],[uicolor greencolor], [uicolor bluecolor]];
nsmutablearray<uiview*> *pageviews = [nsmutablearray arraywithcapacity:colors.count];
nslayoutxaxisanchor *prevleftanchor = containerview.leftanchor;
for (int i = 0; i < colors.count; i++)
{
//建立页视图
uiview *pageview = [uiview new];
pageview.backgroundcolor = colors[i];
pageview.translatesautoresizingmaskintoconstraints = no;
[containerview addsubview:pageview];
//页视图分别从左往右排列,第1页的左边约束是容器视图的左边,其他页的左边约束则是前面兄弟视图的右边。
[pageview.leftanchor constraintequaltoanchor:prevleftanchor].active = yes;
//每页的顶部约束是容器视图。
[pageview.topanchor constraintequaltoanchor:containerview.topanchor].active = yes;
//每页的宽度约束是滚动视图
[pageview.widthanchor constraintequaltoanchor:scrollview.widthanchor].active = yes;
//每页的高度约束是滚动视图
[pageview.heightanchor constraintequaltoanchor:scrollview.heightanchor].active = yes;
prevleftanchor = pageview.rightanchor;
[pageviews addobject:pageview];
}
//关键的一步,如果需要左右滚动则将容器视图中的最右部子视图这里是b的右边边界依赖于容器视图的右边边界。
[pageviews.lastobject.rightanchor constraintequaltoanchor:containerview.rightanchor].active = yes;
//这里可以为每个页视图添加不同的条目视图,具体实现大家自行添加代码吧。
}
|
下面是运行时的效果图:

mylayout实现分页滚动的方法
你也可以用MyLayout布局库来实现分页滚动的能力。mylayout布局库是笔者开源的一套功能强大的ui布局库。
您可以从github地址:github.com/youngsoft/M…下载或者从podfile中导入:
|
1
|
pod 'mylayout'
|
来使用mylayout。下面是具体用mylayout来实现分页滚动的代码。
|
1
2
3
4
5
6
7
8
9
10
11
12
13
14
15
16
17
18
19
20
21
22
23
24
25
26
27
28
29
30
31
32
33
34
35
36
37
38
39
40
41
42
43
44
45
46
|
//
#import <mylayout.h>
- (void)loadview {
uiscrollview *scrollview = [[uiscrollview alloc] init];
if (@available(ios 11.0, *)) {
scrollview.contentinsetadjustmentbehavior = uiscrollviewcontentinsetadjustmentnever;
} else {
// fallback on earlier versions
}
scrollview.pagingenabled = yes;
scrollview.backgroundcolor = [uicolor whitecolor];
self.view = scrollview;
//建立一个水平线性布局容器视图
mylinearlayout *containerview = [mylinearlayout linearlayoutwithorientation:myorientation_horz];
containerview.myvertmargin = 0; //水平线性布局的上下边界和滚动视图保持一致,这里也会确定线性布局的高度。
containerview.gravity = mygravity_vert_fill | mygravity_horz_fill; //设置线性布局中的所有子视图均分和填充线性布局的高度和宽度。
[scrollview addsubview:containerview];
//添加页视图
nsarray<uicolor*> *colors = @[[uicolor redcolor],[uicolor greencolor], [uicolor bluecolor]];
nsmutablearray<uiview*> *pageviews = [nsmutablearray arraywithcapacity:colors.count];
for (int i = 0; i < colors.count; i++)
{
//建立页视图
uiview *pageview = [uiview new];
pageview.backgroundcolor = colors[i];
[containerview addsubview:pageview];
//因为线性布局通过属性gravity的设置就可以确定子页视图的高度和宽度,再加上线性布局的特性,所以页视图不需要设置任何附加的约束。
[pageviews addobject:pageview];
}
//关键的一步, 设置线性布局的宽度是滚动视图的倍数
containerview.widthsize.equalto(scrollview.widthsize).multiply(colors.count);
//这里可以为每个页视图添加不同的条目视图,具体实现大家自行添加代码吧。
}
|
mylayout实现桌面的图标列表分页功能
mylayout中的流式布局myflowlayout所具备的能力和flex-box相似,甚至有些特性要强于后者。流式布局用于一些子视图有规律排列的场景,就比如本例子中的滚动分页的图标列表的能力。下面就是具体的实现代码。
|
1
2
3
4
5
6
7
8
9
10
11
12
13
14
15
16
17
18
19
20
21
22
23
24
25
26
27
28
29
30
31
32
33
34
35
36
37
38
39
40
|
- (void)loadview {
uiscrollview *scrollview = [[uiscrollview alloc] init];
if (@available(ios 11.0, *)) {
scrollview.contentinsetadjustmentbehavior = uiscrollviewcontentinsetadjustmentnever;
} else {
// fallback on earlier versions
}
scrollview.pagingenabled = yes;
scrollview.backgroundcolor = [uicolor whitecolor];
self.view = scrollview;
//建立一个垂直数量约束流式布局:每列展示3个子视图,每页展示9个子视图,整体从左往右滚动。
myflowlayout *containerview = [myflowlayout flowlayoutwithorientation:myorientation_vert arrangedcount:3];
containerview.pagedcount = 9; //pagedcount设置为非0时表示开始分页展示的功能,这里表示每页展示9个子视图,这个数量必须是arrangedcount的倍数。
containerview.wrapcontentwidth = yes; //设置布局视图的宽度由子视图包裹,当垂直流式布局的这个属性设置为yes,并和pagedcount搭配使用会产生分页从左到右滚动的效果。
containerview.myvertmargin = 0; //容器视图的高度和滚动视图保持一致。
containerview.subviewhspace = 10;
containerview.subviewvspace = 10; //设置子视图的水平和垂直间距。
containerview.padding = uiedgeinsetsmake(5, 5, 5, 5); //布局视图的内边距设置。
[scrollview addsubview:containerview];
//建立条目视图
for (int i = 0; i < 40; i++)
{
uilabel *label = [uilabel new];
label.textalignment = nstextalignmentcenter;
label.backgroundcolor = [uicolor greencolor];
label.text = [nsstring stringwithformat:@"%d",i];
[containerview addsubview:label];
}
//获取流式布局的横屏size classes,并且设置设备处于横屏时,每排数量由3个变为6个,每页的数量由9个变为18个。
myflowlayout *containerviewsc = [containerview fetchlayoutsizeclass:mysizeclass_landscape copyfrom:mysizeclass_wany | mysizeclass_hany];
containerviewsc.arrangedcount = 6;
containerviewsc.pagedcount = 18;
|
从上面的代码可以看出要实现分页滚动的图标列表的能力,主要是对充当容器视图的流式布局设置一些属性即可,不需要为条目设置任何约束,而且还支持横竖屏下每页的不同数量的展示能力。整个功能代码量少,对比用uicollectionview来实现相同的功能要简洁和容易得多。下面是程序运行的效果:
横竖屏切换
对于带有分页功能的滚动视图来说,当需要支持横竖屏时就有可能会出现横竖屏切换时界面停留在两个页面中间而不是按页进行滚动的效果。其原因是无论是分页滚动还是不分页滚动,在滚动时都是通过调整滚动视图的contentoffset来实现的。而当滚动视图进行横竖屏切换时不会调整对应的contentoffset值,这样就导致了在屏幕方向切换时的滚动位置出现异常。解决的办法就是在屏幕滚动时的相应回调处理方法中修正这个contentoffset的值来解决这个问题。比如我们可以在屏幕切换的sizeclass变化的视图控制器的协议方法中添加如下代码:
|
1
2
3
4
5
6
7
8
9
10
11
12
13
14
15
16
17
|
- (void)traitcollectiondidchange:(nullable uitraitcollection *)previoustraitcollection
{
[super traitcollectiondidchange:previoustraitcollection];
uiscrollview *scrollview = (uiscrollview*)self.view;
//根据当前的contentoffset调整到正确的contentoffset
int pageindex = scrollview.contentoffset.x / scrollview.frame.size.width;
int pages = scrollview.contentsize.width / scrollview.frame.size.width;
if (pageindex >= pages)
pageindex = pages - 1;
if (pageindex < 0)
pageindex = 0;
scrollview.contentoffset = cgpointmake(pageindex * scrollview.frame.size.width, scrollview.contentoffset.y);
}
|
总结
以上就是这篇文章的全部内容了,希望本文的内容对大家的学习或者工作具有一定的参考学习价值,谢谢大家对快网idc的支持。

相关文章


- 64M VPS建站:是否适合初学者操作和管理? 2025-06-10
- ASP.NET自助建站系统中的用户注册和登录功能定制方法 2025-06-10
- ASP.NET自助建站系统的域名绑定与解析教程 2025-06-10
- 个人服务器网站搭建:如何选择合适的服务器提供商? 2025-06-10
- ASP.NET自助建站系统中如何实现多语言支持? 2025-06-10