前言
项目有个需求:裁剪图片,针对头像,下面是要求:
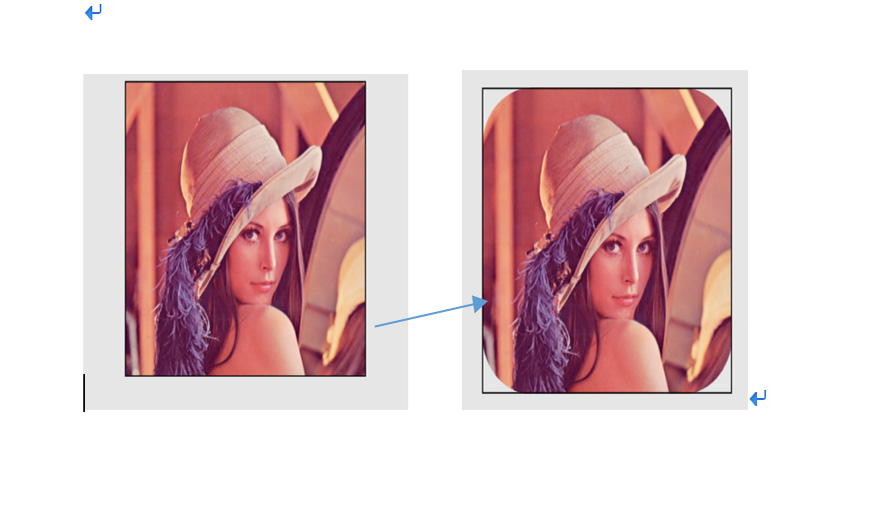
大家可以看到这张图片的圆角已经去除,下面说说我在项目利用了两种方式实现此裁剪以及查看技术文档发现更高效裁剪方式,下面一一讲解:看下来大约需要15-20分钟。
在公共类中util类中创建类方法
1.cgcontext裁剪
|
1
2
|
//cgcontext裁剪
+ (uiimage *)cgcontextclip:(uiimage *)img cornerradius:(cgfloat)c;
|
实现该方法:
|
1
2
3
4
5
6
7
8
9
10
11
12
13
14
15
16
17
18
19
20
21
22
23
24
25
26
|
// cgcontext 裁剪
+ (uiimage *)cgcontextclip:(uiimage *)img cornerradius:(cgfloat)c{
int w = img.size.width * img.scale;
int h = img.size.height * img.scale;
uigraphicsbeginimagecontextwithoptions(cgsizemake(w, h), false, 1.0);
cgcontextref context = uigraphicsgetcurrentcontext();
cgcontextmovetopoint(context, 0, c);
cgcontextaddarctopoint(context, 0, 0, c, 0, c);
cgcontextaddlinetopoint(context, w-c, 0);
cgcontextaddarctopoint(context, w, 0, w, c, c);
cgcontextaddlinetopoint(context, w, h-c);
cgcontextaddarctopoint(context, w, h, w-c, h, c);
cgcontextaddlinetopoint(context, c, h);
cgcontextaddarctopoint(context, 0, h, 0, h-c, c);
cgcontextaddlinetopoint(context, 0, c);
cgcontextclosepath(context);
// 先裁剪 context,再画图,就会在裁剪后的 path 中画
cgcontextclip(context);
[img drawinrect:cgrectmake(0, 0, w, h)]; // 画图
cgcontextdrawpath(context, kcgpathfill);
uiimage *ret = uigraphicsgetimagefromcurrentimagecontext();
uigraphicsendimagecontext();
return ret;
}
|
在该需要的地方调用如下:
|
1
|
[util cgcontextclip:image cornerradius:radius];
|
2.uibezierpath 裁剪
在util.h类中声明
|
1
2
|
//uibezierpath 裁剪
+ (uiimage *)uibezierpathclip:(uiimage *)img cornerradius:(cgfloat)c;
|
在util.m实现方法
|
1
2
3
4
5
6
7
8
9
10
11
12
13
|
//uibezierpath 裁剪
+ (uiimage *)uibezierpathclip:(uiimage *)img cornerradius:(cgfloat)c{
int w = img.size.width * img.scale;
int h = img.size.height * img.scale;
cgrect rect = cgrectmake(0, 0, w, h);
uigraphicsbeginimagecontextwithoptions(cgsizemake(w, h), false, 1.0);
[[uibezierpath bezierpathwithroundedrect:rect cornerradius:c] addclip];
[img drawinrect:rect];
uiimage *ret = uigraphicsgetimagefromcurrentimagecontext();
uigraphicsendimagecontext();
return ret;
}
|
3.空域处理的办法,写个裁剪圆角的算法
对于图像上的一个点(x, y),判断其在不在圆角矩形内,在的话 alpha 是原值,不在的话 alpha 设为 0 即可
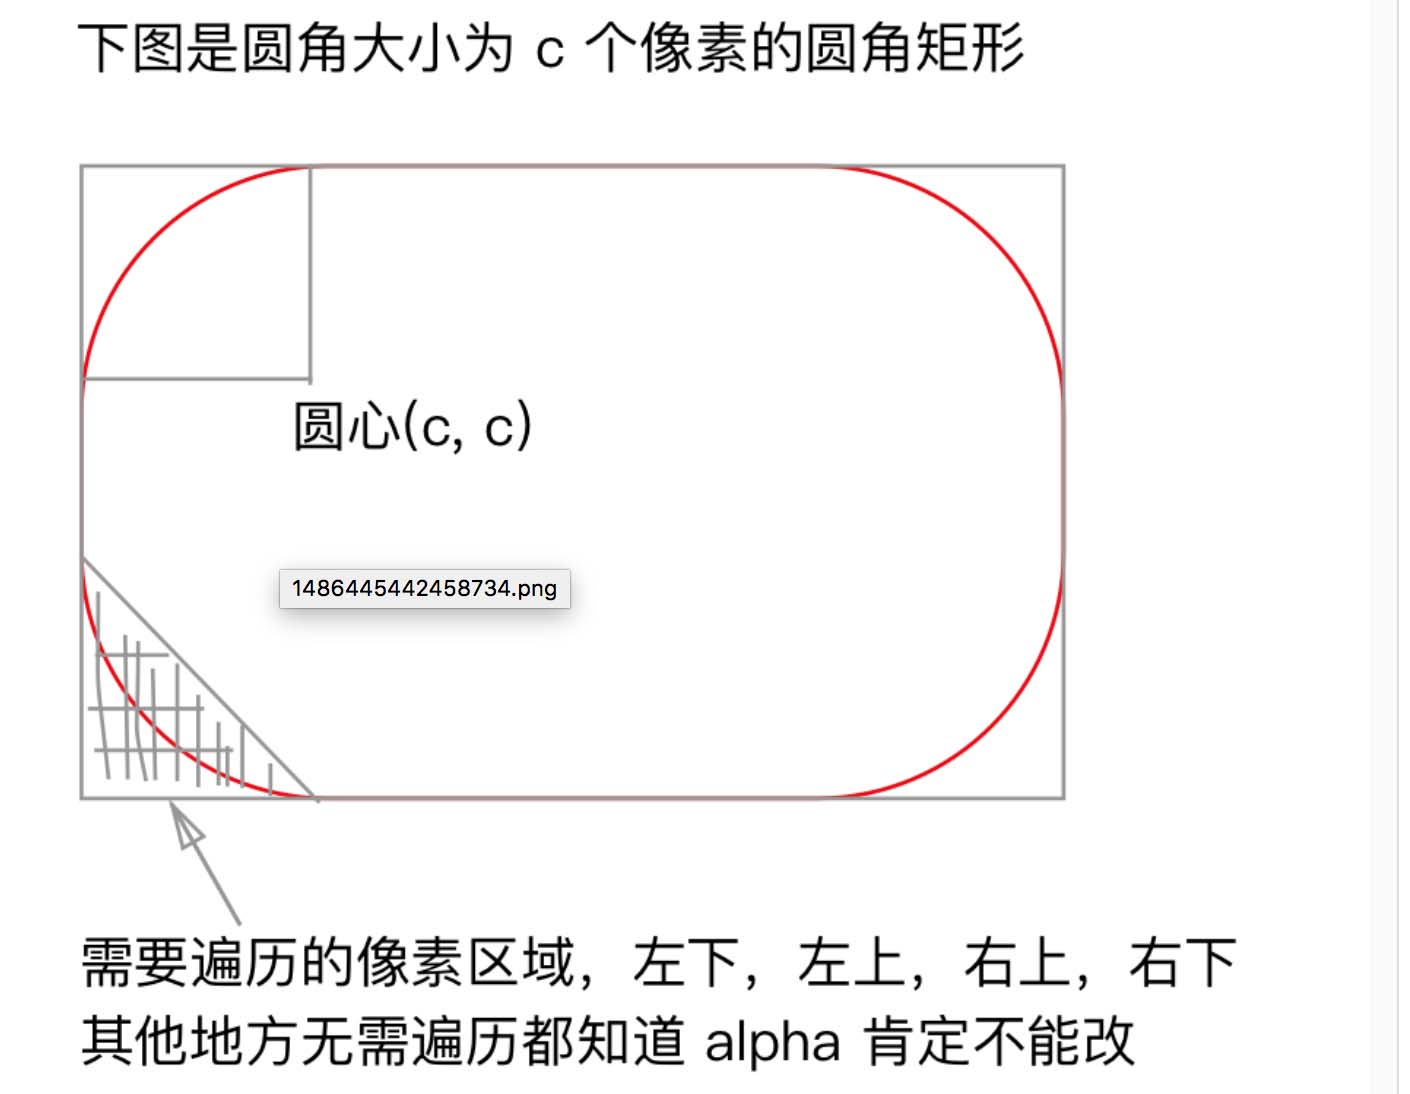
遍历所有像素,判断每个像素在不在4个圆的圆内就行了,4个角,每个角有一个四分之一的圆。
一个优化就是,我不需要遍历全部的像素就能裁出圆角,只需要考虑类似左下角三角形的区域就行了,左下,左上,右上,右下,一共4个三角形区域(另外3个图中没画出),for循环的时候,就循环这个4个三角形区域就行了。
所以对于一幅 w * h 的图像,设圆角大小为 n,n <= min(w, h) / 2,其复杂度为 o(n) = 2(n^2),最坏的情况计算量也不会超过 wh / 2。
对于一个像素点(x, y),判断其在不在圆内的公式:
如果 (x-cx)^2 + (y-cy)^2 <= r^2 就表示点 (x, y) 在圆内,反之不在。通过测试:此算法效率可以提高几倍之上(时间)
在util.h中声明:
|
1
|
+ (uiimage *)dealimage:(uiimage *)img cornerradius:(cgfloat)c
|
在util.m中实现:
|
1
2
3
4
5
6
7
8
9
10
11
12
13
14
15
16
17
18
19
20
21
22
23
24
25
26
27
28
29
30
31
32
33
34
35
36
37
38
39
40
41
42
43
44
45
46
47
48
49
50
51
52
53
54
55
56
57
58
59
60
61
62
63
64
65
66
67
68
69
70
71
72
73
74
75
76
77
78
79
80
81
82
83
84
85
86
87
88
89
90
91
92
93
94
95
96
97
98
99
100
101
|
+ (uiimage *)dealimage:(uiimage *)img cornerradius:(cgfloat)c {
// 1.cgdataproviderref 把 cgimage 转 二进制流
cgdataproviderref provider = cgimagegetdataprovider(img.cgimage);
void *imgdata = (void *)cfdatagetbyteptr(cgdataprovidercopydata(provider));
int width = img.size.width * img.scale;
int height = img.size.height * img.scale;
// 2.处理 imgdata
// dealimage(imgdata, width, height);
cornerimage(imgdata, width, height, c);
// 3.cgdataproviderref 把 二进制流 转 cgimage
cgdataproviderref pv = cgdataprovidercreatewithdata(null, imgdata, width * height * 4, releasedata);
cgimageref content = cgimagecreate(width , height, 8, 32, 4 * width, cgcolorspacecreatedevicergb(), kcgbitmapbyteorder32big | kcgimagealphapremultipliedlast, pv, null, true, kcgrenderingintentdefault);
uiimage *result = [uiimage imagewithcgimage:content];
cgdataproviderrelease(pv); // 释放空间
cgimagerelease(content);
return result;
}
void releasedata(void *info, const void *data, size_t size) {
free((void *)data);
}
// 在 img 上处理图片, 测试用
void dealimage(uint32 *img, int w, int h) {
int num = w * h;
uint32 *cur = img;
for (int i=0; i<num; i++, cur++) {
uint8 *p = (uint8 *)cur;
// rgba 排列
// f(x) = 255 - g(x) 求负片
p[0] = 255 - p[0];
p[1] = 255 - p[1];
p[2] = 255 - p[2];
p[3] = 255;
}
}
// 裁剪圆角
void cornerimage(uint32 *const img, int w, int h, cgfloat cornerradius) {
cgfloat c = cornerradius;
cgfloat min = w > h ? h : w;
if (c < 0) { c = 0; }
if (c > min * 0.5) { c = min * 0.5; }
// 左上 y:[0, c), x:[x, c-y)
for (int y=0; y<c; y++) {
for (int x=0; x<c-y; x++) {
uint32 *p = img + y * w + x; // p 32位指针,rgba排列,各8位
if (iscircle(c, c, c, x, y) == false) {
*p = 0;
}
}
}
// 右上 y:[0, c), x:[w-c+y, w)
int tmp = w-c;
for (int y=0; y<c; y++) {
for (int x=tmp+y; x<w; x++) {
uint32 *p = img + y * w + x;
if (iscircle(w-c, c, c, x, y) == false) {
*p = 0;
}
}
}
// 左下 y:[h-c, h), x:[0, y-h+c)
tmp = h-c;
for (int y=h-c; y<h; y++) {
for (int x=0; x<y-tmp; x++) {
uint32 *p = img + y * w + x;
if (iscircle(c, h-c, c, x, y) == false) {
*p = 0;
}
}
}
// 右下 y~[h-c, h), x~[w-c+h-y, w)
tmp = w-c+h;
for (int y=h-c; y<h; y++) {
for (int x=tmp-y; x<w; x++) {
uint32 *p = img + y * w + x;
if (iscircle(w-c, h-c, c, x, y) == false) {
*p = 0;
}
}
}
}
// 判断点 (px, py) 在不在圆心 (cx, cy) 半径 r 的圆内
static inline bool iscircle(float cx, float cy, float r, float px, float py) {
if ((px-cx) * (px-cx) + (py-cy) * (py-cy) > r * r) {
return false;
}
return true;
}
// 其他图像效果可以自己写函数,然后在 dealimage: 中调用 otherimage 即可
void otherimage(uint32 *const img, int w, int h) {
// 自定义处理
}
|
上面是三种方式,可以解决图片裁剪的需求,
总结
以上就是这篇文章的全部内容了,希望本文的内容对大家的学习或者工作具有一定的参考学习价值,如果有疑问大家可以留言交流,谢谢大家对快网idc的支持。

相关文章


- ASP.NET本地开发时常见的配置错误及解决方法? 2025-06-10
- ASP.NET自助建站系统的数据库备份与恢复操作指南 2025-06-10
- 个人网站服务器域名解析设置指南:从购买到绑定全流程 2025-06-10
- 个人网站搭建:如何挑选具有弹性扩展能力的服务器? 2025-06-10
- 个人服务器网站搭建:如何选择适合自己的建站程序或框架? 2025-06-10