背景
最近在研究ios无埋点统计技术,我们的统计sdk主要分两部分:点击事件和网络请求。统计所有的点击事件是采用method swizzling实现的,可以做到使用中不需要一行代码实现统计所有事件,具体细节将来我会专门抽几篇文章介绍。
今天主要说说如何统计app中的所有网络请求。公司网络请求如果不是静态库或者框架,很容易想到在网络请求发送和返回时添加统计的代码。如何在不修改原来代码(或者修改最少)的基础上拦截所有的请求呢,能不能从系统层面上拦截回调呢?答案是肯定的,苹果有一个黑魔法nsurlprotocol。
介绍
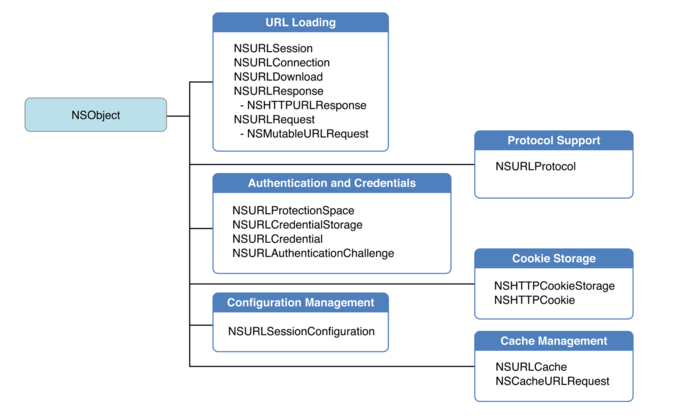
nsurlprotocol是ios url loading system中的一部分,看起来像是一个协议,但其实这是一个类,而且必须使用该类的子类,并且需要被注册。先看看他在url loading system中的位置:
使用场景
不管是uiwebview还是urlsession还是第三方的afnetworkong、alamofire或者sdwebimage他们都是基于urlsession或者nsurlconnection来实现的,因此可以通过nsurlprotocol做自定义操作。
实现
首先要继承nsurlprotocol创建自定义的类,然后重写startloading、stoploading添加我们的统计代码就可以了:
|
1
2
3
|
static nsstring * const hasinitkey = @"llmarkerprotocolkey";
@interface llmarkerurlprotocol : nsurlprotocol
@end
|
子类实现的nsurlprotocol方法:
1.0 +(bool)caninitwithrequest:(nsurlrequest *)request;子类是否能响应该请求。
|
1
2
3
4
5
6
|
+(bool)caninitwithrequest:(nsurlrequest *)request{
if ([nsurlprotocol propertyforkey:hasinitkey inrequest:request]) {
return no;
}
return yes;
}
|
2.0 +(nsurlrequest *)canonicalrequestforrequest:(nsurlrequest *)request;自定义网络请求,如果不需要处理直接返回request。
|
1
2
3
|
+(nsurlrequest *)canonicalrequestforrequest:(nsurlrequest *)request{
return request;
}
|
3.0 -(void)startloading 开始网络请求,需要在该方法中发起一个请求,对于nsurlconnection来说,就是创建一个nsurlconnection,对于nsurlsession,就是发起一个nsurlsessiontask 。一般下载前需要设置该请求正在进行下载,防止多次下载的情况发生。
|
1
2
3
4
5
6
|
-(void)startloading{
nsmutableurlrequest *mutablereqeust = [[self request] mutablecopy];
//做下标记,防止递归调用
[nsurlprotocol setproperty:@yes forkey:hasinitkey inrequest:mutablereqeust];
self.connection = [nsurlconnection connectionwithrequest:mutablereqeust delegate:self];
}
|
4.0 -(void)stoploading 停止相应请求,清空请求connection 或task。
|
1
2
3
|
-(void)stoploading{
[self.connection cancel];
}
|
5.0 实现nsurlconnectiondelegate、nsurlconnectiondatadelegate或者nsurlsessiontaskdelegate。
|
1
2
3
4
5
6
7
8
9
10
11
12
13
14
15
16
17
18
19
20
|
#pragma mark - nsurlconnectiondelegate
-(void)connection:(nsurlconnection *)connection didfailwitherror:(nserror *)error{
[self.client urlprotocol:self didfailwitherror:error];
}
#pragma mark - nsurlconnectiondatadelegate
- (void)connection:(nsurlconnection *)connection didreceiveresponse:(nsurlresponse *)response
{
self.responsedata = [[nsmutabledata alloc] init];
[self.client urlprotocol:self didreceiveresponse:response cachestoragepolicy:nsurlcachestoragenotallowed];
}
- (void)connection:(nsurlconnection *)connection didreceivedata:(nsdata *)data {
[self.responsedata appenddata:data];
[self.client urlprotocol:self didloaddata:data];
}
- (void)connectiondidfinishloading:(nsurlconnection *)connection {
[self.client urlprotocoldidfinishloading:self];
}
|
使用
一、在appdelegate中注册:
|
1
|
[nsurlprotocol registerclass:[llmarkerurlprotocol class]];
|
这样能拦截uiwebview和自定义的请求了,如果要拦截afnetworking、alamofire等第三方请求还需要做一些修改。
二、llmarkerurlprotocol中添加自定义nsurlsessionconfiguration方法:
|
1
2
3
4
5
6
7
|
+ (nsurlsessionconfiguration *) defaultsessionconfiguration{
nsurlsessionconfiguration *config = [nsurlsessionconfiguration defaultsessionconfiguration];
nsmutablearray *array = [[config protocolclasses] mutablecopy];
[array insertobject:[self class] atindex:0];
config.protocolclasses = array;
return config;
}
|
拦截第三方网络库方法就是让第三方使用我们这个nsurlsessionconfiguration。因为我们在自己的nsurlsessionconfiguration 中的protocolclasses中注册了自己类。
三、 下面以alamofire为例
1.0 继承alamofire.sessionmanager 自定义sessionmanager
|
1
2
3
4
5
6
7
8
|
class llsessionmanger: alamofire.sessionmanager{
public static let sharedmanager: sessionmanager = {
let configuration = llmarkerurlprotocol.defaultsessionconfiguration()
configuration?.httpadditionalheaders = sessionmanager.defaulthttpheaders
let manager = alamofire.sessionmanager(configuration: configuration!)
return manager
}()
}
|
2.0 使用 llsessionmanger进行网络请求
|
1
2
3
4
5
6
|
let manager = llsessionmanger.sharedmanager
manager.request("https://httpbin.org/get").responsejson { (response) in
if let json = response.result.value {
print("json: \\(json)")
}
}
|
注意:afnetworking、sdwebimage等第三方库的修改和alamofire类似,找到使用nsurlsessionconfiguration的地方,换成llmarkerurlprotocol的defaultsessionconfiguration就可以了。
看到这你可能发现,如果使用alamofire进行网络请求,我们还是修改了原来的代码,下篇文章单独介绍如何不修改原来代码,通过注册alamofire通知方式,拦截alamofire的网络请求。
以上就是本文的全部内容,希望对大家的学习有所帮助,也希望大家多多支持快网idc。

相关文章


- 64M VPS建站:能否支持高流量网站运行? 2025-06-10
- 64M VPS建站:怎样选择合适的域名和SSL证书? 2025-06-10
- 64M VPS建站:怎样优化以提高网站加载速度? 2025-06-10
- 64M VPS建站:是否适合初学者操作和管理? 2025-06-10
- ASP.NET自助建站系统中的用户注册和登录功能定制方法 2025-06-10