最近在项目中遇到了这样一个问题:前后端分离,前端用vue来做,所有的数据请求都使用vue-resource,没有使用表单,因此数据交互都是使用json,后台使用spring boot,权限验证使用了spring security,因为之前用spring security都是处理页面的,这次单纯处理ajax请求,因此记录下遇到的一些问题。这里的解决方案不仅适用于ajax请求,也可以解决移动端请求验证。
创建工程
首先我们需要创建一个spring boot工程,创建时需要引入web、spring security、mysql和mybatis(数据库框架其实随意,我这里使用mybatis),创建好之后,依赖文件如下:
|
1
2
3
4
5
6
7
8
9
10
11
12
13
14
15
16
17
18
19
20
21
22
23
|
<dependency>
<groupid>org.mybatis.spring.boot</groupid>
<artifactid>mybatis-spring-boot-starter</artifactid>
<version>1.3.1</version>
</dependency>
<dependency>
<groupid>org.springframework.boot</groupid>
<artifactid>spring-boot-starter-security</artifactid>
</dependency>
<dependency>
<groupid>org.springframework.boot</groupid>
<artifactid>spring-boot-starter-web</artifactid>
</dependency>
<dependency>
<groupid>mysql</groupid>
<artifactid>mysql-connector-java</artifactid>
<scope>runtime</scope>
</dependency>
<dependency>
<groupid>commons-codec</groupid>
<artifactid>commons-codec</artifactid>
<version>1.11</version>
</dependency>
|
注意最后一个 commons-codec 依赖是我手动加入进来的,这是一个apache的开源项目,可以用来生成md5消息摘要,我在后文中将对密码进行简单的处理。
创建数据库并配置
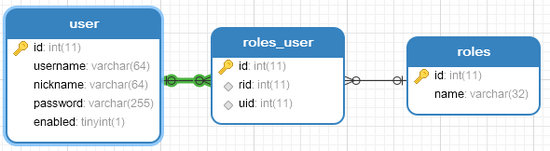
为了简化逻辑,我这里创建了三个表,分别是用户表、角色表、用户角色关联表,如下:
接下来我们需要在application.properties中对自己的数据库进行简单的配置,这里各位小伙伴视自己的具体情况而定。
|
1
2
3
|
spring.datasource.url=jdbc:mysql:///vueblog
spring.datasource.username=root
spring.datasource.password=123
|
构造实体类
这里主要是指构造用户类,这里的用户类比较特殊,必须实现userdetails接口,如下:
|
1
2
3
4
5
6
7
8
9
10
11
12
13
14
15
16
17
18
19
20
21
22
23
24
25
26
27
28
29
30
31
32
33
|
public class user implements userdetails {
private long id;
private string username;
private string password;
private string nickname;
private boolean enabled;
private list<role> roles;
@override
public boolean isaccountnonexpired() {
return true;
}
@override
public boolean isaccountnonlocked() {
return true;
}
@override
public boolean iscredentialsnonexpired() {
return true;
}
@override
public boolean isenabled() {
return enabled;
}
@override
public list<grantedauthority> getauthorities() {
list<grantedauthority> authorities = new arraylist<>();
for (role role : roles) {
authorities.add(new simplegrantedauthority("role_" + role.getname()));
}
return authorities;
}
//getter/setter省略...
}
|
实现了userdetails接口之后,该接口中有几个方法需要我们实现,四个返回boolean的方法都是见名知意,enabled表示档期账户是否启用,这个我数据库中确实有该字段,因此根据查询结果返回,其他的为了简单期间都直接返回true,getauthorities方法返回当前用户的角色信息,用户的角色其实就是roles中的数据,将roles中的数据转换为list<grantedauthority>之后返回即可, 这里有一个要注意的地方,由于我在数据库中存储的角色名都是诸如‘超级管理员'、‘普通用户'之类的,并不是以 role_ 这样的字符开始的,因此需要在这里手动加上 role_ ,切记 。
另外还有一个role实体类,比较简单,按照数据库的字段创建即可,这里不再赘述。
创建userservice
这里的userservice也比较特殊,需要实现userdetailsservice接口,如下:
|
1
2
3
4
5
6
7
8
9
10
11
12
13
14
15
16
17
18
19
|
@service
public class userservice implements userdetailsservice {
@autowired
usermapper usermapper;
@autowired
rolesmapper rolesmapper;
@override
public userdetails loaduserbyusername(string s) throws usernamenotfoundexception {
user user = usermapper.loaduserbyusername(s);
if (user == null) {
//避免返回null,这里返回一个不含有任何值的user对象,在后期的密码比对过程中一样会验证失败
return new user();
}
//查询用户的角色信息,并返回存入user中
list<role> roles = rolesmapper.getrolesbyuid(user.getid());
user.setroles(roles);
return user;
}
}
|
实现了userdetailsservice接口之后,我们需要实现该接口中的loaduserbyusername方法,即根据用户名查询用户。这里注入了两个mybatis中的mapper,usermapper用来查询用户,rolesmapper用来查询角色。在loaduserbyusername方法中,首先根据传入的参数(参数就是用户登录时输入的用户名)去查询用户,如果查到的用户为null,可以直接抛一个usernamenotfoundexception异常,但是我为了处理方便,返回了一个没有任何值的user对象,这样在后面的密码比对过程中一样会发现登录失败的(这里大家根据自己的业务需求调整即可),如果查到的用户不为null,此时我们根据查到的用户id再去查询该用户的角色,并将查询结果放入到user对象中,这个查询结果将在user对象的getauthorities方法中用上。
security配置
我们先来看一下我的security配置,然后我再来一一解释:
|
1
2
3
4
5
6
7
8
9
10
11
12
13
14
15
16
17
18
19
20
21
22
23
24
25
26
27
28
29
30
31
32
33
34
35
36
37
38
39
40
41
42
43
44
45
46
47
48
49
50
51
52
53
54
55
|
@configuration
public class websecurityconfig extends websecurityconfigureradapter {
@autowired
userservice userservice;
@override
protected void configure(authenticationmanagerbuilder auth) throws exception {
auth.userdetailsservice(userservice).passwordencoder(new passwordencoder() {
@override
public string encode(charsequence charsequence) {
return digestutils.md5digestashex(charsequence.tostring().getbytes());
}
/**
* @param charsequence 明文
* @param s 密文
* @return
*/
@override
public boolean matches(charsequence charsequence, string s) {
return s.equals(digestutils.md5digestashex(charsequence.tostring().getbytes()));
}
});
}
@override
protected void configure(httpsecurity http) throws exception {
http.authorizerequests()
.antmatchers("/admin/**").hasrole("超级管理员")
.anyrequest().authenticated()//其他的路径都是登录后即可访问
.and().formlogin().loginpage("/login_page").successhandler(new authenticationsuccesshandler() {
@override
public void onauthenticationsuccess(httpservletrequest httpservletrequest, httpservletresponse httpservletresponse, authentication authentication) throws ioexception, servletexception {
httpservletresponse.setcontenttype("application/json;charset=utf-8");
printwriter out = httpservletresponse.getwriter();
out.write("{\\"status\\":\\"ok\\",\\"msg\\":\\"登录成功\\"}");
out.flush();
out.close();
}
})
.failurehandler(new authenticationfailurehandler() {
@override
public void onauthenticationfailure(httpservletrequest httpservletrequest, httpservletresponse httpservletresponse, authenticationexception e) throws ioexception, servletexception {
httpservletresponse.setcontenttype("application/json;charset=utf-8");
printwriter out = httpservletresponse.getwriter();
out.write("{\\"status\\":\\"error\\",\\"msg\\":\\"登录失败\\"}");
out.flush();
out.close();
}
}).loginprocessingurl("/login")
.usernameparameter("username").passwordparameter("password").permitall()
.and().logout().permitall().and().csrf().disable();
}
@override
public void configure(websecurity web) throws exception {
web.ignoring().antmatchers("/reg");
}
}
|
这是我们配置的核心,小伙伴们听我一一道来:
1.首先这是一个配置类,因此记得加上@configuration注解,又因为这是spring security的配置,因此记得继承websecurityconfigureradapter。
2.将刚刚创建好的userservice注入进来,一会我们要用。
3.configure(authenticationmanagerbuilder auth)方法中用来配置我们的认证方式,在auth.userdetailsservice()方法中传入userservice,这样userservice中的loaduserbyusername方法在用户登录时将会被自动调用。后面的passwordencoder是可选项,可写可不写,因为我是将用户的明文密码生成了md5消息摘要后存入数据库的,因此在登录时也需要对明文密码进行处理,所以就加上了passwordencoder,加上passwordencoder后,直接new一个passwordencoder匿名内部类即可,这里有两个方法要实现,看名字就知道方法的含义,第一个方法encode显然是对明文进行加密,这里我使用了md5消息摘要,具体的实现方法是由commons-codec依赖提供的;第二个方法matches是密码的比对,两个参数,第一个参数是明文密码,第二个是密文,这里只需要对明文加密后和密文比较即可(小伙伴如果对此感兴趣可以继续考虑密码加盐)。
4.configure(httpsecurity http)用来配置我们的认证规则等,authorizerequests方法表示开启了认证规则配置,antmatchers("/admin/**").hasrole("超级管理员")表示 /admin/** 的路径需要有‘超级管理员'角色的用户才能访问,我在网上看到小伙伴对hasrole方法中要不要加 role_ 前缀有疑问,这里是不要加的,如果用hasauthority方法才需要加。anyrequest().authenticated()表示其他所有路径都是需要认证/登录后才能访问。接下来我们配置了登录页面为login_page,登录处理路径为/login,登录用户名为username,密码为password,并配置了这些路径都可以直接访问,注销登陆也可以直接访问,最后关闭csrf。在successhandler中,使用response返回登录成功的json即可,切记不可以使用defaultsuccessurl,defaultsuccessurl是只登录成功后重定向的页面,使用failurehandler也是由于相同的原因。
5.configure(websecurity web)方法中我配置了一些过滤规则,不赘述。
6.另外,对于静态文件,如 /images/** 、 /css/** 、 /js/** 这些路径,这里默认都是不拦截的。
controller
最后来看看我们的controller,如下:
|
1
2
3
4
5
6
7
8
9
10
11
12
13
14
15
|
@restcontroller
public class loginregcontroller {
/**
* 如果自动跳转到这个页面,说明用户未登录,返回相应的提示即可
* <p>
* 如果要支持表单登录,可以在这个方法中判断请求的类型,进而决定返回json还是html页面
*
* @return
*/
@requestmapping("/login_page")
public respbean loginpage() {
return new respbean("error", "尚未登录,请登录!");
}
}
|
这个controller整体来说还是比较简单的,respbean一个响应bean,返回一段简单的json,不赘述,这里需要小伙伴注意的是 login_page ,我们配置的登录页面是一个 login_page ,但实际上 login_page 并不是一个页面,而是返回一段json,这是因为当我未登录就去访问其他页面时spring security会自动跳转到到 login_page 页面,但是在ajax请求中,不需要这种跳转,我要的只是是否登录的提示,所以这里返回json即可。
测试
最后小伙伴可以使用postman或者restclient等工具来测试登录和权限问题,我就不演示了。
ok,经过上文的介绍,想必小伙伴们对spring boot+spring security处理ajax登录请求已经有所了解了,好了,本文就说到这里,有问题欢迎留言讨论。
原文链接:https://segmentfault.com/a/1190000012476796?utm_source=tuicool&utm_medium=referral

相关文章


- 个人网站服务器域名解析设置指南:从购买到绑定全流程 2025-06-10
- 个人网站搭建:如何挑选具有弹性扩展能力的服务器? 2025-06-10
- 个人服务器网站搭建:如何选择适合自己的建站程序或框架? 2025-06-10
- 64M VPS建站:能否支持高流量网站运行? 2025-06-10
- 64M VPS建站:怎样选择合适的域名和SSL证书? 2025-06-10