本篇文章介绍CentOS7.2部署OpenStack,具体如下:
1、系统环境
# uname -r
3.10.0-327.el7.x86_64
# cat /etc/redhat-release
CentOS Linux release 7.2.1511 (Core)
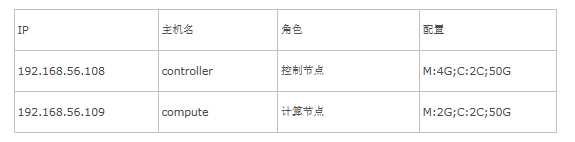
2、服务器部署
3、基础环境准备
3.1、配置hosts
?
|
1
2
3
4
5 |
# cat /etc/hosts
192.168.56.108 controller
192.168.56.109 compute |
3.2、配置时间同步
?
|
1
2
3
4
5
6
7
8
9
10
11
12
13
14
15
16
17
18
19
20
21
22
23 |
[root@controller ~]# yum install -y ntp
[root@controller ~]# vim /etc/ntp.conf
15 restrict -6 ::1
16 restrict 192.168.1.0 mask 255.255.255.0 nomodify notrap
27 restrict 0.centos.pool.ntp.org nomodify notrap noquery
28 restrict 1.centos.pool.ntp.org nomodify notrap noquery
29 restrict 2.centos.pool.ntp.org nomodify notrap noquery
30 restrict 3.centos.pool.ntp.org nomodify notrap noquery
31 server 127.127.1.0
32 fudge 127.127.1.0 stratum 10
[root@controller ~]# systemctl enable ntpd
[root@controller ~]# systemctl start ntpd |
在控制节点和计算节点配置定时任务
?
|
1 |
[root@compute ~]# crontab -l */5 * * * * /usr/sbin/ntpdate 192.168.56.108 >/dev/null 2>&1 |
3.3、关闭防火墙
?
|
1 |
# systemctl stop firewalld |
3.4、关闭selinux
?
|
1 |
# SELINUX=disabled /etc/selinux/config //需要重启 |
3.5、安装基础包
?
|
1
2
3
4
5 |
[root@controller ~]# yum install -yhttp://dl.fedoraproject.org/pub/epel/7/x86_64/e/epel-release-7-7.noarch.rpm
[root@controller ~]# yum install -y centos-release-openstack-liberty
[root@controller ~]# yum install -y python-openstackclient |
3.6、安装mysql
?
|
1
2
3 |
[root@controller ~]# yum install -y mariadb mariadb-server MySQL-python
[root@controller ~]# vim /etc/my.cnf |
在mysqld模块添加如下几行:
?

|
1
2
3
4
5
6
7
8
9
10
11
12
13
14
15 |
default-storage-engine = innodb
innodb_file_per_table
collation-server = utf8_general_ci
init-connect = 'SET NAMES utf8'
character-set-server = utf8
[root@controller ~]# systemctl enable mariadb.service
[root@controller ~]# systemctl start mariadb.service
[root@controller ~]# mysql_secure_installation |
3.7、安装rabbitmq
?
|
1
2
3
4
5
6
7
8
9
10
11
12
13
14
15
16
17
18
19
20
21
22
23 |
[root@controller ~]# yum install -y rabbitmq-server
[root@controller ~]# systemctl enable rabbitmq-server.service
[root@controller ~]# systemctl start rabbitmq-server.service
[root@controller ~]# rabbitmqctl add_user openstack openstack
Creating user "openstack" ...
...done.
[root@controller ~]# rabbitmqctl set_permissions openstack '.*' '.*' '.*'
Setting permissions for user "openstack" in vhost "/"...
...done.
[root@controller ~]# rabbitmqctl set_user_tags openstack administrator
[root@controller ~]# rabbitmq-plugins enable rabbitmq_management
[root@controller ~]# systemctl restart rabbitmq-server.service |
在浏览器中输入http://192.168.56.108:15672,默认账户和密码为guest
登录后将前面创建的openstack用户加入到admin中,结果如下图:

以上就是本文的全部内容,希望对大家的学习有所帮助,也希望大家多多支持快网idc。
原文链接:http://www.cnblogs.com/dongdongwq/p/5649894.html

相关文章


猜你喜欢
- 刀片服务器与机架服务器的区别介绍 2025-05-27
- 服务器虚拟化技术深度科普 2025-05-27
- 服务器租用价格怎么计算?服务器租用多少钱一年? 2025-05-27
- 云服务器的“弹性”体现在哪些方面? 2025-05-27
- 刀片服务器是什么 刀片服务器的主要特点 2025-05-27