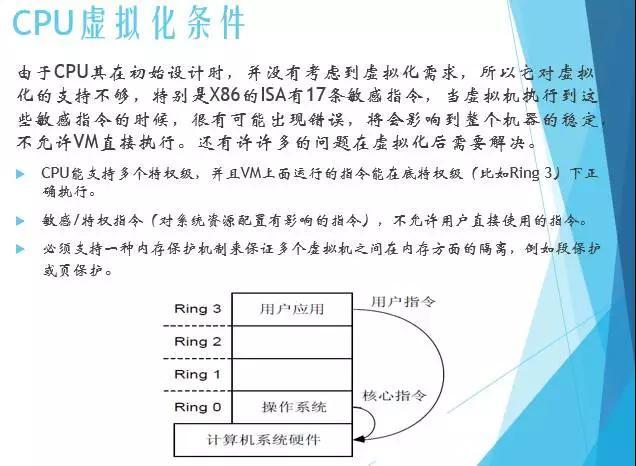
前面我们创建的两个任务 test 和 build-and-push 都已经完成了,我们还可以创建一个流水线来将这两个任务组织起来,形成一个流水线,这里就是我们要使用的 Pipeline 这个 CRD 对象。
创建流水线
比如我们这里的流水线流程为先运行 test 任务,如果通过了再执行后面的 build-and-push 这个任务,那么我们可以创建一个名为 test-pipeline.yaml 的资源对象,内容如下所示:
- #test-pipeline.yaml
- apiVersion:tekton.dev/v1beta1
- kind:Pipeline
- metadata:
- name:test-pipeline
- spec:
- resources:#为Tasks提供输入和输出资源声明
- –name:demo-git
- type:git
- –name:harbor-image
- type:image
- tasks:#添加task到流水线中
- #运行应用测试
- –name:test
- taskRef:
- name:test
- resources:
- inputs:
- –name:repo#Task输入名称
- resource:demo-git#Pipeline资源名称
- #构建并推送Docker镜像
- –name:build-and-push
- taskRef:
- name:build-and-push
- runAfter:
- -test#测试任务执行之后
- resources:
- inputs:
- –name:repo#指定输入的git仓库资源
- resource:demo-git
- outputs:#指定输出的镜像资源
- –name:builtImage
- resource:harbor-image
首先我们需要定义流水线需要哪些资源,可以是输入或者输出的资源,在这里我们只有一个输入,那就是命名为 repo 的应用程序源码的 GitHub 仓库。接下来定义任务,每个任务都通过 taskRef 进行引用,并传递任务需要的输入参数。
同样直接创建这个资源对象即可:
- $kubectlapply-ftest-pipeline.yaml
- pipeline.tekton.dev/test-pipelinecreated
前面我们提到过和通过创建 TaskRun 去触发 Task 任务类似,我们可以通过创建一个 PipelineRun 对象来运行流水线。这里我们创建一个名为 test-pipelinerun.yaml 的 PipelineRun 对象来运行流水线,文件内容如下所示:
- apiVersion:tekton.dev/v1beta1
- kind:PipelineRun
- metadata:
- name:test-pipelinerun
- spec:
- serviceAccountName:build-sa
- pipelineRef:
- name:test-pipeline
- resources:
- –name:demo-git#指定输入的git仓库资源
- resourceRef:
- name:demo-git
- –name:harbor-image#指定输出的镜像资源
- resourceRef:
- name:harbor-image
定义方式和 TaskRun 几乎一样,通过 serviceAccountName 属性指定 ServiceAccount 对象,pipelineRef 关联流水线对象。同样直接创建这个资源,创建后就会触发我们的流水线任务了:
- $kubectlapply-ftest-pipelinerun.yaml
- pipelinerun.tekton.dev/test-pipelineruncreated
- $githubkubectlgetpods|greptest-pipelinerun
- test-pipelinerun-build-and-push-62g65-pod-6jqqf0/4Init:1/203s
- test-pipelinerun-test-c4r9m-pod-j7jjd0/2Completed012s
- $tknpipelinerundescribetest-pipelinerun
- Name:test-pipelinerun
- Namespace:default
- PipelineRef:test-pipeline
- ServiceAccount:build-sa
- Timeout:1h0m0s
- Labels:
- tekton.dev/pipeline=test-pipeline
- Status
- STARTEDDURATIONSTATUS
- 47secondsago22secondsSucceeded
- Resources
- NAMERESOURCEREF
- ∙demo-gitdemo-git
- ∙harbor-imageharbor-image
- Params
- Noparams
- Results
- Noresults
- Workspaces
- Noworkspaces
- Taskruns
- NAMETASKNAMESTARTEDDURATIONSTATUS
- ∙test-pipelinerun-build-and-push-62g65build-and-push38secondsago13secondsSucceeded
- ∙test-pipelinerun-test-c4r9mtest46secondsago8secondsSucceeded
到这里证明我们的流水线执行成功了。我们将 Tekton 安装在 Kubernetes 集群上,定义了一个 Task,并通过 YAML 清单和 Tekton CLI 创建 TaskRun 对其进行了测试。我们创建了由两个任务组成的 Tektok 流水线,第一个任务是从 GitHub 克隆代码并运行应用程序测试,第二个任务是构建一个 Docker 镜像并将其推送到 Docker Hub 上。
使用 Results 传递数据
上面我们在构建镜像的时候可以看到镜像的 TAG 我们是写死的,或者需要在每次执行的时候通过参数传递进去,比较麻烦,那么有没有什么办法可以自动生成镜像 TAG 呢?比如根据时间戳来生成一个构建的ID。
这里我们可以通过定义一个 Task 任务,然后通过 script 脚本去获取到数据后传入到 results 中去,我们可以把这些 results 数据传递到流水线中的其他任务中去,比如我们想要获取 git commit 的 SHA 值,或者生成一个随机的 ID 来作为镜像 TAG,比如这里我们创建一个名为 generate-build-id 的 Task 任务,定义了 get-timestamp 和 get-buildid 两个 Steps,一个用于生成时间戳,一个用于生成一个包含基本版本的结果值,将结果添加到 results 中去。
- #generate-build-id.yaml
- apiVersion:tekton.dev/v1beta1
- kind:Task
- metadata:
- name:generate-build-id
- spec:
- description:>-
- Givenabaseversion,thistaskgeneratesauniquebuildidbyappending
- thebase-versiontothecurrenttimestamp.
- params:
- –name:base-version
- description:Baseproductversion
- type:string
- default:"1.0"
- results:
- –name:timestamp
- description:Currenttimestamp
- –name:build-id
- description:IDofthecurrentbuild
- steps:
- –name:get-timestamp
- image:bash:5.0.18
- script:|
- #!/usr/bin/envbash
- ts=`date"+%Y%m%d-%H%M%S"`
- echo"CurrentTimestamp:${ts}"
- echo${ts}|tr-d"\\n"|tee$(results.timestamp.path)
- –name:get-buildid
- image:bash:5.0.18
- script:|
- #!/usr/bin/envbash
- ts=`cat$(results.timestamp.path)`
- buildId=$(inputs.params.base-version)-${ts}
- echo${buildId}|tr-d"\\n"|tee$(results.build-id.path)
直接创建上面的 Task:
- kubectlapply-fgenerate-build-id.yaml
创建完成后,现在我们就可以在 Pipeline 中来使用这个 Task 了,用来生成构建 ID,修改 test-pipeline.yaml,增加 generate-build-id 任务:
- #test-pipeline.yaml
- apiVersion:tekton.dev/v1beta1
- kind:Pipeline
- metadata:
- name:test-pipeline
- spec:
- resources:#为Tasks提供输入和输出资源声明
- –name:demo-git
- type:git
- –name:harbor-image
- type:image
- params:
- –name:image-tag
- type:string
- tasks:#添加task到流水线中
- #运行应用测试
- –name:test
- taskRef:
- name:test
- resources:
- inputs:
- –name:repo#Task输入名称
- resource:demo-git#Pipeline资源名称
- –name:get-build-id
- taskRef:
- name:generate-build-id
- params:
- –name:base-version
- value:$(params.image-tag)
- #构建并推送Docker镜像
- –name:build-and-push
- taskRef:
- name:build-and-push
- runAfter:
- -test#测试任务执行之后
- resources:
- inputs:
- –name:repo#指定输入的git仓库资源
- resource:demo-git
- outputs:#指定输出的镜像资源
- –name:builtImage
- resource:harbor-image
- params:
- –name:imageTag
- value:"$(tasks.get-build-id.results.build-id)"
然后在 build-and-push 任务中通过 "$(tasks.get-build-id.results.build-id)" 获取构建的 ID,将这个 ID 作为参数传入任务中去,所以我们也需要在 build-and-push 任务中增加 build-id 这个参数:
- #task-build-push.yaml
- apiVersion:tekton.dev/v1beta1
- kind:Task
- metadata:
- name:build-and-push
- spec:
- resources:
- inputs:#定义输入资源
- –name:repo#输入资源,就是github的那个仓库
- type:git
- outputs:#定义输出资源
- –name:builtImage#输出镜像名字
- type:image
- params:
- –name:pathToDockerfile#指明dockerfile在仓库中的哪个位置
- type:string
- default:$(resources.inputs.repo.path)/Dockerfile#repo资源的路径
- description:Thepathtothedockerfiletobuild
- –name:pathToContext#指明dockerfile在仓库中的哪个位置
- type:string
- default:$(resources.inputs.repo.path)#repo资源的路径
- description:thebuildcontextusedbydockerdaemon
- –name:imageTag
- type:string
- default:"v0.2.0"
- description:thedockerimagetag
- steps:
- –name:build-and-push
- image:docker:stable
- script:|
- #!/usr/bin/envsh
- dockerloginharbor.k8s.local
- dockerbuild-t$(resources.outputs.builtImage.url):$(params.imageTag)-f$(params.pathToDockerfile)$(params.pathToContext)
- dockerpush$(resources.outputs.builtImage.url):$(params.imageTag)#这边的参数都是在input和output中定义的
- volumeMounts:
- –name:dockersock#将docker.sock文件挂载进来,使用宿主机dockerdaemon构建镜像
- mountPath:/var/run/docker.sock
- volumes:
- –name:dockersock
- hostPath:
- path:/var/run/docker.sock
然后需要将 builtImage 这个 output 资源的 url 定义中将镜像 tag 去掉,在 PipelineRun 对象中新增 image-tag 的参数:
- #test-pipelinerun.yaml
- apiVersion:tekton.dev/v1beta1
- kind:PipelineRun
- metadata:
- name:test-pipelinerun
- spec:
- serviceAccountName:build-sa
- pipelineRef:
- name:test-pipeline
- resources:
- –name:demo-git#指定输入的git仓库资源
- resourceRef:
- name:demo-git
- –name:harbor-image#指定输出的镜像资源
- resourceRef:
- name:harbor-image
- params:
- –name:image-tag
- value:"v0.3.0"
所有修改完成后,重新执行我们的整个流水线即可。
- $tknpipelinerunlogstest-pipelinerun
- [test:git-source-repo-g68nd]{"level":"info","ts":1623934515.6170688,"caller":"git/git.go:169","msg":"Successfullyclonedhttps://github.com.cnpmjs.org/cnych/tekton-demo@5e1e3a1d0f167b9b639df5b802a0f0f81064d21e(grafted,HEAD,origin/master)inpath/workspace/repo"}
- [test:git-source-repo-g68nd]{"level":"info","ts":1623934515.6349964,"caller":"git/git.go:207","msg":"Successfullyinitializedandupdatedsubmodulesinpath/workspace/repo"}
- [test:run-test]PASS
- [test:run-test]ok_/workspace/repo0.002s
- [get-build-id:get-timestamp]CurrentTimestamp:20210617-125634
- [get-build-id:get-timestamp]20210617-125634
- [get-build-id:get-buildid]v0.3.0-20210617-125634
- [build-and-push:git-source-repo-v2lhk]{"level":"info","ts":1623934601.68953,"caller":"git/git.go:169","msg":"Successfullyclonedhttps://github.com.cnpmjs.org/cnych/tekton-demo@5e1e3a1d0f167b9b639df5b802a0f0f81064d21e(grafted,HEAD,origin/master)inpath/workspace/repo"}
- [build-and-push:git-source-repo-v2lhk]{"level":"info","ts":1623934601.7080255,"caller":"git/git.go:207","msg":"Successfullyinitializedandupdatedsubmodulesinpath/workspace/repo"}
- [build-and-push:build-and-push]Authenticatingwithexistingcredentials…
- [build-and-push:build-and-push]LoginSucceeded
- [build-and-push:build-and-push]WARNING!Yourpasswordwillbestoredunencryptedin/root/.docker/config.json.
- [build-and-push:build-and-push]Configureacredentialhelpertoremovethiswarning.See
- [build-and-push:build-and-push]https://docs.docker.com/engine/reference/commandline/login/#credentials-store
- [build-and-push:build-and-push]
- [build-and-push:build-and-push]SendingbuildcontexttoDockerdaemon154.1kB
- [build-and-push:build-and-push]Step1/6:FROMgolang:1.14-alpine
- ……
- [build-and-push:build-and-push]Successfullybuilt2358e77bbe0e
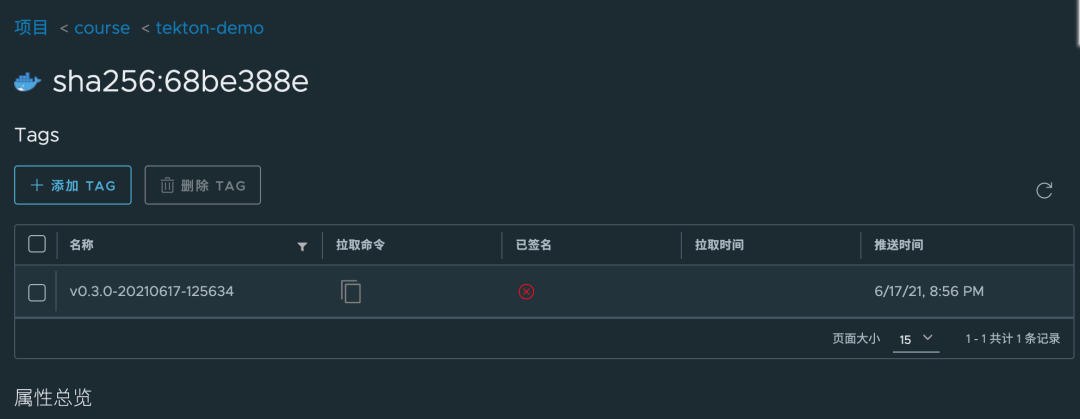
- [build-and-push:build-and-push]Successfullytaggedharbor.k8s.local/course/tekton-demo:v0.3.0-20210617-125634
- [build-and-push:build-and-push]Thepushreferstorepository[harbor.k8s.local/course/tekton-demo]
- [build-and-push:build-and-push]f9a271a3fb3c:Preparing
- ……
- [build-and-push:build-and-push]26ec43d351f2:Pushed
- [build-and-push:build-and-push]v0.3.0-20210617-125634:digest:sha256:68be388e3f85dd10a6689a986eb2f7f7f5a5c89bb03f40c3db3178e0ce242752size:2198
- [build-and-push:image-digest-exporter-t54fb]{"severity":"INFO","timestamp":"2021-06-17T12:56:46.54052284Z","caller":"logging/config.go:116","message":"Successfullycreatedthelogger."}
- [build-and-push:image-digest-exporter-t54fb]{"severity":"INFO","timestamp":"2021-06-17T12:56:46.541010181Z","caller":"logging/config.go:117","message":"Logginglevelsetto:info"}
- [build-and-push:image-digest-exporter-t54fb]{"severity":"INFO","timestamp":"2021-06-17T12:56:46.541254959Z","caller":"imagedigestexporter/main.go:59","message":"Noindex.jsonfoundfor:builtImage","commit":"7ca5d61"}
我们可以看到在 get-build-id 任务中为我们生成了 v0.3.0-20210617-125634 这样的镜像 TAG,最后也通过 results 传递到了下面的构建任务中去,镜像的 TAG 也更新了。
Tekton Catalog
当然这些任务其实都具有一定的通用性的,为此 Tekton 官方提供了一个 Catalog 的服务,用来专门提供一些通用的任务,比如我们想要获取 Git Commit 的相关信息,可以使用 https://artifacthub.io/packages/tekton-task/tekton-catalog-tasks/git-clone 这个 Catalog,文档中也包含相关的使用说明。
到这里我们就完成了使用 Tekton 创建 CI/CD 流水线的一个简单示例,不过这个示例还比较简单,接下来我们再通过一个稍微复杂点的应用来完成我们前面的 Jenkins 流水线。
原文链接:https://mp.weixin.qq.com/s/M08CrTEeriZwvNCjlaZdkg