编写Dockerfile文件
配置yum源
|
1
2
3
4
5
6
7
8
9
10
11
12 |
cd /tmp/docker
vim Dockerfile
FROM rhel7
EXPOSE 80 22 # 向外暴露80和22的端口
COPY dvd.repo /etc/yum.repos.d/dvd.repo
&& yum install -y httpd openssh-server openssh-clients supervisor
&& yum clean all
&& ssh-keygen -q -t rsa -f /etc/ssh/ssh_host_rsa_key -N ""
&& ssh-keygen -q -t ecdsa -f /etc/ssh/ssh_host_ed25519_key -N ""
&& echo root:redhat | chpasswd
COPY supervisord.conf /etc/supervisord.conf
CMD ["/usr/bin/supervisord"] |
|
1
2
3
4
5
6
7
8
9 |
vim supervisord.conf
[supervisord]
nodaemon=true
[program:sshd]
command=/usr/sbin/sshd -D
[program:httpd]
command=/usr/sbin/httpd |
|
1
2
3
4
5
6
7
8
9
10
11
12
13
14
15
16
17
18
19
20
21
22
23
24
25
26
27
28
29 |
docker build -t rhel7:v3
Sending build context to Docker daemon 8.192 kB
Step 1/6 : FROM rhel7
---> 0a3eb3fde7fd
Step 2/6 : EXPOSE 80 22
---> Running in 5727c9e984a5
---> e25a8a0821f7
Removing intermediate container 5727c9e984a5
Step 3/6 : COPY dvd.repo /etc/yum.repos.d/dvd.repo
---> 2d9e8f9648a7
Removing intermediate container 62955f7a7a74
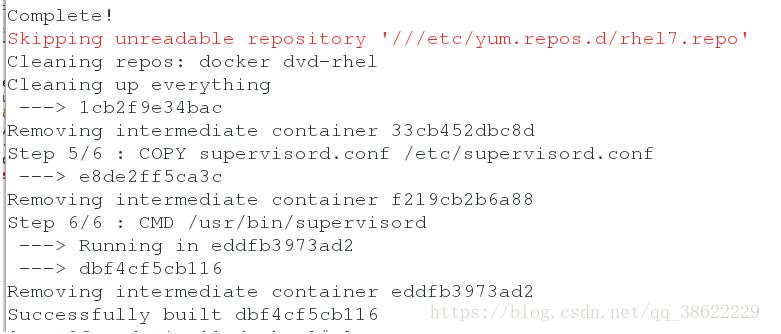
Step 4/6 : RUN rpmdb --rebuilddb && yum install -y httpd openssh-server openssh-clients supervisor && yum clean all && ssh-keygen -q -t rsa -f /etc/ssh/ssh_host_rsa_key -N "" && ssh-keygen -q -t ecdsa -f /etc/ssh/ssh_host_ecdsa_key -N "" && ssh-keygen -q -t ecdsa -f /etc/ssh/ssh_host_ed25519_key -N "" && echo root:redhat | chpasswd
Dependency Updated:
elfutils-libelf.x86_64 0:0.166-2.el7
Complete!
Skipping unreadable repository '///etc/yum.repos.d/rhel7.repo'
Cleaning repos: docker dvd-rhel
Cleaning up everything
---> 1cb2f9e34bac
Removing intermediate container 33cb452dbc8d
Step 5/6 : COPY supervisord.conf /etc/supervisord.conf
---> e8de2ff5ca3c
Removing intermediate container f219cb2b6a88
Step 6/6 : CMD /usr/bin/supervisord
---> Running in eddfb3973ad2
---> dbf4cf5cb116
Removing intermediate container eddfb3973ad2
Successfully built dbf4cf5cb116 |
docker run -d –name vm1 -v /tmp/docker/web/:/var/www/html rhel7:v3
docker ps

|
1
2
3
4
5
6
7
8
9
10
11
12
13
14
15
16
17 |
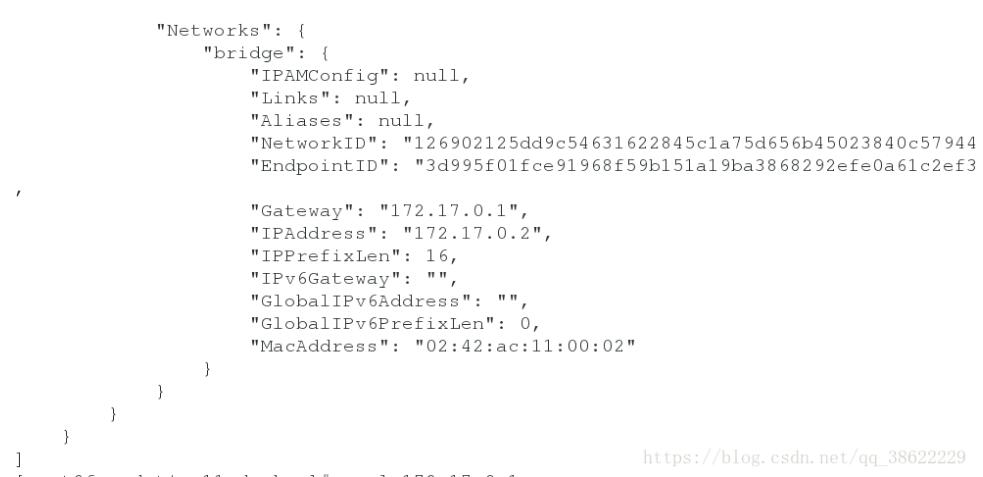
docker inspect vm1
"Networks": {
"bridge": {
"IPAMConfig": null,
"Links": null,
"Aliases": null,
"NetworkID": "126902125dd9c54631622845c1a75d656b45023840c57944ec24f4acecf6dc3f",
"EndpointID": "3d995f01fce91968f59b151a19ba3868292efe0a61c2ef355bcd1eb84bda7248",
"Gateway": "172.17.0.1",
"IPAddress": "172.17.0.2", # 容器的ip
"IPPrefixLen": 16,
"IPv6Gateway": "",
"GlobalIPv6Address": "",
"GlobalIPv6PrefixLen": 0,
"MacAddress": "02:42:ac:11:00:02"
}
} |
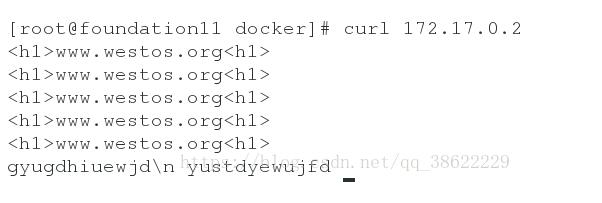
验证:
curl 172.17.0.2
验证sshd服务:

补充知识:使用Dockerfile构建supervisor容器部署项目,CMD ["supervisord","-c","/etc/supervisord.conf"]执行失败
问题描述:
在编写Dockerfile创建supervisor容器时,最后一条启动supervisor的命令不起作用 -> CMD ["supervisord","-c","/etc/supervisord.conf"],但是进到容器内部执行supervisord -c /etc/supervisord.conf可以成功运行。
先贴出来Dockerfile文件代码
|
1
2
3
4
5
6
7
8
9
10
11
12
13
14
15
16
17
18
19
20
21
22
23
24
25
26
27
28
29 |
FROM python:latest
WORKDIR /root/
RUN mkdir /etc/supervisor
RUN mkdir -p /root/projects/logs/gunicorn/
RUN mkdir -p /root/projects/logs/celery/
RUN mkdir -p /root/projects/Sy_EvaluateJkApi/logs/
RUN echo "deb http://mirrors.aliyun.com/debian/ buster main non-free contrib" > /etc/apt/sources.list
RUN echo "deb-src http://mirrors.aliyun.com/debian/ buster main non-free contrib" >> /etc/apt/sources.list
RUN echo "deb http://mirrors.aliyun.com/debian-security buster/updates main" >> /etc/apt/sources.list
RUN echo "deb-src http://mirrors.aliyun.com/debian-security buster/updates main" >> /etc/apt/sources.list
RUN echo "deb http://mirrors.aliyun.com/debian/ buster-updates main non-free contrib" >> /etc/apt/sources.list
RUN echo "deb-src http://mirrors.aliyun.com/debian/ buster-updates main non-free contrib" >> /etc/apt/sources.list
RUN echo "deb http://mirrors.aliyun.com/debian/ buster-backports main non-free contrib" >> /etc/apt/sources.list
RUN echo "deb-src http://mirrors.aliyun.com/debian/ buster-backports main non-free contrib" >> /etc/apt/sources.list
RUN apt-get update -y
RUN apt-get install -y git lrzsz vim
RUN pip install supervisor -i https://mirrors.aliyun.com/pypi/simple/
RUN pip install gunicorn -i https://mirrors.aliyun.com/pypi/simple/
RUN pip install gevent -i https://mirrors.aliyun.com/pypi/simple/
RUN /usr/local/bin/echo_supervisord_conf > /etc/supervisord.conf
RUN echo "[include]">>/etc/supervisord.conf
RUN echo "files = /etc/supervisor/*.ini">>/etc/supervisord.conf
ADD sy.ini /etc/supervisor/sy.ini
ADD Sy_EvaluateJkApi /root/projects/Sy_EvaluateJkApi
RUN pip3 install -r /root/projects/Sy_EvaluateJkApi/requirements.txt -i https://mirrors.aliyun.com/pypi/simple/
EXPOSE 8800
CMD ["supervisord","-c","/etc/supervisord.conf"] |
使用docker build -t system:test . 命令构建容器镜像没有异常,但是使用docker run -itd system:test运行容器就会显示容器不在运行。
解决方式:
把CMD ["supervisord","-c","/etc/supervisord.conf"]命令改成CMD ["supervisord","-n","-c","/etc/supervisord.conf"]就可以成功运行了。
supervisor里是这么写的-n/–nodaemon — run in the foreground (same as 'nodaemon=true' in config file),加了-n让supervisor在前台保持运行就可以了。
以上这篇supervisor下的Dockerfile的多服务镜像封装操作就是小编分享给大家的全部内容了,希望能给大家一个参考,也希望大家多多支持快网idc。
原文链接:https://blog.csdn.net/qq_38622229/article/details/81903605

相关文章


- 服务器技术之硬件冗余技术 2025-05-27
- 服务器是租用还是服务器托管好? 2025-05-27
- 什么是DNS以及它如何影响服务器? 2025-05-27
- 刀片服务器与机架服务器的区别介绍 2025-05-27
- 服务器虚拟化技术深度科普 2025-05-27