上篇文章给大家介绍了使用docker compose安装FastDfs文件服务器的实例详解
今天给大家介绍如何使用 docker compose 搭建 fastDFS文件服务器,内容详情如下所示:
平台 :Mac M1
备注:关于 IP Address
关于 docker 的网络模式,上述文中提到了 docker 的 Host 模式:
如果启动容器的时候使用host模式,那么这个容器将不会获得一个独立的Network Namespace,而是和宿主机共用一个 Network Namespace。容器将不会虚拟出自己的网卡,配置自己的 IP 等,而是使用宿主机的 IP 和端口。但是,容器的其他方面,如文件系统、进程列表等还是和宿主机隔离的。
问题在于:使用宿主机的 IP 和端口的话,配置文件中 IP 填写 localhost的话按理说能访问到容器,然而事实上却不行。个人理解(如果理解有问题的话烦请指正)的 IP Address填写方法如下:
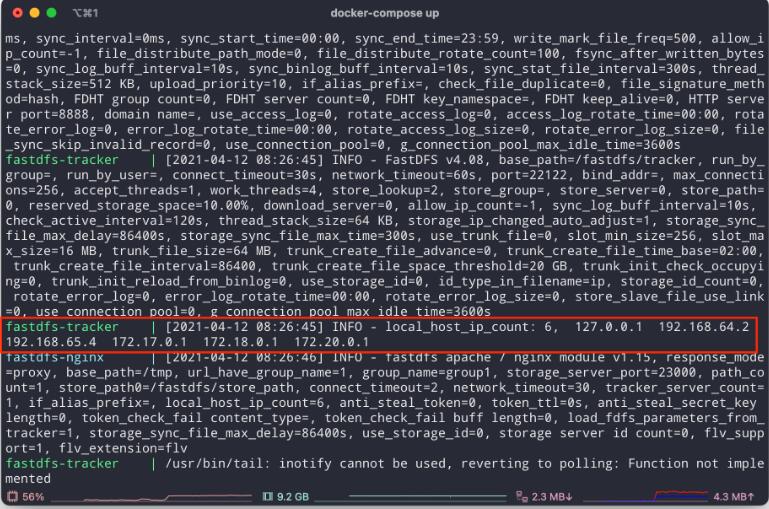
启动 tracker 时控制台输出:
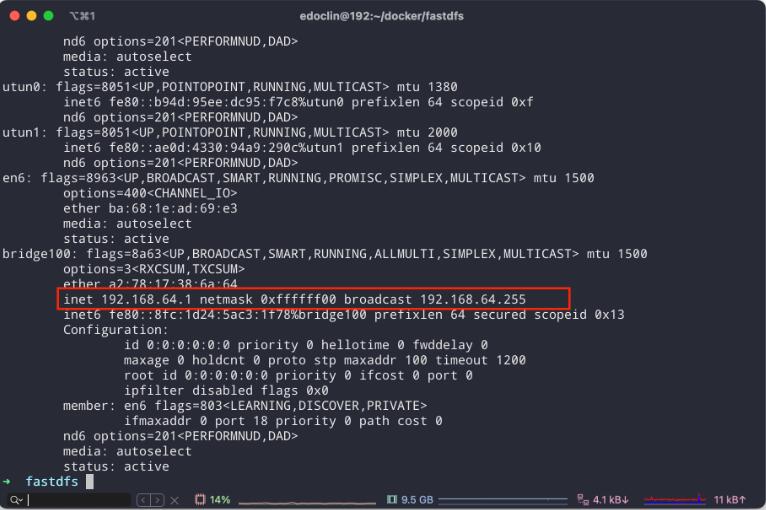
192.168.64.2的网络为:
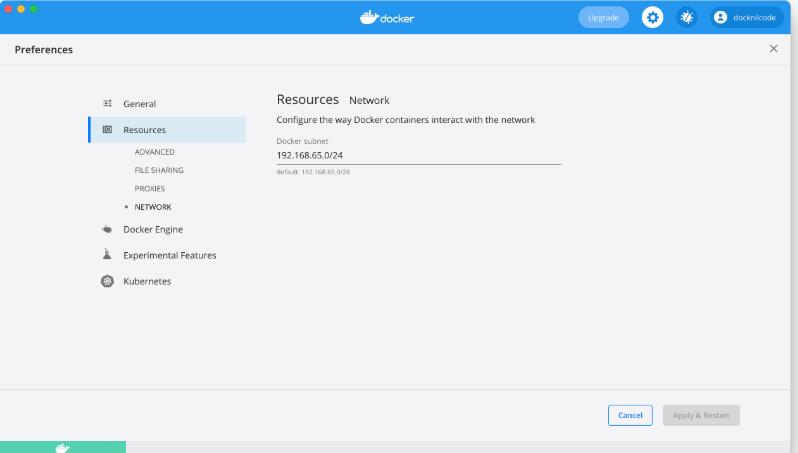
192.168.65.4的网络为:
文件目录
|
1
2
3
4
5
6
7
8
9 |
├── docker-compose.yaml
├── nginx
│ └── nginx.conf
├── storage
│ └── data
└── tracker
│ └── conf
│ └── client.conf
└── store_path |
./docker-compose.yaml
|
1
2
3
4
5
6
7
8
9
10
11
12
13
14
15
16
17
18
19
20
21
22
23
24
25
26
27
28
29
30
31
32
33
34
35 |
version: "2"
services:
fastdfs-tracker:
hostname: fastdfs-tracker
container_name: fastdfs-tracker
image: season/fastdfs:1.2
network_mode: "host"
command: tracker
volumes:
- ./tracker/data:/fastdfs/tracker/data
- ./tracker/conf:/etc/fdfs
fastdfs-storage:
hostname: fastdfs-storage
container_name: fastdfs-storage
image: season/fastdfs:1.2
network_mode: "host"
volumes:
- ./storage/data:/fastdfs/storage/data
- ./store_path:/fastdfs/store_path
environment:
- TRACKER_SERVER=192.168.64.2:22122
command: storage
depends_on:
- fastdfs-tracker
fastdfs-nginx:
hostname: fastdfs-nginx
container_name: fastdfs-nginx
image: season/fastdfs:1.2
network_mode: "host"
volumes:
- ./nginx/nginx.conf:/etc/nginx/conf/nginx.conf
- ./store_path:/fastdfs/store_path
environment:
- TRACKER_SERVER=192.168.64.2:22122
command: nginx |
./tracker/conf/client.conf
|
1
2
3
4
5
6
7
8
9
10
11
12
13
14
15
16
17
18
19
20
21
22
23
24
25
26
27
28
29
30
31
32
33
34
35
36
37
38
39
40
41
42
43
44
45
46
47
48
49
50
51
52
53
54
55
56
57
58
59
60 |
# connect timeout in seconds
# default value is 30s
connect_timeout=30
# network timeout in seconds
# default value is 30s
network_timeout=60
# the base path to store log files
base_path=/fastdfs/client
# tracker_server can ocur more than once, and tracker_server format is
# "host:port", host can be hostname or ip address
# 需要修改此处 ip
tracker_server=192.168.64.2:22122
#standard log level as syslog, case insensitive, value list:
### emerg for emergency
### alert
### crit for critical
### error
### warn for warning
### notice
### info
### debug
log_level=info
# if use connection pool
# default value is false
# since V4.05
use_connection_pool = false
# connections whose the idle time exceeds this time will be closed
# unit: second
# default value is 3600
# since V4.05
connection_pool_max_idle_time = 3600
# if load FastDFS parameters from tracker server
# since V4.05
# default value is false
load_fdfs_parameters_from_tracker=false
# if use storage ID instead of IP address
# same as tracker.conf
# valid only when load_fdfs_parameters_from_tracker is false
# default value is false
# since V4.05
use_storage_id = false
# specify storage ids filename, can use relative or absolute path
# same as tracker.conf
# valid only when load_fdfs_parameters_from_tracker is false
# since V4.05
storage_ids_filename = storage_ids.conf
#HTTP settings
http.tracker_server_port=80
#use "#include" directive to include HTTP other settiongs
##include http.conf |
./nginx/nginx.conf
|
1
2
3
4
5
6
7
8
9
10
11
12
13
14
15
16
17
18
19
20
21
22
23
24
25
26
27
28
29
30
31
32
33
34
35
36
37
38
39
40
41
42
43
44
45
46
47
48
49
50
51
52
53
54
55 |
#user nobody;
worker_processes 1;
#error_log logs/error.log;
#error_log logs/error.log notice;
#error_log logs/error.log info;
#pid logs/nginx.pid;
events {
worker_connections 1024;
}
http {
include mime.types;
default_type application/octet-stream;
#log_format main '$remote_addr - $remote_user [$time_local] "$request" '
# '$status $body_bytes_sent "$http_referer" '
# '"$http_user_agent" "$http_x_forwarded_for"';
#access_log logs/access.log main;
sendfile on;
#tcp_nopush on;
#keepalive_timeout 0;
keepalive_timeout 65;
#gzip on;
server {
listen 9800;
server_name localhost;
#charset koi8-r;
#access_log logs/host.access.log main;
# 修改部分
location / {
root /fastdfs/store_path/data;
ngx_fastdfs_module;
}
#error_page 404 /404.html;
# redirect server error pages to the static page /50x.html
#
error_page 500 502 503 504 /50x.html;
location = /50x.html {
root html;
}
}
} |
SpringBoot 集成 fastDFS
添加依赖
|
1
2
3
4
5 |
<dependency>
<groupId>com.github.tobato</groupId>
<artifactId>fastdfs-client</artifactId>
<version>1.27.2</version>
</dependency> |
applicaiton.yaml
|
1
2
3
4
5
6
7
8
9
10
11
12
13
14 |
# 分布式文件系统配置
fdfs:
#根据自己的ip进行更改
ip: 192.168.64.2
#socket连接超时时长
soTimeout: 1500
connectTimeout: 600
#支持多个
trackerList:
- ${fdfs.ip}:22122
# fastDFS 中的 nginx 的 ip 和 port
# IDEA 提示使用 https,
# nginx 配置 SSL 请移步:
web-server-url: http://${fdfs.ip}:9800/ |
FastDFSConfig.java
|
1
2
3
4
5
6
7 |
@Configuration
// 导入FastDFS-Client组件
@Import(FdfsClientConfig.class)
// 解决jmx重复注册bean的问题
@EnableMBeanExport(registration = RegistrationPolicy.IGNORE_EXISTING)
public aspect FastDFSConfig {
} |
FastDFSUtil.java
|
1
2
3
4
5
6
7
8
9
10
11
12
13
14
15
16
17
18
19
20
21
22
23
24
25
26
27
28
29
30
31
32
33
34
35
36
37
38
39
40
41
42
43
44
45
46
47
48
49
50
51
52
53
54 |
@Component
public class FastDFSUtil {
@Resource
private FastFileStorageClient fastFileStorageClient;
@Resource
private FdfsWebServer fdfsWebServer;
public String uploadFile(MultipartFile file) throws IOException {
StorePath storePath = fastFileStorageClient.uploadFile(file.getInputStream(), file.getSize(), FilenameUtils.getExtension(file.getOriginalFilename()), null);
String fullPath = storePath.getFullPath();
getResAccessUrl(fullPath);
return fullPath;
}
public String uploadFile(File file) {
try {
FileInputStream inputStream = new FileInputStream(file);
StorePath storePath = fastFileStorageClient.uploadFile(inputStream, file.length(), FilenameUtils.getExtension(file.getName()), null);
return storePath.getFullPath();
} catch (Exception e) {
e.printStackTrace();
return null;
}
}
public byte[] downloadFile(String filePath) {
StorePath storePath = StorePath.parseFromUrl(filePath);
return fastFileStorageClient.downloadFile(storePath.getGroup(), storePath.getPath(), new DownloadByteArray());
}
public Boolean deleteFile(String filePath) {
if (StringUtils.isEmpty(filePath)) {
return false;
}
try {
StorePath storePath = StorePath.parseFromUrl(filePath);
fastFileStorageClient.deleteFile(storePath.getGroup(), storePath.getPath());
} catch (Exception e) {
e.printStackTrace();
return false;
}
return true;
}
/**
* 封装文件完整 URL 地址
*
* @param path
* @return
*/
public String getResAccessUrl(String path) {
return fdfsWebServer.getWebServerUrl() + path;
}
} |
FastDFSController.java
|
1
2
3
4
5
6
7
8
9
10
11
12
13
14
15
16
17
18
19
20
21
22
23
24
25
26
27
28
29
30
31
32
33
34
35
36
37
38
39
40
41
42
43
44
45
46 |
@RestController
@RequestMapping("/fast-dfs")
public class FastDFSController {
/**
* @param file
* @return
* @throws IOException
*/
@PostMapping("")
@Transactional
public void uploadFile(MultipartFile file, String cuisineId) throws IOException {
String s = fastDfsUtil.uploadFile(file);
String resAccessUrl = fastDfsUtil.getResAccessUrl(s);
}
/**
* @param response
* @throws IOException
*/
@GetMapping("")
public void downloadFile(String filePath, HttpServletResponse response) throws IOException {
byte[] bytes = fastDfsUtil.downloadFile(filePath);
String[] split = filePath.split("/");
String fileName = split[split.length - 1];
// 设置强制下载不打开
response.setContentType("application/force-download");
fileName = URLEncoder.encode(fileName, StandardCharsets.UTF_8);
response.setHeader("Content-Disposition", "attachment;filename=" + fileName);
IOUtils.write(bytes, response.getOutputStream());
}
/**
* 流媒体的方式播放视频,只能从头看到尾,不能手动点击重新看已经看过的内容
* @param filePath
* @param response
* @throws IOException
*/
@GetMapping("/play")
public void streamMedia(String filePath, HttpServletResponse response) throws IOException {
byte[] bytes = fastDfsUtil.downloadFile(filePath);
IOUtils.copy(new ByteArrayInputStream(bytes), response.getOutputStream());
response.flushBuffer();
}
} |
到此这篇关于如何使用 docker compose 搭建 fastDFS文件服务器的文章就介绍到这了,更多相关docker compose 搭建 fastDFS内容请搜索快网idc以前的文章或继续浏览下面的相关文章希望大家以后多多支持快网idc!
原文链接:https://www.cnblogs.com/edoclin/p/14648832.html

相关文章


- 服务器租用价格怎么计算?服务器租用多少钱一年? 2025-05-27
- 云服务器的“弹性”体现在哪些方面? 2025-05-27
- 刀片服务器是什么 刀片服务器的主要特点 2025-05-27
- 利用FTP和计划任务自动备份网站数据和数据库 2025-05-27
- 服务器技术之硬件冗余技术 2025-05-27