目录
一、docker consul概述
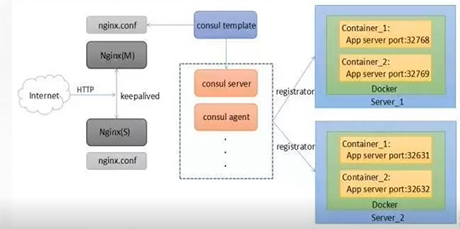
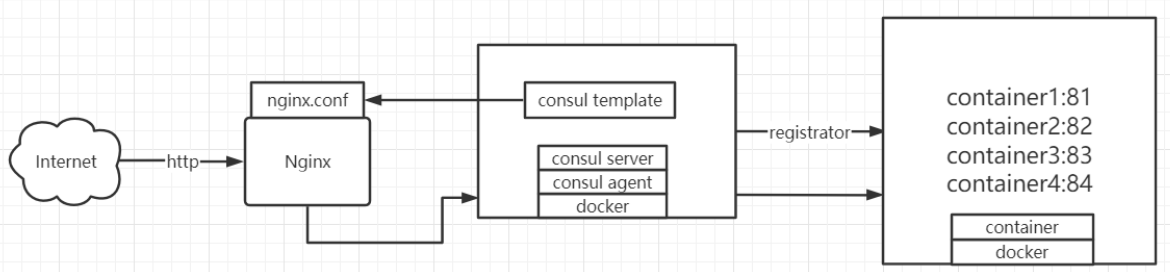
容器服务更新与发现:先发现再更新,发现的是后端节点上容器的变化(registrator),更新的是nginx配置文件(agent)
registrator:是consul安插在docker容器里的眼线,用于监听监控节点上容器的变化(增加或减少,或者宕机),一旦有变化会把这些信息告诉并注册在consul server端(使用回调和协程的方式,所以它的延迟和资源消耗会很少),consul server发生一旦发生注册列表的变化后,会把注册的信息告诉agent
agent(代理):用来控制consul template模板,用template组件去和nginx.conf来进行对接,模板里全是变量,用变量的方式去加载后端由注册到consul server端之后,server端会把信息告诉agent,agent和template进行对接,写入template,template就有了镜像,更新完之后会作为nginx.conf子配置文件被前端的nginx识别,consul agent会控制reload之后会识别nginx.conf配置文件中的变化,相当于识别后端的节点,就可以在地址池中动态调整自己后端资源。
consul的特性
- 支持健康检查、允许存储键值对
- 基于golong语言,可移植性强
- 支持acl访问控制
二、基于 nginx 与 consul 构建自动发现即高可用的 docker 服务架构
1.项目需求
- 使用 docker 将 consul、consul template、registrator 与 nginx 组成一个值得新人且可扩展的服务架构
- 在这个架构中添加或移除服务时,不需要重写任何配置,也不需要重启任何服务,一切都能够正常运行,以实现自动化运维
2.环境准备
| 主机 | ip 地址 | 需要安装的软件 |
|---|---|---|
| 主节点 | 192.168.126.11 | docker-ce、consul、consul-template、nginx |
| nginx | 192.168.126.12 | doker-ce |
3.部署步骤
|
1
2
3 |
#两台节点上都安装 docker-ce,记得关闭防火墙
systemctl stop firewalld && systemctl disable firewalld
setenforce 0 && sed -i "s/selinux=*/selinux=disabled/g" /etc/selinux/config |
①在主节点上部署consul
|
1
2
3
4
5
6
7
8
9
10
11
12
13
14
15
16
17
18
19
20
21
22
23
24
25
26
27
28
29 |
[root@xjj ~]# mkdir /consul
[root@xjj ~]# cd /consul/
[root@xjj consul]# rz
[root@xjj consul]# ls
consul_0.9.2_linux_amd64.zip
[root@xjj consul]# unzip consul_0.9.2_linux_amd64.zip -d /usr/bin/
archive: consul_0.9.2_linux_amd64.zip
inflating: /usr/bin/consul
[root@xjj consul]# consul agent \\
> -server \\
> -bootstrap \\
> -ui \\
> -data-dir=/var/lib/consul-data \\
> -bind=192.168.126.11 \\
> -client=0.0.0.0 \\
> -node=consul-server01 &> /var/log/consul.log &
[1] 100683
[root@xjj consul]# jobs -l
[1]+ 100683 运行中 consul agent -server -bootstrap -ui -data-dir=/var/lib/consul-data -bind=192.168.126.11 -client=0.0.0.0 -node=consul-server01 &>/var/log/consul.log &
[root@xjj consul]# consul members
node address status type build protocol dc
consul-server01 192.168.126.11:8301 alive server 0.9.2 2 dc1
[root@xjj consul]# consul info|grep leader
leader = true
leader_addr = 192.168.126.11:8300
[root@xjj consul]# netstat -natp|grep 8500
tcp 0 0 127.0.0.1:34120 127.0.0.1:8500 time_wait -
tcp 0 0 127.0.0.1:34118 127.0.0.1:8500 time_wait -
tcp6 0 0 :::8500 :::* listen 100683/consul |
参数详解
|
1
2
3
4
5
6
7
8
9
10
11
12
13
14
15
16
17
18
19 |
[root@xjj consul]# consul agent \\ #设置代理
> -server \\ #服务功能
> -bootstrap \\ #参与选举领袖
> -ui \\ #提供web访问界面
> -data-dir=/var/lib/consul-data \\ #提供一个代理存储数据目录
> -bind=192.168.126.16 \\ #绑定本机地址
> -client=0.0.0.0 \\ #面对的客户端地址(所有)
> -node=consul-server01 &> /var/log/consul.log & #定义节点名称,日志混合输出到log,并且放到后台运行
jobs -l #查看当前终端放入后台的工作,并列出进程的pid号
consul members #查看群集信息
consul info|grep leader #查看管理信息,leader就是领袖
#可通过http api获取群集信息:
curl 127.0.0.1:8500/v1/status/peers '//查看集群server成员'
curl 127.0.0.1:8500/v1/status/leader '//集群raf leader'
curl 127.0.0.1:8500/v1/catalog/services '//注册的所有服务'
curl 127.0.0.1:8500/v1/catalog/nginx '//查看(nginx)服务信息'
curl 127.0.0.1:8500/v1/catalog/nodes '//集群节点详细信息' |
②nginx 服务器连接 consul 并创建 nginx 容器服务
|
1
2
3
4
5
6
7
8
9
10
11
12
13
14
15
16
17
18
19
20
21
22
23
24
25
26
27
28
29
30
31
32 |
[root@localhost ~]# docker run -d \\
> --name=registrator \\
> --net=host \\
> -v /var/run/docker.sock:/tmp/docker.sock \\
> --restart=always \\
> gliderlabs/registrator:latest \\
> -ip=192.168.126.12 \\
> consul://192.168.126.11:8500
-----
digest: sha256:6e708681dd52e28f4f39d048ac75376c9a762c44b3d75b2824173f8364e52c10
status: downloaded newer image for gliderlabs/registrator:latest
db4cb9d6a56ce8b9a2155b1113e48e6c974889cd4cca363b410c116b75be5d59
[root@localhost ~]# docker ps -a
container id image command created status ports names
db4cb9d6a56c gliderlabs/registrator:latest "/bin/registrator -i…" 5 seconds ago up 5 seconds registrator
#创建容器,用来测试服务发现功能是否正常:
[root@localhost ~]# docker run -itd -p 81:80 --name xjj01 -h xcf01 nginx #-h选项表示指定host主机名称
[root@localhost ~]# docker run -itd -p 82:80 --name xjj02 -h xcf02 nginx
[root@localhost ~]# docker run -itd -p 83:80 --name xjj03 -h xcf03 httpd
[root@localhost ~]# docker run -itd -p 84:80 --name xjj0 -h xcf04 httpd
[root@localhost ~]# docker ps -a
container id image command created status ports names
8940a9b03dbb httpd "httpd-foreground" 4 seconds ago up 3 seconds 0.0.0.0:84->80/tcp, :::84->80/tcp xjj0
9ac4d089eb14 httpd "httpd-foreground" 39 seconds ago up 38 seconds 0.0.0.0:83->80/tcp, :::83->80/tcp xjj03
3d626fd61639 nginx "/docker-entrypoint.…" 25 minutes ago created xjj02
263aa9deb346 nginx "/docker-entrypoint.…" 26 minutes ago up 26 minutes 0.0.0.0:81->80/tcp, :::81->80/tcp xjj01
db4cb9d6a56c gliderlabs/registrator:latest "/bin/registrator -i…" 29 minutes ago up 29 minutes registrator
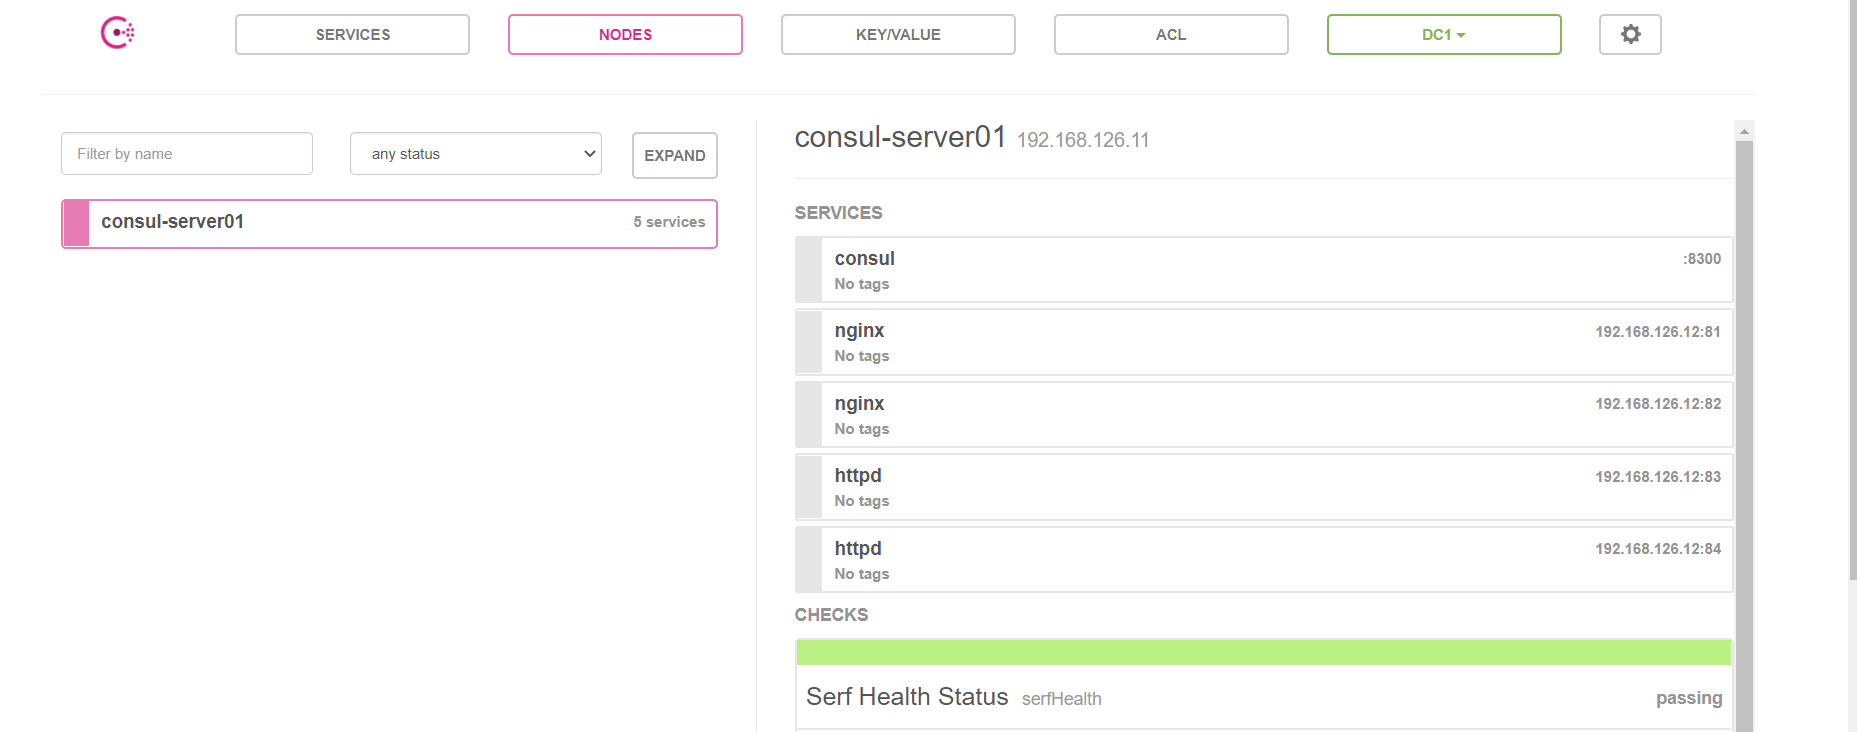
浏览器访问测试:`192.168.126.11:8500` |
|
1
2 |
[root@xjj consul]# curl 127.0.0.1:8500/v1/catalog/services
{"consul":[],"httpd":[],"nginx":[]}[root@xjj consul]# |
③consul 群集添加 consul-template 以实现容器自动加入
consul-template是一个守护进程,用于实时查询consul集群信息,并更新文件系统上任意数量的指定模板,生成配置文件,更新完成以后,可以查询consul中的服务目录,key、key-values等
|
1
2
3
4
5
6
7
8
9
10
11
12
13
14
15
16
17
18
19
20
21
22 |
cd consul/
vim nginx.ctmpl
upstream http_backend {
{{range service "nginx"}}
server {{.address}}:{{.port}};
{{end}}
}
server {
listen 100;
server_name localhost 192.168.126.11;
access_log /var/log/nginx/lic.com-access.log;
index index.html index.php;
location / {
proxy_set_header host $host;
proxy_set_header x-real-ip $remote_addr;
proxy_set_header client-ip $remote_addr;
proxy_set_header x-forwarded-for $proxy_add_x_forwarded_for;
proxy_pass http://http_backend;
}
} |
|
1
2
3
4
5
6
7
8
9
10
11
12
13
14
15
16
17
18
19
20
21
22
23
24
25
26
27
28
29
30
31
32
33
34
35
36
37
38
39
40
41
42
43
44
45
46
47
48
49
50
51
52
53 |
yum -y install gcc pcre-devel zlib-devel
rz nginx-1.12.2.tar.gz
tar zxvf nginx-1.12.2.tar.gz -c /opt
cd /opt/nginx-1.12.10
./configure --prefix=/usr/local/nginx
make && make install
--
vim /usr/local/nginx/conf/nginx.conf
第19 include vhost/*.conf; #19行添加,虚拟主机目录
[root@xjj nginx-1.12.2]# mkdir /usr/local/nginx/conf/vhost
'//创建虚拟主机目录'
[root@xjj nginx-1.12.2]# mkdir /var/log/nginx
'//创建日志文件目录'
[root@xjj nginx-1.12.2]# /usr/local/nginx/sbin/nginx
'//启动nginx'
[root@xjj nginx-1.12.2]# netstat -natp|grep nginx
tcp 0 0 0.0.0.0:80 0.0.0.0:* listen 104348/nginx: maste
--
#启动template,指定template模板文件及生成路径:
[root@xjj consul]# consul-template -consul-addr 192.168.126.16:8500 -template "/consul/nginx.ctmpl:/usr/local/nginx/conf/vhost/xjj.conf:/usr/local/nginx/sbin/nginx -s reload" --log-level=info
#指定模板路径/consul/nginx.ctmpl,生成到/usr/locla/nginx/conf/vhost/xjj.conf,然后重载nginx -s reload,之后定义日志级别,进入监控状态
--
#主节点打开新终端查看配置文件:
[root@xjj ~]# cat /usr/local/nginx/conf/vhost/xjj.conf
#访问这个池子里面的web页面,得访问192.168.126.11:8080,且是轮询机制,这里若访问不了,可以重载nginx再试试
upstream http_backend {
server 192.168.126.12:81;
server 192.168.126.12:82;
}
server {
listen 8080;
server_name localhost 192.168.126.11;
access_log /var/log/nginx/xjj.cn-access.log;
index index.html index.php;
location / {
proxy_set_header host $host;
proxy_set_header x-real-ip $remote_addr;
proxy_set_header client-ip $remote_addr;
proxy_set_header x-forwarded-for $proxy_add_x_forwarded_for;
proxy_pass http://http_backend;
}
} |
④新增一个 nginx 容器节点以测试自动更新
|
1
2
3
4
5
6
7
8
9
10
11
12
13
14
15
16
17
18
19
20
21
22
23
24
25 |
[root@localhost ~]# docker run -itd -p 85:80 --name xjj05 -h xcf05 nginx #增加一个nginx容器节点,测试服务发现及配置更新功能
[root@xjj ~]# cat /usr/local/nginx/conf/vhost/xcf.conf
upstream http_backend {
server 192.168.126.12:81;
server 192.168.126.12:82;
server 192.168.126.12:85;
}
server {
listen 8080;
server_name localhost 192.168.126.11;
access_log /var/log/nginx/xcf.cn-access.log;
index index.html index.php;
location / {
proxy_set_header host $host;
proxy_set_header x-real-ip $remote_addr;
proxy_set_header client-ip $remote_addr;
proxy_set_header x-forwarded-for $proxy_add_x_forwarded_for; }
} |
⑤测试访问代理服务器 是否可以完成代理访问轮询
|
1
2
3
4
5 |
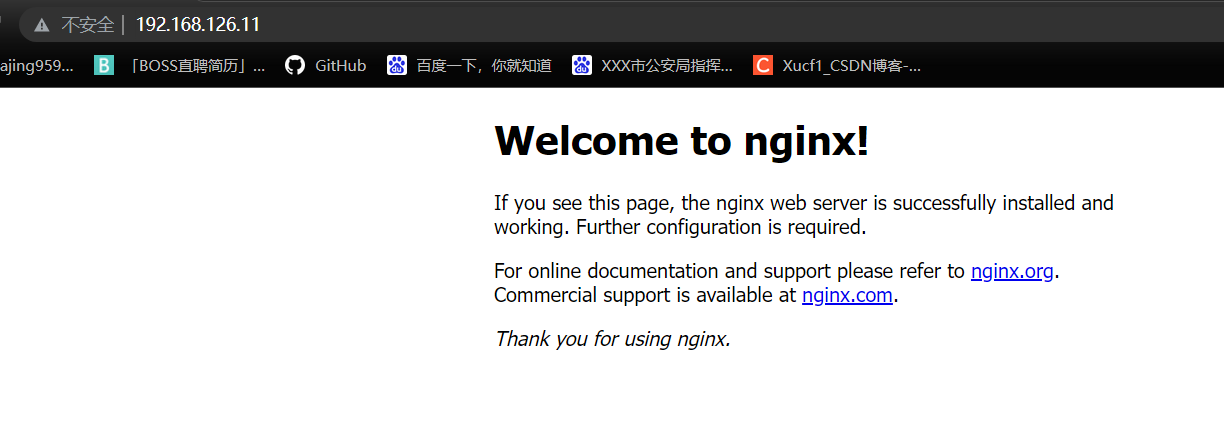
http://192.168.126.11:80/
docker logs -f xjj01
docker logs -f xjj02
docker logs -f xjj05 |
⑥consul 多节点配置
|
1
2
3
4
5
6
7
8
9
10
11
12
13
14
15
16
17
18
19 |
#添加一台已有docker环境的服务器加入已有的群集中:
consul agent \\
-server \\
-bootstrap \\
-ui \\
-data-dir=/var/ib/consul-data \\
-bind=192.168.126.11 \\
-client=0.0.0.0 \\
-node=consul-server02 \\
-enable-script-checks=true \\
-datacenter=dc1 \\
-join 192.168.126.15 &> /var/log/consul.log &
--解释--
-enable-script-checks=true: 设置检查服务为可用
-datacenter: 数据中心名称
-join: 加入到已有的集群中 |
到此这篇关于docker-consul概述以及集群环境搭建步骤(图文详解)的文章就介绍到这了,更多相关docker-consul 集群环境搭建内容请搜索快网idc以前的文章或继续浏览下面的相关文章希望大家以后多多支持快网idc!
原文链接:https://blog.csdn.net/weixin_53560205/article/details/121738920

相关文章


- 服务器租用价格怎么计算?服务器租用多少钱一年? 2025-05-27
- 云服务器的“弹性”体现在哪些方面? 2025-05-27
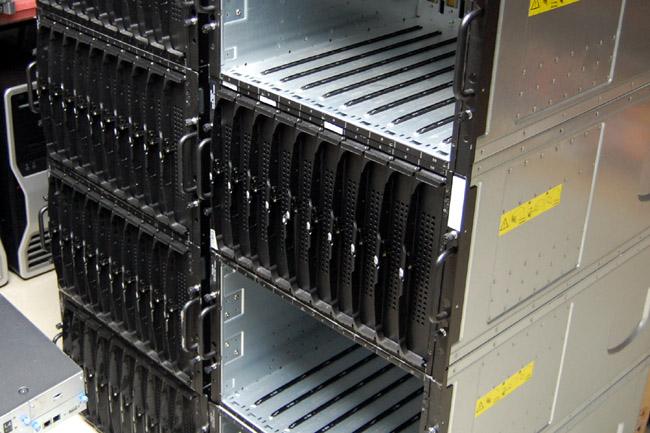
- 刀片服务器是什么 刀片服务器的主要特点 2025-05-27
- 利用FTP和计划任务自动备份网站数据和数据库 2025-05-27
- 服务器技术之硬件冗余技术 2025-05-27