

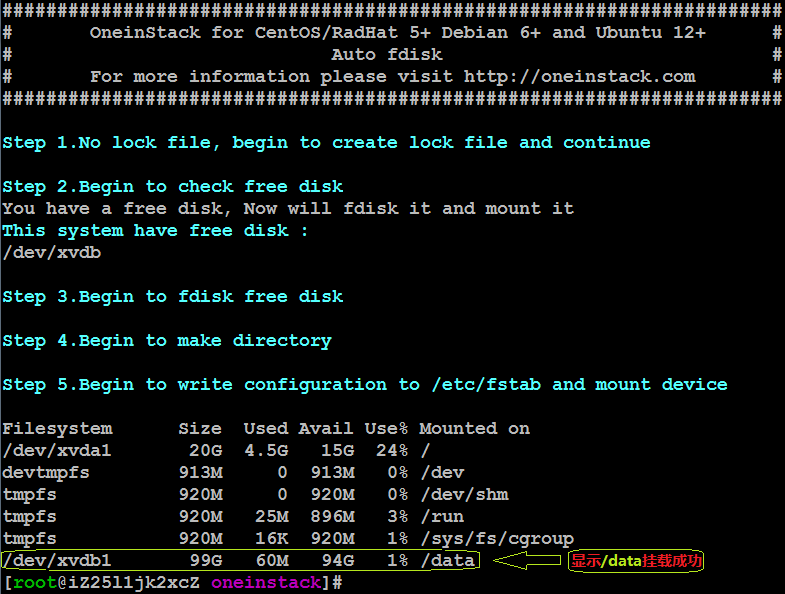
功能:自动检测是否有尚未分区的数据盘,格式化新的数据盘并自动挂载
解决了什么问题:一键式检测是否有尚未分区的数据盘,并能对其格式化和自动挂载,省去了复杂的命令和步骤
执行方法:以root身份执行命令
?
|
1
2
3 |
wget http://mirrors.linuxeye.com/scripts/auto_fdisk.sh
chmod +x auto_fdisk.sh
./auto_fdisk.sh |
脚本内容如下:
?
|
1
2
3
4
5
6
7
8
9
10
11
12
13
14
15
16
17
18
19
20
21
22
23
24
25
26
27
28
29
30
31
32
33
34
35
36
37
38
39
40
41
42
43
44
45
46
47
48
49
50
51
52
53
54
55
56
57
58
59
60
61
62
63
64
65
66
67
68
69
70
71
72
73
74
75
76
77
78
79
80
81
82
83
84
85
86
87
88
89
90
91
92
93
94
95
96
97
98
99
100
101
102
103
104
105
106
107
108
109
110
111
112
113
114
115
116
117
118
119
120
121
122
123
124
125
126
127
128
129
130
131
132
133
134
135
136
137
138
139
140
141
142
143
144
145
146
147
148
149
150
151
152
153
154
155
156
157
158
159
160
161
162
163 |
#!/bin/bash
# author: yeho <lj2007331 at gmail.com>
# blog: https://blog.linuxeye.com
#
# notes: oneinstack for centos/radhat 5+ debian 6+ and ubuntu 12+
#
# project home page:
# http://oneinstack.com
# https://github.com/lj2007331/oneinstack
export path=/usr/local/sbin:/usr/local/bin:/sbin:/bin:/usr/sbin:/usr/bin
clear
printf "
#######################################################################
# oneinstack for centos/radhat 5+ debian 6+ and ubuntu 12+ #
# auto fdisk #
# for more information please visit http://oneinstack.com #
#######################################################################
"
echo=echo
for cmd in echo /bin/echo; do
$cmd >/dev/null 2>&1 || continue
if ! $cmd -e "" | grep -qe '^-e'; then
echo=$cmd
break
fi
done
csi=$($echo -e "\\033[")
cend="${csi}0m"
cdgreen="${csi}32m"
cred="${csi}1;31m"
cgreen="${csi}1;32m"
cyellow="${csi}1;33m"
cblue="${csi}1;34m"
cmagenta="${csi}1;35m"
ccyan="${csi}1;36m"
csuccess="$cdgreen"
cfailure="$cred"
cquestion="$cmagenta"
cwarning="$cyellow"
cmsg="$ccyan"
# check if user is root
[ $(id -u) != "0" ] && { echo "${cfailure}error: you must be root to run this script${cend}"; exit 1; }
mount_dir=/data
fstab_file=/etc/fstab
count=0
tmp1=/tmp/.tmp1
tmp2=/tmp/.tmp2
> $tmp1
> $tmp2
# check lock file, one time only let the script run one time
lockfile=/tmp/.$(basename $0)
if [ -f "$lockfile" ];then
echo
echo "${cwarning}the script is already exist, please next time to run this script${cend}"
echo
exit
else
echo
echo "${cmsg}step 1.no lock file, begin to create lock file and continue${cend}"
echo
touch $lockfile
fi
# check disk partition
check_disk() {
> $lockfile
for i in `fdisk -l | grep "disk" | grep "/dev" | awk '{print $2}' | awk -f: '{print $1}' | grep "vd"`
do
device_count=$(fdisk -l $i | grep "$i" | awk '{print $2}' | awk -f: '{print $1}' | wc -l)
new_mount=$(df -h)
if [ $device_count -lt 2 ];then
if [ -n "$(echo $new_mount | grep -w "$i")" -o "$(grep -v '^#' $fstab_file | grep -v ^$ | awk '{print $1,$2,$3}' | grep -w "$i" | awk '{print $2}')" == '/' -o "$(grep -v '^#' $fstab_file | grep -v ^$ | awk '{print $1,$2,$3}' | grep -w "$i" | awk '{print $3}')" == 'swap' ];then
echo "${cwarning}the $i disk is mounted${cend}"
else
echo $i >> $lockfile
echo "you have a free disk, now will fdisk it and mount it"
fi
fi
done
disk_list=$(cat $lockfile)
if [ "x$disk_list" == "x" ];then
echo
echo "${cwarning}no free disk need to be fdisk. exit script${cend}"
echo
rm -rf $lockfile
exit 0
else
echo "${cmsg}this system have free disk :${cend}"
for i in `echo $disk_list`
do
echo "$i"
count=$((count+1))
done
[ $count -gt 1 ] && { echo "${cwarning}this system has at least two free disk, you must manually mount it${cend}"; exit 0; }
fi
}
# check os
check_os() {
os_release=$(grep "aliyun linux release" /etc/issue 2>/dev/null)
os_release_2=$(grep "aliyun linux release" /etc/aliyun-release 2>/dev/null)
if [ "$os_release" ] && [ "$os_release_2" ];then
if echo "$os_release" | grep "release 5" >/dev/null 2>&1;then
os_release=aliyun5
modify_env
fi
fi
}
# install ext4
modify_env() {
modprobe ext4
yum -y install e4fsprogs
}
# fdisk ,formating and create the file system
fdisk_fun() {
fdisk -s 56 $1 << eof
n
p
1
wq
eof
sleep 5
mkfs.ext4 ${1}1
}
# make directory
make_dir() {
echo "${cmsg}step 4.begin to make directory${cend}"
[ -d "$mount_dir" ] && mv ${mount_dir}{,_bk}
mkdir -p $mount_dir
echo "$mount_dir" >> $tmp1
}
# config /etc/fstab and mount device
main() {
for i in `echo $disk_list`
do
echo
echo "${cmsg}step 3.begin to fdisk free disk${cend}"
[ -n "`df -h | grep ${i}1`" ] && { echo "${cfailure}the ${i}1 already mount${cend}"; echo; exit 0; }
fdisk_fun $i > /dev/null 2>&1
echo
echo "${i}1" >> $tmp2
done
make_dir
> $lockfile
paste $tmp2 $tmp1 > $lockfile
echo
echo "${cmsg}step 5.begin to write configuration to /etc/fstab and mount device${cend}"
while read a b
do
[ -z "`grep ^${a} $fstab_file`" -a -z "`grep ${b} $fstab_file`" ] && echo "${a} $b ext4 defaults 0 0" >> $fstab_file
done < $lockfile
mount -a
echo
}
# start script
echo "${cmsg}step 2.begin to check free disk${cend}"
#service mysqld stop
#mv /data /root
check_os
check_disk
main
df -h
#mv /root/data/* /data
#service mysqld start
rm -rf $lockfile $tmp1 $tmp2 |
感谢阅读,希望能帮助到大家,谢谢大家对本站的支持!

相关文章


猜你喜欢
- 个人网站搭建:如何挑选具有弹性扩展能力的服务器? 2025-06-10
- 个人服务器网站搭建:如何选择适合自己的建站程序或框架? 2025-06-10
- 64M VPS建站:能否支持高流量网站运行? 2025-06-10
- 64M VPS建站:怎样选择合适的域名和SSL证书? 2025-06-10
- 64M VPS建站:怎样优化以提高网站加载速度? 2025-06-10


