本文介绍了centos7上elastic search安装及填坑记,分享给大家,具体如下:
下载elastic search 5.3.0
|
1
2
3
4
5 |
wget https://artifacts.elastic.co/downloads/elasticsearch/elasticsearch-5.3.0.tar.gz
mv elasticsearch-5.3.0.tar.gz /opt
cd /opt
tar -xzvf elasticsearch-5.3.0.tar.gz
cd elasticsearch-5.3.0/ |
启动es
|
1
2 |
cd /bin
./elasticsearch |
按照道理应该就可以了,然而接下来各种坑一一出现,分别阐述
错误1:error='cannot allocate memory' (errno=12)

error='cannot allocate memory'
solutions:
由于elasticsearch5.0默认分配jvm空间大小为2g,需要改小一点
|
1
2
3 |
vim config/jvm.options
-xms2g → -xms512m
-xmx2g → -xmx512m |
错误2: can not run elasticsearch as root
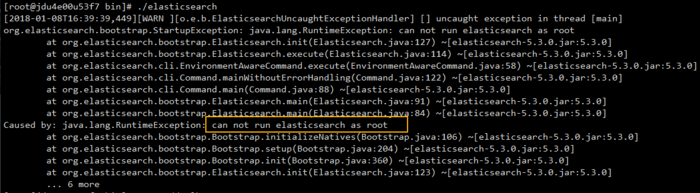
can not run elasticsearch as root
solutions:
在 linux 环境中,elasticsearch 不允许以 root 权限来运行!所以需要创建一个非root用户,以非root用户来起es
|
1
2
3
4 |
groupadd elk # 创建用户组elk
useradd elk -g elk -p 111111 # 创建新用户elk,-g elk 设置其用户组为 elk,-p 111 设置其密码6个1
chown -r elk:elk /opt # 更改 /opt 文件夹及内部文件的所属用户及组为 elk:elk
su elk # 切换到非root用户elk下来 |
错误3:(1) max file descriptors [4096] for elasticsearch process is too low, increase to at least [65536]
(2) max virtual memory areas vm.max_map_count [65530] is too low, increase to at least [262144]
此错误出现在修改config/elasticsearch.yml中的network.host为network.host: 0.0.0.0以便让外网任何ip都能来访问时。
solutions:
切换到root用户,然后
|
1
2
3
4
5
6 |
vim /etc/security/limits.conf
* soft nofile 300000
* hard nofile 300000
* soft nproc 102400
* soft memlock unlimited
* hard memlock unlimited |
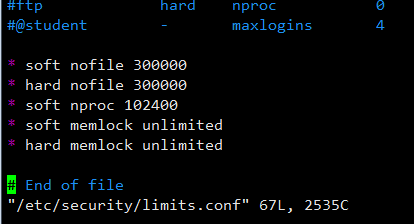
/etc/security/limits.conf
错误4:max virtual memory areas vm.max_map_count [65530] is too low, increase to at least [262144]
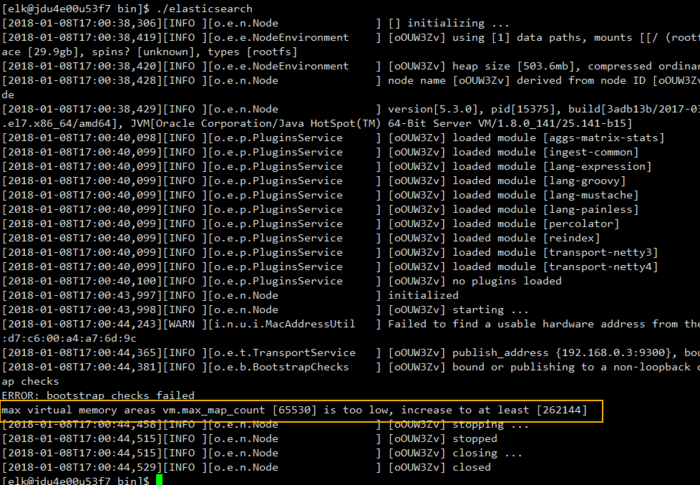
vm.max_map_count is too low
solutions:
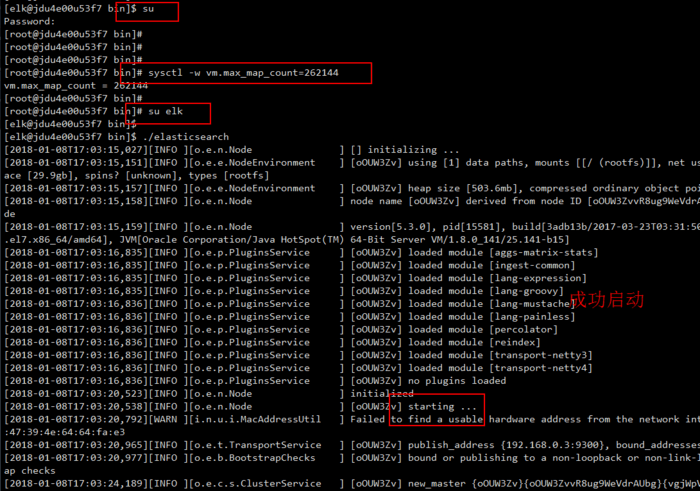
先要切换到root用户;
然后可以执行以下命令,设置 vm.max_map_count ,但是重启后又会恢复为原值。
|
1 |
sysctl -w vm.max_map_count=262144 |
持久性的做法是在 /etc/sysctl.conf 文件中修改 vm.max_map_count 参数:
|
1
2 |
echo "vm.max_map_count=262144" > /etc/sysctl.conf
sysctl -p |
最后终于在外网访问成功:
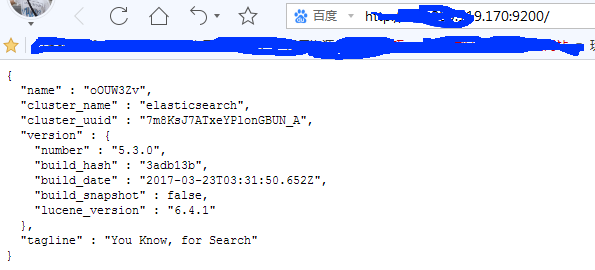
外网访问成功!
安装可视化插件 elasticsearch-head
|
1
2
3
4 |
git clone git://github.com/mobz/elasticsearch-head.git
cd elasticsearch-head
npm install # 此处我试图用cnpm install有问题,用npm可以
npm run start |
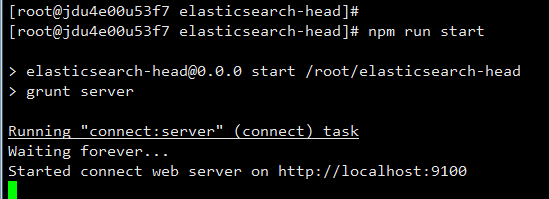
然后在外网访问http://你的安装机ip:9100
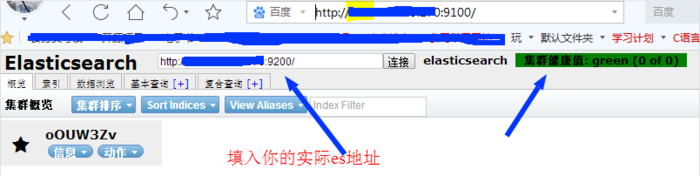
访问elasticsearch-head可视化界面成功
最后实际简单测试一下
新建 index,可以直接向 elastic 服务器发出 put 请求。下面的例子是新建一个名叫weather的 index。

用rest接口向es添加index
然而刷新elasticsearch-head可视化界面可以看到索引已经成功插入
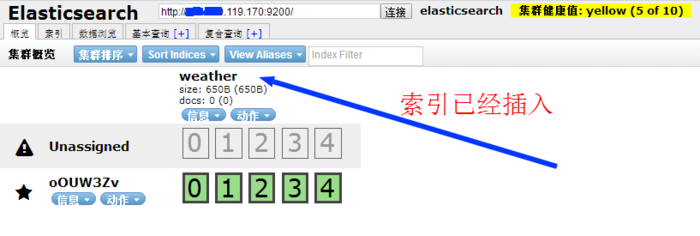
索引已经插入
以上就是本文的全部内容,希望对大家的学习有所帮助,也希望大家多多支持快网idc。
原文链接:https://www.jianshu.com/p/04f4d7b4a1d3

相关文章


- ASP.NET本地开发时常见的配置错误及解决方法? 2025-06-10
- ASP.NET自助建站系统的数据库备份与恢复操作指南 2025-06-10
- 个人网站服务器域名解析设置指南:从购买到绑定全流程 2025-06-10
- 个人网站搭建:如何挑选具有弹性扩展能力的服务器? 2025-06-10
- 个人服务器网站搭建:如何选择适合自己的建站程序或框架? 2025-06-10