需求
最近需要迁移Node线上服务,于是新申请了两台线上服务器;
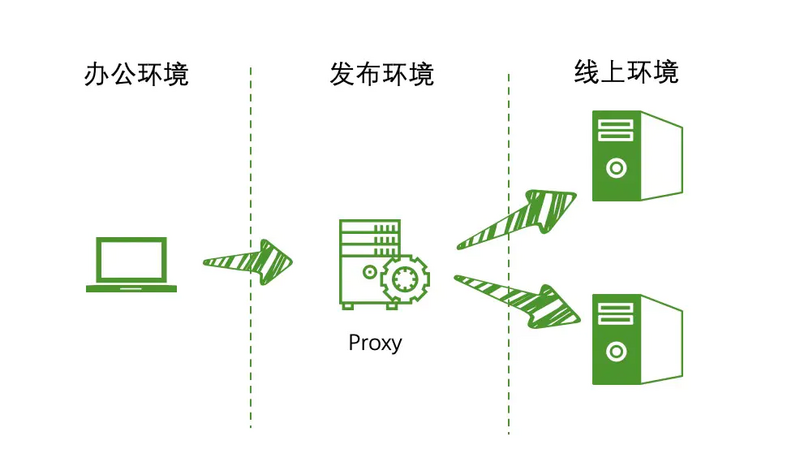
部署服务器后,需要验证服务是否正常,办公环境与线上环境网络是隔离的,无法直接访问;但是,线上服务器可通过部署服务器访问,而办公网络是可以访问部署机的;
所以,可通过在部署机上配置代理的方式,办公环境请求部署机,然后把请求代理到线上服务的方式验证服务是否正常。
整个网络结构如下图所示:
Nginx安装
下载
下载页面: http://nginx.org/en/download.html选择版本鼠标右键拷贝链接地址
|
1
2
3
4 |
# 下载
[work@40-10-14 opt]$ wget http://nginx.org/download/nginx-1.18.0.tar.gz
# 解压文件
[work@40-10-14 opt]$ tar -xvf nginx-1.18.0.tar.gz |
安装
|
1
2
3
4
5
6 |
# 1. 默认安装:root权限进入解压后的目录,执行如下命令安装
[root@40-10-14 nginx-1.18.0]# ./configure && make && make install
# 2.指定目录:安装到指定的/opt/nginx目录
[work@40-10-14 opt]$ mkdir /opt/nginx
[work@40-10-14 nginx-1.18.0]$ ./configure --prefix=/opt/nginx && make && mae install |
默认安装,非root权限会报如下错误
|
1
2
3
4 |
mkdir: cannot create directory `/usr/local/nginx': Permission denied
make[1]: *** [install] Error 1
make[1]: Leaving directory `/opt/nginx-1.18.0'
make: *** [install] Error 2 |
默认安装后,查看nginx的安装目录,可以看到安装在/usr/local/nginx目录下
|
1
2 |
[root@40-10-14 opt]# whereis nginx
nginx: /usr/local/nginx |
1.建议使用指定目录方式安装。如果切换为root权限去安装,后续修改config文件也需要root权限
2.或者root安装后,修改权限为普通用户可操作也行
添加软链
添加软链,使得nginx命令全局能访问,每次运行就不用切换到安装目录中了
|
1
2
3
4
5 |
# 添加软链
[root@40-10-14 sbin]# ln -s /opt/nginx/sbin/nginx /usr/local/bin/
# 查看版本
[root@40-10-14 sbin]# nginx -v
nginx version: nginx/1.18.0 |
常用命令
强制停止:
|
1
2
3
4
5
6
7
8
9 |
# 查看linux进程id
[root@40-10-14 ~]# ps -ef | grep nginx
nobody 45198 1 0 16:12 ? 00:00:00 nginx: worker process
root 51261 50692 0 17:00 pts/0 00:00:00 grep nginx
# 关闭进程
[root@40-10-14 ~]# kill 45198
# 之前的进程已被关闭
[root@40-10-14 ~]# ps -ef | grep nginx
root 51277 50692 0 17:00 pts/0 00:00:00 grep nginx |
配置代理
配置两台机器的请求转发,编辑nginx安装目录下的nginx/conf/nginx.conf文件即可
|
1
2
3
4
5
6
7
8
9
10
11
12
13
14
15
16
17
18
19
20
21
22
23
24
25
26
27
28
29
30
31
32
33
34
35
36
37
38
39
40
41
42
43
44
45
46
47
48
49
50
51
52
53
54
55
56
57
58
59
60
61
62
63
64
65
66
67
68
69
70
71
72
73
74
75
76
77
78
79
80
81
82
83
84
85
86
87
88
89
90
91
92
93
94
95
96
97
98
99
100
101
102
103
104
105
106
107
108
109
110
111
112
113
114
115
116
117
118
119
120
121
122
123
124
125 |
#user nobody;
worker_processes 1;
#error_log logs/error.log;
#error_log logs/error.log notice;
#error_log logs/error.log info;
#pid logs/nginx.pid;
events {
worker_connections 1024;
}
http {
include mime.types;
default_type application/octet-stream;
#log_format main '$remote_addr - $remote_user [$time_local] "$request" '
# '$status $body_bytes_sent "$http_referer" '
# '"$http_user_agent" "$http_x_forwarded_for"';
#access_log logs/access.log main;
sendfile on;
#tcp_nopush on;
#keepalive_timeout 0;
keepalive_timeout 65;
#gzip on;
# 请求需要转发到如下两台机器上,流量平分;指定IP和端口
upstream zpserver {
server xx.xx.xx.22:10001;
server xx.xx.xx.23:10001;
}
server {
# nginx服务端口为80
listen 80;
server_name localhost;
#charset koi8-r;
#access_log logs/host.access.log main;
# /user根路径的请求才转发
location /user {
root html;
index index.html index.htm;
proxy_pass http://zpserver;
}
#error_page 404 /404.html;
# redirect server error pages to the static page /50x.html
#
error_page 500 502 503 504 /50x.html;
location = /50x.html {
root html;
}
# proxy the PHP scripts to Apache listening on 127.0.0.1:80
#
#location ~ \\.php$ {
# proxy_pass http://127.0.0.1;
#}
# pass the PHP scripts to FastCGI server listening on 127.0.0.1:9000
#
#location ~ \\.php$ {
# root html;
# fastcgi_pass 127.0.0.1:9000;
# fastcgi_index index.php;
# fastcgi_param SCRIPT_FILENAME /scripts$fastcgi_script_name;
# include fastcgi_params;
#}
# deny access to .htaccess files, if Apache's document root
# concurs with nginx's one
#
#location ~ /\\.ht {
# deny all;
#}
}
# another virtual host using mix of IP-, name-, and port-based configuration
#
#server {
# listen 8000;
# listen somename:8080;
# server_name somename alias another.alias;
# location / {
# root html;
# index index.html index.htm;
# }
#}
# HTTPS server
#
#server {
# listen 443 ssl;
# server_name localhost;
# ssl_certificate cert.pem;
# ssl_certificate_key cert.key;
# ssl_session_cache shared:SSL:1m;
# ssl_session_timeout 5m;
# ssl_ciphers HIGH:!aNULL:!MD5;
# ssl_prefer_server_ciphers on;
# location / {
# root html;
# index index.html index.htm;
# }
#}
} |
注意:修改完nginx的配置文件后,需要运行nginx -s reload才能生效
验证
由于线上服务很多都是需要登录的,所以访问时需要使用域名访问,而不能使用IP访问,因为cookie都是跟域名绑定的
解决这个问题很简单,配置本机host即可
|
1
2 |
# IP为Nginx服务器IP
xx.xx.xx.14 xxx.daojia.com |
通过上述配置,在本机浏览器上请求xxx.daojia.com即可间接通过部署机上的Nginx访问到线上服务,以此在内网测试服务是否正确;待服务无异常后,把线上流量切过来即可。
到此这篇关于通过Nginx解决网络隔离实践记录详解的文章就介绍到这了,更多相关Nginx 网络隔离内容请搜索快网idc以前的文章或继续浏览下面的相关文章希望大家以后多多支持快网idc!
原文链接:https://segmentfault.com/a/1190000022554783

相关文章


- ASP.NET本地开发时常见的配置错误及解决方法? 2025-06-10
- ASP.NET自助建站系统的数据库备份与恢复操作指南 2025-06-10
- 个人网站服务器域名解析设置指南:从购买到绑定全流程 2025-06-10
- 个人网站搭建:如何挑选具有弹性扩展能力的服务器? 2025-06-10
- 个人服务器网站搭建:如何选择适合自己的建站程序或框架? 2025-06-10