1.首先我们要知道什么是Hibernate
Hibernate是一个轻量级的ORMapping对象。主要用来实现Java和数据库表之间的映射,除此之外还提供数据查询和数据获取的方法,
可以大幅度减少开发时人工使用SQL和JDBC处理数据的时间,解放编程人员95%的任务。
2.什么是ORM Object-Relational-Mapping对象关系映射
ORM:是通过java对象映射到数据库表,通过操作Java对象可以完成对数据表的操作。(假如你用的是Dbutils那么还需要在Java类中写sql语句,而orm就不用)
Hibernate是一个完全的ORM框架只需要对对象的操作即可生成底层的SQL。
接下来直接进入主题:
先看看使用hibernate的基本流程!下面是简单的流程图
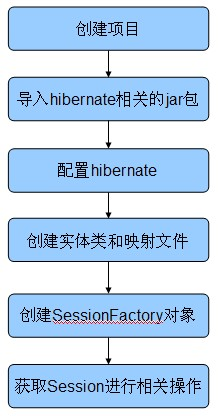
1.创建项目:
用myeclipse创建一个web project
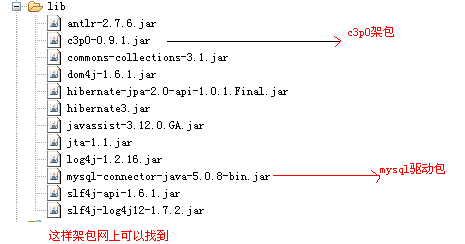
2.导入hibernate相关的架包到项目
第三步: 配置hibernate
在src目录下新建一个xml文件,名称为hibernate.cfg.xml(当然,你也可以不叫这个名称,不过在代码中要作相应的修改),拷贝如下内容:
|
1
2
3
4
5
6
7
8
9
10
11
12
13
14
15
16
17
18
19
20
21
22
23
24
25
26
27
28
29
30
31
32
33
34
|
<?xml version="1.0" encoding="UTF-8"?>
<!DOCTYPE hibernate-configuration PUBLIC
"-//Hibernate/Hibernate Configuration DTD 3.0//EN"
"http://www.hibernate.org/dtd/hibernate-configuration-3.0.dtd">
<hibernate-configuration>
<!-- 配置会话工厂 hibernate 核心 管理数据库连接池 -->
<session-factory>
<!-- 1.配置数据库连接参数 -->
<!-- 1.1配置jdbc四个基本连接参数 -->
<property name="hibernate.connection.username">root</property>
<property name="hibernate.connection.password">root</property>
<property name="hibernate.connection.url">jdbc:mysql:///hibernateexec</property>
<property name="hibernate.connection.driver_class">com.mysql.jdbc.Driver</property>
<!-- 1.2配置 hibernate使用的方言 -->
<property name="hibernate.dialect">org.hibernate.dialect.MySQLDialect</property>
<!-- 2.配置其他相关属性 -->
<!-- 2.1自动建表 -->
<property name="hibernate.hbm2ddl.auto">update</property>
<!-- 2.2在日志中输出sql -->
<property name="hibernate.show_sql">true</property>
<!-- 2.3格式化sql -->
<property name="hibernate.format_sql">true</property>
<!-- 开启事务 -->
<property name="hibernate.connection.autocommit">true</property>
<!-- 配置c3p0数据库连接池 -->
<property name="hibernate.connection.provider_class">org.hibernate.connection.C3P0ConnectionProvider</property>
<property name="hibernate.c3p0.min_size">5</property>
<property name="hibernate.c3p0.max_size">50</property>
<property name="hibernate.c3p0.timeout">120</property>
<property name="hibernate.c3p0.idle_test_period">3000</property>
<!-- 3.加载映射文件 -->
<mapping resource="com/study/model/Customer.hbm.xml"/>
</session-factory>
</hibernate-configuration>
|
这里提醒一点:customer表你可以不用去手动创建,但是数据库hibernateexec是要你手动创建的
第四步.创建实体和映射文件
|
1
2
3
4
5
6
7
8
9
10
11
|
public class Customer {
private int id;
private String name;
private int age;
private String city;
private String addr;
}
/*
* 提供set和get方法
*/
Customer 实体
|
映射文件和实体对象在同一个包下:
|
1
2
3
4
5
6
7
8
9
10
11
12
13
14
15
16
17
18
19
20
21
22
23
24
25
26
27
28
29
30
31
32
33
34
35
36
37
38
39
40
41
42
|
<?xml version="1.0" encoding="UTF-8"?>
<!DOCTYPE hibernate-mapping PUBLIC
"-//Hibernate/Hibernate Mapping DTD 3.0//EN"
"http://www.hibernate.org/dtd/hibernate-mapping-3.0.dtd">
<hibernate-mapping>
<!-- 完成实体类 和数据表的映射 -->
<!-- 1.类与表的映射 -->
<!--
name 要映射的完整类名
table 映射到数据库的表名
catalog 映射到数据库的名字
-->
<class name="com.study.model.Customer" table="customer" catalog="hibernateexec">
<!-- 2.类中属性 和表中 数据列的映射 -->
<!-- 2.1主键 -->
<!--
name 属性名(类中)
column 列名(表中)
type 数据类型
-->
<id name="id" column="id" type="int">
<!-- 配置主键生成策略 主键自动增长-->
<generator class="identity"></generator>
</id>
<!-- 2.2 普通属性 -->
<!--
name 属性名(类中)
column 列名(表中)
type 数据类型(也可以直接写String)
-->
<property name="name" column="name" type="java.lang.String"></property>
<property name="age" column="age" type="int"></property>
<!-- 也可以分开写 -->
<property name="city">
<column name="city" sql-type="varchar(20)"></column>
</property>
<!-- 如果什么都不写,那就默认类的属性名和数据库中的列名一致都为addr,类型为varchar -->
<property name="addr"></property>
</class>
</hibernate-mapping>
Customer.hbm.xml
|
第五步:创建SessionFactory对象
第六步:获取Session对象进行相关操作
第五步和第六步我和在一起,第六步我们发现不论增删改查前面四步都是一样的,我们其实可以提取到一个工具类,再来调用这样加快效率。
|
1
2
3
4
5
6
7
8
9
10
11
12
13
14
15
16
17
18
19
20
21
22
23
24
25
26
27
28
29
30
31
32
33
34
35
36
37
38
39
40
41
42
43
44
45
46
47
48
49
50
51
52
53
54
55
56
57
58
59
60
61
62
63
64
65
66
67
68
69
70
71
72
73
74
75
76
77
78
79
80
81
82
83
84
85
86
87
88
89
90
91
92
93
94
95
96
97
98
99
100
101
102
103
104
105
106
107
108
109
110
111
112
113
|
import java.util.List;
import org.hibernate.Query;
import org.hibernate.SQLQuery;
import org.hibernate.Session;
import org.hibernate.SessionFactory;
import org.hibernate.Transaction;
import org.hibernate.cfg.Configuration;
import org.junit.Test;
import com.study.model.Customer;
public class HibernateTest {
/*
* 保存数据
*/
@Test
public void testInsert() {
// 实例化配置对象 加载映射文件 加载 hibernate.cfg.xml
Configuration configuration = new Configuration().configure();
// 创建会话工厂
SessionFactory sessionFactory = configuration.buildSessionFactory();
// 创建会话
Session session = sessionFactory.openSession();
// 开启事务
Transaction transaction = session.beginTransaction();
// 编写自己的逻辑代码
Customer customer = new Customer();
customer.setName("小黄");
customer.setAge(40);
customer.setCity("北京");
// 直接保存
session.save(customer);
// 提交事务
transaction.commit();
session.close();
sessionFactory.close();
}
//查询所有的
@Test
public void testFindAllByHQL(){
// 实例化配置对象 加载映射文件 加载 hibernate.cfg.xml
Configuration configuration = new Configuration().configure();
// 创建会话工厂
SessionFactory sessionFactory = configuration.buildSessionFactory();
// 创建会话
Session session = sessionFactory.openSession();
// 开启事务
Transaction transaction = session.beginTransaction();
//编写HQL语句(面向类和属性的查询
String hql =" from Customer";//这里是Customer不是表名 是类名 查询Customer
Query query =session.createQuery(hql);
List<Customer> customers=query.list();
System.out.println(customers);
// 提交事务
transaction.commit();
session.close();
sessionFactory.close();
}
// 删除
@Test
public void testDelete() {
// 实例化配置对象 加载映射文件 加载 hibernate.cfg.xml
Configuration configuration = new Configuration().configure();
// 创建会话工厂
SessionFactory sessionFactory = configuration.buildSessionFactory();
// 创建会话
Session session = sessionFactory.openSession();
// 开启事务
Transaction transaction = session.beginTransaction();
Customer customer =new Customer();
customer.setId(2);
session.delete(customer);
// 提交事务
transaction.commit();
session.close();
sessionFactory.close();
}
// 修改
@Test
public void testUpdate() {
// 实例化配置对象 加载映射文件 加载 hibernate.cfg.xml
Configuration configuration = new Configuration().configure();
// 创建会话工厂
SessionFactory sessionFactory = configuration.buildSessionFactory();
// 创建会话
Session session = sessionFactory.openSession();
// 开启事务
Transaction transaction = session.beginTransaction();
Customer customer = (Customer) session.get(Customer.class, 2);
customer.setCity("杭州");
session.update(customer);
// 提交事务
transaction.commit();
session.close();
sessionFactory.close();
}
// 查询 根据id查询
@Test
public void testFindById() {
// 实例化配置对象 加载映射文件 加载 hibernate.cfg.xml
Configuration configuration = new Configuration().configure();
// 创建会话工厂
SessionFactory sessionFactory = configuration.buildSessionFactory();
// 创建会话
Session session = sessionFactory.openSession();
// 开启事务
Transaction transaction = session.beginTransaction();
Customer customer = (Customer) session.get(Customer.class, 1);
System.out.println(customer);
// 提交事务
transaction.commit();
session.close();
sessionFactory.close();
}
}
|
运行效果:当你运行第一个增加用户的时候,运行结束数据库会自动创建customer表格,和往表格里添加数据。

这样就通过hibernate进行基础的增删改查了。
以上就是本文的全部内容,希望本文的内容对大家的学习或者工作能带来一定的帮助,同时也希望多多支持快网idc!
原文链接:http://www.cnblogs.com/qdhxhz/p/6478317.html

相关文章


- 64M VPS建站:是否适合初学者操作和管理? 2025-06-10
- ASP.NET自助建站系统中的用户注册和登录功能定制方法 2025-06-10
- ASP.NET自助建站系统的域名绑定与解析教程 2025-06-10
- 个人服务器网站搭建:如何选择合适的服务器提供商? 2025-06-10
- ASP.NET自助建站系统中如何实现多语言支持? 2025-06-10