前言
在很久很久以前,我们是怎么创建Spring Boot的docker image呢?最最通用的办法就是将Spring boot的应用程序打包成一个fat jar,然后写一个docker file,将这个fat jar制作成为一个docker image然后运行。
今天我们来体验一下Spring Boot 2.3.3 带来的快速创建docker image的功能。
传统做法和它的缺点
现在我们创建一个非常简单的Spring Boot程序:
|
1
2
3
4
5
6
7
8
9
10
11
12
13
|
@SpringBootApplication
@RestController
public class Application {
public static void main(String[] args) {
SpringApplication.run(Application.class, args);
}
@GetMapping("/getInfo")
public String getInfo() {
return "www.flydean.com";
}
}
|
默认情况下,我们build出来的是一个fat jar:springboot-with-docker-0.0.1-SNAPSHOT.jar
我们解压看一下它的内容:
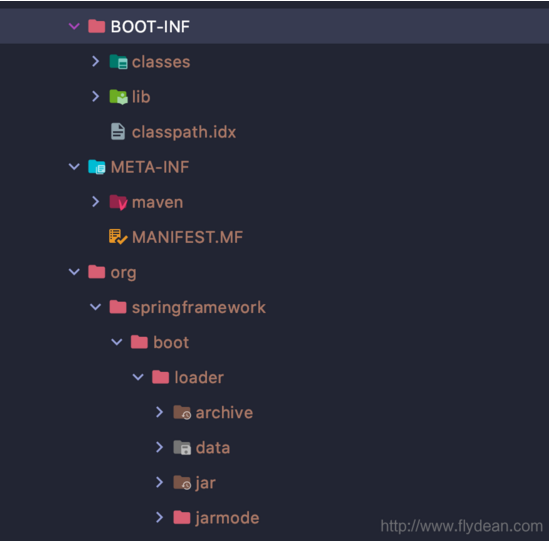
Spring boot的fat jar分为三个部分,第一部分就是BOOT-INF, 里面的class目录放的是我们自己编写的class文件。而lib目录存放的是项目依赖的其他jar包。
第二部分是META-INF,里面定义了jar包的属性信息。
第三部分是Spring Boot的类加载器,fat jar包的启动是通过Spring Boot的jarLauncher来创建LaunchedURLClassLoader,通过它来加载lib下面的jar包,最后以一个新线程启动应用的Main函数。
这里不多讲Spring Boot的启动。
我们看一下,如果想要用这个fat jar来创建docker image应该怎么写:
|
1
2
3
4
5
|
FROM openjdk:8-jdk-alpine
EXPOSE 8080
ARG JAR_FILE=target/springboot-with-docker-0.0.1-SNAPSHOT.jar
ADD ${JAR_FILE} app.jar
ENTRYPOINT ["java","-jar","/app.jar"]
|
这样写有两个问题。
第一个问题:我们是用的far jar,在使用far jar的过程中会有一定的性能问题,肯定要比解压过后的性能要低,尤其是在容器环境中运行的情况下,可能会更加突出。
第二个问题:我们知道docker的image是按layer来构建的,按layer构建的好处就是可以减少image构建的时间和重用之前的layer。
但是如果使用的是fat jar包,即使我们只修改了我们自己的代码,也会导致整个fat jar重新更新,从而影响docker image的构建速度。
使用Buildpacks
传统的办法除了有上面的两个问题,还有一个就是需要自己构建docker file,有没有一键构建docker image的方法呢?
答案是肯定的。
Spring Boot在2.3.0之后,引入了Cloud Native 的buildpacks,通过这个工具,我们可以非常非常方便的创建docker image。
在Maven和Gradle中,Spring Boot引入了新的phase: spring-boot:build-image
我们可以直接运行:
|
1
|
mvn spring-boot:build-image
|
运行之,很不幸的是,你可能会遇到下面的错误:
[ERROR] Failed to execute goal org.springframework.boot:spring-boot-maven-plugin:2.3.3.RELEASE:build-image (default-cli) on project springboot-with-docker: Execution default-cli of goal org.springframework.boot:spring-boot-maven-plugin:2.3.3.RELEASE:build-image failed: Docker API call to 'localhost/v1.24/images/create?fromImage=gcr.io%2Fpaketo-buildpacks%2Fbuilder%3Abase-platform-api-0.3' failed with status code 500 "Internal Server Error" and message "Get https://gcr.io/v2/: net/http: request canceled while waiting for connection (Client.Timeout exceeded while awaiting headers)" -> [Help 1]
这是因为我们无法从gcr.io中拉取镜像!
没关系,如果你会正确的上网方式的话,那么我估计你已经找到了一个代理。
将你的代理配置到Docker的代理项里面,我使用的是Docker desktop,下面是我的配置:
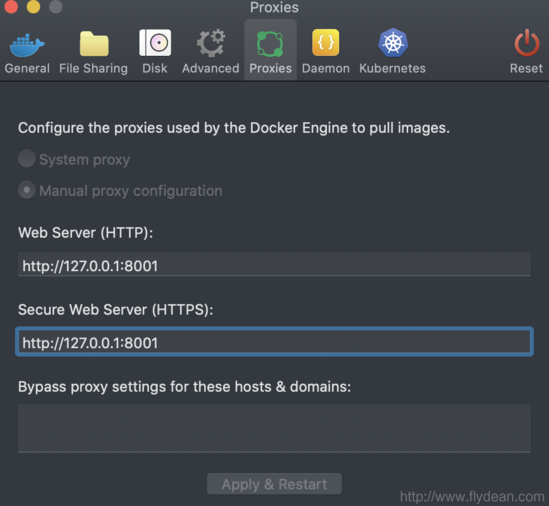
重新运行 mvn spring-boot:build-image
等待执行结果:
[INFO] — spring-boot-maven-plugin:2.3.3.RELEASE:build-image (default-cli) @ springboot-with-docker —
[INFO] Building image 'docker.io/library/springboot-with-docker:0.0.1-SNAPSHOT'
[INFO]
[INFO] > Pulling builder image 'gcr.io/paketo-buildpacks/builder:base-platform-api-0.3' 0%
[INFO] > Pulling builder image 'gcr.io/paketo-buildpacks/builder:base-platform-api-0.3' 0%
[INFO] > Pulling builder image 'gcr.io/paketo-buildpacks/builder:base-platform-api-0.3' 0%
[INFO] > Pulling builder image 'gcr.io/paketo-buildpacks/builder:base-platform-api-0.3' 0%
[INFO] > Pulling builder image 'gcr.io/paketo-buildpacks/builder:base-platform-api-0.3' 0%
[INFO] > Pulling builder image 'gcr.io/paketo-buildpacks/builder:base-platform-api-0.3' 0%
你可以看到,我们的确是需要从gcr.io拉取image。
Layered Jars
如果你不想使用Cloud Native Buildpacks,还是想使用传统的Dockerfile。 没关系,SpringBoot为我们提供了独特的分层jar包系统。
怎么开启呢? 我们需要在POM文件中加上下面的配置:
|
1
2
3
4
5
6
7
8
9
10
11
12
13
|
<build>
<plugins>
<plugin>
<groupId>org.springframework.boot</groupId>
<artifactId>spring-boot-maven-plugin</artifactId>
<configuration>
<layers>
<enabled>true</enabled>
</layers>
</configuration>
</plugin>
</plugins>
</build>
|
再次打包,看下jar包的内容:
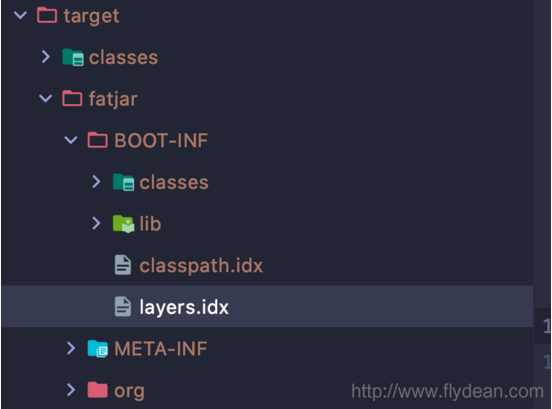
看起来和之前的jar包没什么不同,只不过多了一个layers.idx 这个index文件:
|
1
2
3
4
5
6
7
8
9
10
|
- "dependencies":
- "BOOT-INF/lib/"
- "spring-boot-loader":
- "org/"
- "snapshot-dependencies":
- "application":
- "BOOT-INF/classes/"
- "BOOT-INF/classpath.idx"
- "BOOT-INF/layers.idx"
- "META-INF/"
|
index文件主要分为4个部分:
- dependencies – 非SNAPSHOT的依赖jar包
- snapshot-dependencies – SNAPSHOT的依赖jar包
- spring-boot-loader – Spring boot的class loader文件
- application – 应用程序的class和resources文件
注意,这里的index文件是有顺序的,它和我们将要添加到docker image中的layer顺序是一致的。
最少变化的将会最先添加到layer中,变动最大的放在最后面的layer。
我们可以使用layertools jarmode来对生成的fat jar进行校验或者解压缩:
|
1
2
3
4
5
6
7
8
|
java -Djarmode=layertools -jar springboot-with-docker-0.0.1-SNAPSHOT.jar
Usage:
java -Djarmode=layertools -jar springboot-with-docker-0.0.1-SNAPSHOT.jar
Available commands:
list List layers from the jar that can be extracted
extract Extracts layers from the jar for image creation
help Help about any command
|
使用list命令,我们可列出jar包中的layer信息。使用extract我们可以解压出不同的layer。
我们执行下extract命令,看下结果:

可以看到,我们根据layers.idx解压出了不同的文件夹。
我们看一下使用layer的dockerFile应该怎么写:
|
1
2
3
4
5
6
7
8
9
10
11
12
13
|
FROM adoptopenjdk:11-jre-hotspot as builder
WORKDIR application
ARG JAR_FILE=target/*.jar
COPY ${JAR_FILE} application.jar
RUN java -Djarmode=layertools -jar application.jar extract
FROM adoptopenjdk:11-jre-hotspot
WORKDIR application
COPY --from=builder application/dependencies/ ./
COPY --from=builder application/spring-boot-loader/ ./
COPY --from=builder application/snapshot-dependencies/ ./
COPY --from=builder application/application/ ./
ENTRYPOINT ["java", "org.springframework.boot.loader.JarLauncher"]
|
自定义Layer
如果我们需要自定义Layer该怎么做呢?
我们可以创建一个独立的layers.xml文件:
|
1
2
3
4
5
6
7
8
9
10
11
12
13
14
15
16
17
18
19
20
21
22
23
24
25
26
27
|
<layers xmlns="http://www.springframework.org/schema/boot/layers"
xmlns:xsi="http://www.w3.org/2001/XMLSchema-instance"
xsi:schemaLocation="http://www.springframework.org/schema/boot/layers
https://www.springframework.org/schema/boot/layers/layers-2.3.xsd">
<application>
<into layer="spring-boot-loader">
<include>org/springframework/boot/loader/**</include>
</into>
<into layer="application" />
</application>
<dependencies>
<into layer="snapshot-dependencies">
<include>*:*:*SNAPSHOT</include>
</into>
<into layer="company-dependencies">
<include>com.flydean:*</include>
</into>
<into layer="dependencies"/>
</dependencies>
<layerOrder>
<layer>dependencies</layer>
<layer>spring-boot-loader</layer>
<layer>snapshot-dependencies</layer>
<layer>company-dependencies</layer>
<layer>application</layer>
</layerOrder>
</layers>
|
怎么使用这个layer.xml呢?
添加到build plugin中就可以了:
|
1
2
3
4
5
6
7
8
9
10
11
12
13
14
|
<build>
<plugins>
<plugin>
<groupId>org.springframework.boot</groupId>
<artifactId>spring-boot-maven-plugin</artifactId>
<configuration>
<layers>
<enabled>true</enabled>
<configuration>${project.basedir}/src/main/resources/layers.xml</configuration>
</layers>
</configuration>
</plugin>
</plugins>
</build>
|
本文的例子: springboot-with-docker
总结
到此这篇关于利用Spring Boot创建docker image完整步骤的文章就介绍到这了,更多相关Spring Boot创建docker image内容请搜索快网idc以前的文章或继续浏览下面的相关文章希望大家以后多多支持快网idc!
原文链接:http://www.flydean.com/springboot-docker-image/

相关文章


- ASP.NET本地开发时常见的配置错误及解决方法? 2025-06-10
- ASP.NET自助建站系统的数据库备份与恢复操作指南 2025-06-10
- 个人网站服务器域名解析设置指南:从购买到绑定全流程 2025-06-10
- 个人网站搭建:如何挑选具有弹性扩展能力的服务器? 2025-06-10
- 个人服务器网站搭建:如何选择适合自己的建站程序或框架? 2025-06-10