

使用SpringBoot进行文件上传的方法和SpringMVC差不多,本文单独新建一个最简单的DEMO来说明一下。
主要步骤包括:
1、创建一个springboot项目工程,本例名称(demo-uploadfile)。
2、配置 pom.xml 依赖。
3、创建和编写文件上传的 Controller(包含单文件上传和多文件上传)。
4、创建和编写文件上传的 HTML 测试页面。
5、文件上传相关限制的配置(可选)。
6、运行测试。
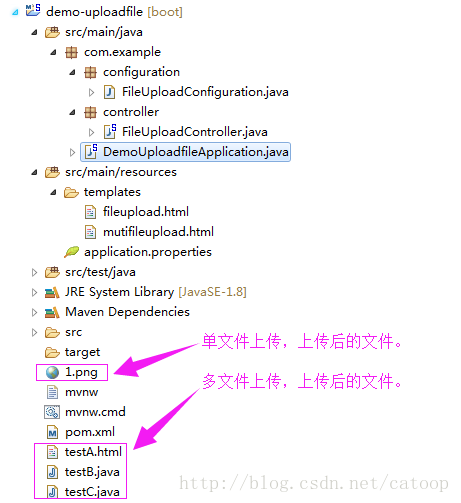
项目工程截图如下:
文件代码:
?
|
1
2
3
4
5
6
7
8
9
10
11
12
13
14
15
16
17
18
19
20
|
<dependencies>
<!-- spring boot web支持 -->
<dependency>
<groupId>org.springframework.boot</groupId>
<artifactId>spring-boot-starter-web</artifactId>
</dependency>
<!-- thmleaf模板依赖. -->
<dependency>
<groupId>org.springframework.boot</groupId>
<artifactId>spring-boot-starter-thymeleaf</artifactId>
</dependency>
<dependency>
<groupId>org.springframework.boot</groupId>
<artifactId>spring-boot-starter-test</artifactId>
<scope>test</scope>
</dependency>
</dependencies>
|
?
|
1
2
3
4
5
6
7
8
9
10
11
12
13
14
15
16
17
18
19
20
21
22
23
24
25
26
27
28
29
30
31
32
33
34
35
36
37
38
39
40
41
42
43
44
45
46
47
48
49
50
51
52
53
54
55
56
57
58
59
60
61
62
63
64
65
66
67
68
69
70
71
72
73
74
75
76
77
78
79
80
81
82
83
84
85
86
87
88
89
90
91
92
93
94
95
96
97
98
99
100
101
102
103
104
105
106
107
108
|
package com.example.controller;
import java.io.BufferedOutputStream;
import java.io.File;
import java.io.FileNotFoundException;
import java.io.FileOutputStream;
import java.io.IOException;
import java.util.List;
import javax.servlet.http.HttpServletRequest;
import org.springframework.stereotype.Controller;
import org.springframework.web.bind.annotation.RequestMapping;
import org.springframework.web.bind.annotation.RequestMethod;
import org.springframework.web.bind.annotation.RequestParam;
import org.springframework.web.bind.annotation.ResponseBody;
import org.springframework.web.multipart.MultipartFile;
import org.springframework.web.multipart.MultipartHttpServletRequest;
/**
* 文件上传的Controller
*
* @author 单红宇(CSDN CATOOP)
* @create 2017年3月11日
*/
@Controller
public class FileUploadController {
// 访问路径为:http://ip:port/upload
@RequestMapping(value = "/upload", method = RequestMethod.GET)
public String upload() {
return "/fileupload";
}
// 访问路径为:http://ip:port/upload/batch
@RequestMapping(value = "/upload/batch", method = RequestMethod.GET)
public String batchUpload() {
return "/mutifileupload";
}
/**
* 文件上传具体实现方法(单文件上传)
*
* @param file
* @return
*
* @author 单红宇(CSDN CATOOP)
* @create 2017年3月11日
*/
@RequestMapping(value = "/upload", method = RequestMethod.POST)
@ResponseBody
public String upload(@RequestParam("file") MultipartFile file) {
if (!file.isEmpty()) {
try {
// 这里只是简单例子,文件直接输出到项目路径下。
// 实际项目中,文件需要输出到指定位置,需要在增加代码处理。
// 还有关于文件格式限制、文件大小限制,详见:中配置。
BufferedOutputStream out = new BufferedOutputStream(
new FileOutputStream(new File(file.getOriginalFilename())));
out.write(file.getBytes());
out.flush();
out.close();
} catch (FileNotFoundException e) {
e.printStackTrace();
return "上传失败," + e.getMessage();
} catch (IOException e) {
e.printStackTrace();
return "上传失败," + e.getMessage();
}
return "上传成功";
} else {
return "上传失败,因为文件是空的.";
}
}
/**
* 多文件上传 主要是使用了MultipartHttpServletRequest和MultipartFile
*
* @param request
* @return
*
* @author 单红宇(CSDN CATOOP)
* @create 2017年3月11日
*/
@RequestMapping(value = "/upload/batch", method = RequestMethod.POST)
public @ResponseBody String batchUpload(HttpServletRequest request) {
List<MultipartFile> files = ((MultipartHttpServletRequest) request).getFiles("file");
MultipartFile file = null;
BufferedOutputStream stream = null;
for (int i = 0; i < files.size(); ++i) {
file = files.get(i);
if (!file.isEmpty()) {
try {
byte[] bytes = file.getBytes();
stream = new BufferedOutputStream(new FileOutputStream(new File(file.getOriginalFilename())));
stream.write(bytes);
stream.close();
} catch (Exception e) {
stream = null;
return "You failed to upload " + i + " => " + e.getMessage();
}
} else {
return "You failed to upload " + i + " because the file was empty.";
}
}
return "upload successful";
}
}
|
?
|
1
2
3
4
5
6
7
8
9
10
11
12
13
14
15
16
17
18
19
20
21
22
23
24
25
26
27
28
|
package com.example.configuration;
import javax.servlet.MultipartConfigElement;
import org.springframework.boot.web.servlet.MultipartConfigFactory;
import org.springframework.context.annotation.Bean;
/**
* 文件上传配置
*
* @author 单红宇(CSDN CATOOP)
* @create 2017年3月11日
*/
public class FileUploadConfiguration {
@Bean
public MultipartConfigElement multipartConfigElement() {
MultipartConfigFactory factory = new MultipartConfigFactory();
// 设置文件大小限制 ,超出设置页面会抛出异常信息,
// 这样在文件上传的地方就需要进行异常信息的处理了;
factory.setMaxFileSize("256KB"); // KB,MB
/// 设置总上传数据总大小
factory.setMaxRequestSize("512KB");
// Sets the directory location where files will be stored.
// factory.setLocation("路径地址");
return factory.createMultipartConfig();
}
}
|
?
|
1
2
3
4
5
6
7
|
@SpringBootApplication
public class DemoUploadfileApplication {
public static void main(String[] args) {
SpringApplication.run(DemoUploadfileApplication.class, args);
}
}
|
?

|
1
2
3
4
5
6
7
8
9
10
11
12
13
14
15
16
17
18
|
<!DOCTYPE html>
<html>
<head>
<title>文件上传示例</title>
</head>
<body>
<h2>文件上传示例</h2>
<hr/>
<form method="POST" enctype="multipart/form-data" action="/upload">
<p>
文件:<input type="file" name="file" />
</p>
<p>
<input type="submit" value="上传" />
</p>
</form>
</body>
</html>
|
?
|
1
2
3
4
5
6
7
8
9
10
11
12
13
14
15
16
17
18
19
20
21
22
23
24
25
|
<!DOCTYPE html>
<html>
<head>
<title>批量文件上传示例</title>
</head>
<body>
<h2>批量文件上传示例</h2>
<hr/>
<form method="POST" enctype="multipart/form-data"
action="/upload/batch">
<p>
文件1:<input type="file" name="file" />
</p>
<p>
文件2:<input type="file" name="file" />
</p>
<p>
文件3:<input type="file" name="file" />
</p>
<p>
<input type="submit" value="上传" />
</p>
</form>
</body>
</html>
|
最后启动服务,访问 http://localhost:8080/upload 和 http://localhost:8080/upload/batch 测试文件上传。
Demo源代码下载地址:uploadfile.rar
以上就是本文的全部内容,希望对大家的学习有所帮助,也希望大家多多支持快网idc。
原文链接:http://blog.csdn.net/catoop/article/details/61415169

相关文章


猜你喜欢
- ASP.NET本地开发时常见的配置错误及解决方法? 2025-06-10
- ASP.NET自助建站系统的数据库备份与恢复操作指南 2025-06-10
- 个人网站服务器域名解析设置指南:从购买到绑定全流程 2025-06-10
- 个人网站搭建:如何挑选具有弹性扩展能力的服务器? 2025-06-10
- 个人服务器网站搭建:如何选择适合自己的建站程序或框架? 2025-06-10


