在Servlet 3.0之前,Servlet采用Thread-Per-Request的方式处理请求,即每一次Http请求都由某一个线程从头到尾负责处理。如果一个请求需要进行IO操作,比如访问数据库、调用第三方服务接口等,那么其所对应的线程将同步地等待IO操作完成, 而IO操作是非常慢的,所以此时的线程并不能及时地释放回线程池以供后续使用,在并发量越来越大的情况下,这将带来严重的性能问题。即便是像Spring、Struts这样的高层框架也脱离不了这样的桎梏,因为他们都是建立在Servlet之上的。为了解决这样的问题,Servlet 3.0引入了异步处理,然后在Servlet 3.1中又引入了非阻塞IO来进一步增强异步处理的性能。
本文源代码:https://github.com/davenkin/servlet-3-async-learning
项目下载地址:servlet-3-async-learning.rar
在Servlet 3.0中,我们可以从HttpServletRequest对象中获得一个AsyncContext对象,该对象构成了异步处理的上下文,Request和Response对象都可从中获取。AsyncContext可以从当前线程传给另外的线程,并在新的线程中完成对请求的处理并返回结果给客户端,初始线程便可以还回给容器线程池以处理更多的请求。如此,通过将请求从一个线程传给另一个线程处理的过程便构成了Servlet 3.0中的异步处理。
举个例子,对于一个需要完成长时处理的Servlet来说,其实现通常为:
|
1
2
3
4
5
6
7
8
9
|
@WebServlet("/syncHello")
public class SyncHelloServlet extends HttpServlet {
protected void doGet(HttpServletRequest request,
HttpServletResponse response) throws ServletException, IOException {
new LongRunningProcess().run();
response.getWriter().write("Hello World!");
}
}
|
为了模拟长时处理过程,我们创建了一个LongRunningProcess类,其run()方法将随机地等待2秒之内的一个时间:
|
1
2
3
4
5
6
7
8
9
10
11
12
13
14
15
|
public class LongRunningProcess {
public void run() {
try {
int millis = ThreadLocalRandom.current().nextInt(2000);
String currentThread = Thread.currentThread().getName();
System.out.println(currentThread + " sleep for " + millis + " milliseconds.");
Thread.sleep(millis);
} catch (InterruptedException e) {
e.printStackTrace();
}
}
}
|
此时的SyncHelloServlet将顺序地先执行LongRunningProcess的run()方法,然后将将HelloWorld返回给客户端,这是一个典型的同步过程。
|
1
2
3
4
5
6
7
8
9
10
11
12
13
14
15
16
17
|
@WebServlet(value = "/simpleAsync", asyncSupported = true)
public class SimpleAsyncHelloServlet extends HttpServlet {
protected void doGet(HttpServletRequest request, HttpServletResponse response) throws ServletException, IOException {
AsyncContext asyncContext = request.startAsync();
asyncContext.start(() -> {
new LongRunningProcess().run();
try {
asyncContext.getResponse().getWriter().write("Hello World!");
} catch (IOException e) {
e.printStackTrace();
}
asyncContext.complete();
});
}
|
此时,我们先通过request.startAsync()获取到该请求对应的AsyncContext,然后调用AsyncContext的start()方法进行异步处理,处理完毕后需要调用complete()方法告知Servlet容器。start()方法会向Servlet容器另外申请一个新的线程(可以是从Servlet容器中已有的主线程池获取,也可以另外维护一个线程池,不同容器实现可能不一样),然后在这个新的线程中继续处理请求,而原先的线程将被回收到主线程池中。事实上,这种方式对性能的改进不大,因为如果新的线程和初始线程共享同一个线程池的话,相当于闲置下了一个线程,但同时又占用了另一个线程。
当然,除了调用AsyncContext的start()方法,我们还可以通过手动创建线程的方式来实现异步处理:
|
1
2
3
4
5
6
7
8
9
10
11
12
13
14
15
16
17
18
19
20
21
22
|
@WebServlet(value = "/newThreadAsync", asyncSupported = true)
public class NewThreadAsyncHelloServlet extends HttpServlet {
protected void doGet(HttpServletRequest request, HttpServletResponse response) throws ServletException, IOException {
AsyncContext asyncContext = request.startAsync();
Runnable runnable = () -> {
new LongRunningProcess().run();
try {
asyncContext.getResponse().getWriter().write("Hello World!");
} catch (IOException e) {
e.printStackTrace();
}
asyncContext.complete();
};
new Thread(runnable).start();
}
}
|
自己手动创建新线程一般是不被鼓励的,并且此时线程不能重用。因此,一种更好的办法是我们自己维护一个线程池。这个线程池不同于Servlet容器的主线程池,如下图:
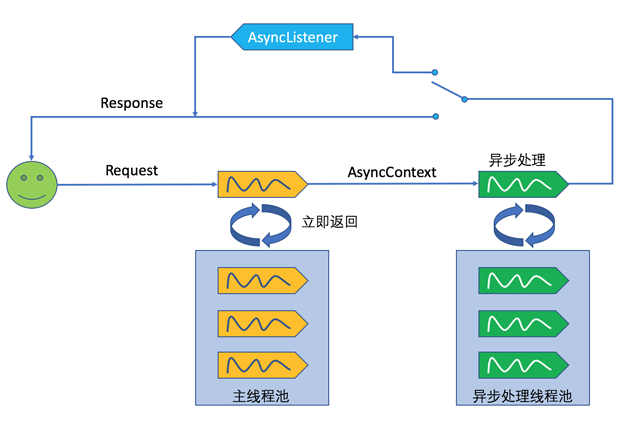
在上图中,用户发起的请求首先交由Servlet容器主线程池中的线程处理,在该线程中,我们获取到AsyncContext,然后将其交给异步处理线程池。可以通过Java提供的Executor框架来创建线程池:
|
1
2
3
4
5
6
7
8
9
10
11
12
13
14
15
16
17
18
19
20
21
22
23
24
25
|
@WebServlet(value = "/threadPoolAsync", asyncSupported = true)
public class ThreadPoolAsyncHelloServlet extends HttpServlet {
private static ThreadPoolExecutor executor = new ThreadPoolExecutor(100, 200, 50000L, TimeUnit.MILLISECONDS, new ArrayBlockingQueue<>(100));
protected void doGet(HttpServletRequest request, HttpServletResponse response) throws ServletException, IOException {
AsyncContext asyncContext = request.startAsync();
executor.execute(() -> {
new LongRunningProcess().run();
try {
asyncContext.getResponse().getWriter().write("Hello World!");
} catch (IOException e) {
e.printStackTrace();
}
asyncContext.complete();
});
}
}
|
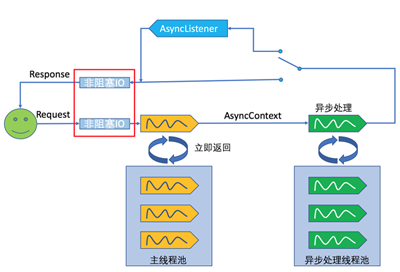
Servlet 3.0对请求的处理虽然是异步的,但是对InputStream和OutputStream的IO操作却依然是阻塞的,对于数据量大的请求体或者返回体,阻塞IO也将导致不必要的等待。因此在Servlet 3.1中引入了非阻塞IO(参考下图红框内容),通过在HttpServletRequest和HttpServletResponse中分别添加ReadListener和WriterListener方式,只有在IO数据满足一定条件时(比如数据准备好时),才进行后续的操作。
对应的代码示:
|
1
2
3
4
5
6
7
8
9
10
11
12
13
14
15
16
17
18
19
20
21
22
23
24
25
26
27
28
29
30
31
32
33
34
35
36
37
38
39
40
41
42
43
|
@WebServlet(value = "/nonBlockingThreadPoolAsync", asyncSupported = true)
public class NonBlockingAsyncHelloServlet extends HttpServlet {
private static ThreadPoolExecutor executor = new ThreadPoolExecutor(100, 200, 50000L, TimeUnit.MILLISECONDS, new ArrayBlockingQueue<>(100));
protected void doGet(HttpServletRequest request, HttpServletResponse response) throws ServletException, IOException {
AsyncContext asyncContext = request.startAsync();
ServletInputStream inputStream = request.getInputStream();
inputStream.setReadListener(new ReadListener() {
@Override
public void onDataAvailable() throws IOException {
}
@Override
public void onAllDataRead() throws IOException {
executor.execute(() -> {
new LongRunningProcess().run();
try {
asyncContext.getResponse().getWriter().write("Hello World!");
} catch (IOException e) {
e.printStackTrace();
}
asyncContext.complete();
});
}
@Override
public void onError(Throwable t) {
asyncContext.complete();
}
});
}
}
|
在上例中,我们为ServletInputStream添加了一个ReadListener,并在ReadListener的onAllDataRead()方法中完成了长时处理过程。
以上就是本文的全部内容,希望对大家的学习有所帮助,也希望大家多多支持快网idc。
原文链接:http://www.jianshu.com/p/05a57d00d5cb

相关文章


- 个人服务器网站搭建:如何选择适合自己的建站程序或框架? 2025-06-10
- 64M VPS建站:能否支持高流量网站运行? 2025-06-10
- 64M VPS建站:怎样选择合适的域名和SSL证书? 2025-06-10
- 64M VPS建站:怎样优化以提高网站加载速度? 2025-06-10
- 64M VPS建站:是否适合初学者操作和管理? 2025-06-10