Druid
Druid:一款为监控而生的数据库连接池框架,整个项目由数据库连接池、插件框架和SQL解析器组成。
Druid功能介于PowerDrill和Dremel之间,它几乎实现了Dremel的所有功能,并且从PowerDrill吸收一些有趣的数据格式。Druid允许以类似Dremel和PowerDrill的方式进行单表查询,同时还增加了一些新特性,如为局部嵌套数据结构提供列式存储格式、为快速过滤做索引、实时摄取和查询、高容错的分布式体系架构等。
spring框架作为JavaEE框架领域的一款重要的开源框架,在企业应用开发中有着很重要的作用,同时Spring框架及其子框架很多,所以知识量很广。
Spring Boot:一款Spring框架的子框架,也可以叫微框架,是2014年推出的一款使Spring框架开发变得容易的框架。学过Spring框架的都知识,Spring框架难以避免地需要配置不少XMl,而使用Spring Boot框架的话,就可以使用注解开发,极大地简化基于Spring框架的开发。
Spring Boot充分利用了JavaConfig的配置模式以及“约定优于配置”的理念,能够极大的简化基于Spring MVC的Web应用和REST服务开发。
然后通过本文给大家介绍基于IDEA编辑器的Spring Boot项目创建和部署。
Spring Boot使用Druid监控
maven配置
要配置spring Boot实现一个Demo的话,只要加入spring-boot-starter(核心模块)和spring-boot-starter-web(因为这个一个Web项目),可以参考我的配置,这里使用了Spring Boot热部署,需要去github上搜索jar:springloaded-1.2.4.RELEASE.jar,然后下载放在项目的lib文件夹里,可以参考我的配置
|
1
2
3
4
5
6
7
8
9
10
11
12
13
14
15
16
17
18
19
20
21
22
23
24
25
26
27
28
29
30
31
32
33
34
35
36
37
38
39
40
41
42
43
44
45
46
47
48
49
50
51
52
53
54
55
56
57
58
59
60
61
62
63
64
65
66
67
68
69
70
71
72
73
74
75
76
77
78
79
80
81
82
83
84
85
86
87
88
89
90
91
92
|
<project xmlns="http://maven.apache.org/POM/4.0.0" xmlns:xsi="http://www.w3.org/2001/XMLSchema-instance"
xsi:schemaLocation="http://maven.apache.org/POM/4.0.0 http://maven.apache.org/maven-v4_0_0.xsd">
<modelVersion>4.0.0</modelVersion>
<groupId>com.example</groupId>
<artifactId>demo</artifactId>
<packaging>war</packaging>
<version>1.0-SNAPSHOT</version>
<name>demo Maven Webapp</name>
<properties>
<project.build.sourceEncoding>UTF-8</project.build.sourceEncoding>
<java.version>1.8</java.version>
<druid.version>1.0.24</druid.version>
<mysql.version>5.1.27</mysql.version>
<spring-boot-admin.version>1.4.5</spring-boot-admin.version>
</properties>
<parent>
<groupId>org.springframework.boot</groupId>
<artifactId>spring-boot-starter-parent</artifactId>
<version>1.5.1.RELEASE</version>
<relativePath/>
</parent>
<dependencies>
<dependency>
<groupId>junit</groupId>
<artifactId>junit</artifactId>
<version>3.8.1</version>
<scope>test</scope>
</dependency>
<dependency>
<groupId>org.springframework.boot</groupId>
<artifactId>spring-boot-starter-web</artifactId>
</dependency>
<dependency>
<groupId>org.springframework.boot</groupId>
<artifactId>spring-boot-starter-actuator</artifactId>
</dependency>
<dependency>
<groupId>org.springframework.boot</groupId>
<artifactId>spring-boot-starter-test</artifactId>
<scope>test</scope>
</dependency>
<dependency>
<groupId>de.codecentric</groupId>
<artifactId>spring-boot-admin-starter-client</artifactId>
<version>${spring-boot-admin.version}</version>
</dependency>
<dependency>
<groupId>org.springframework.boot</groupId>
<artifactId>spring-boot-starter</artifactId>
</dependency>
<dependency>
<groupId>com.alibaba</groupId>
<artifactId>druid</artifactId>
<version>${druid.version}</version>
</dependency>
<dependency>
<groupId>mysql</groupId>
<artifactId>mysql-connector-java</artifactId>
<version>${mysql.version}</version>
</dependency>
</dependencies>
<build>
<plugins>
<plugin>
<groupId>org.springframework.boot</groupId>
<artifactId>spring-boot-maven-plugin</artifactId>
</plugin>
<plugin>
<groupId>org.springframework.boot</groupId>
<artifactId>spring-boot-maven-plugin </artifactId>
<dependencies>
<!--springloaded hot deploy -->
<dependency>
<groupId>org.springframework</groupId>
<artifactId>springloaded</artifactId>
<systemPath>${basedir}/src/main/webapp/WEB-INF/lib/springloaded-1.2.5.RELEASE.jar</systemPath>
</dependency>
</dependencies>
<executions>
<execution>
<goals>
<goal>repackage</goal>
</goals>
<configuration>
<classifier>exec</classifier>
</configuration>
</execution>
</executions>
</plugin>
</plugins>
</build>
</project>
|
application.properties配置
|
1
2
3
4
5
6
7
8
9
10
11
12
13
14
15
16
17
18
19
20
21
22
23
24
25
26
27
28
|
server.context-path=/springbootdemo
#数据库访问配置
spring.datasource.type=com.alibaba.druid.pool.DruidDataSource
spring.datasource.driver-class-name=com.mysql.jdbc.Driver
spring.datasource.url=jdbc:mysql://localhost:3306/myblog
spring.datasource.username=root
spring.datasource.password=root
#数据源配置,初始化大小、最小、最大
spring.datasource.initialSize=5
spring.datasource.minIdle=5
spring.datasource.maxActive=20
#连接等待超时时间
spring.datasource.maxWait=60000
#配置隔多久进行一次检测(检测可以关闭的空闲连接)
spring.datasource.timeBetweenEvictionRunsMillis=60000
#配置连接在池中的最小生存时间
spring.datasource.minEvictableIdleTimeMillis=300000
spring.datasource.validationQuery=SELECT 1 FROM DUAL
spring.datasource.testWhileIdle=true
spring.datasource.testOnBorrow=false
spring.datasource.testOnReturn=false
# 打开PSCache,并且指定每个连接上PSCache的大小
spring.datasource.poolPreparedStatements=true
spring.datasource.maxPoolPreparedStatementPerConnectionSize=20
# 配置监控统计拦截的filters,去掉后监控界面sql无法统计,'wall'用于防火墙
spring.datasource.filters=stat,wall,log4j
# 通过connectProperties属性来打开mergeSql功能;慢SQL记录
spring.datasource.connectionProperties=druid.stat.mergeSql=true;druid.stat.slowSqlMillis=5000
|
方式一原生的servlet和filter方式
编写Servlet类:
|
1
2
3
4
5
6
7
8
9
10
11
12
13
14
15
16
17
18
|
package com.example.web.servlet;
import com.alibaba.druid.support.http.StatViewServlet;
import javax.servlet.annotation.WebInitParam;
import javax.servlet.annotation.WebServlet;
/**
* Created by Administrator on 2017/4/28.
*/
@WebServlet(urlPatterns = "/druid/*",
initParams = {
@WebInitParam(name = "allow", value = "192.168.10.25,127.0.0.1"),// IP白名单 (没有配置或者为空,则允许所有访问)
@WebInitParam(name = "deny", value = "192.168.1.73"),// IP黑名单 (存在共同时,deny优先于allow)
@WebInitParam(name = "loginUsername", value = "admin"),// 用户名
@WebInitParam(name = "loginPassword", value = "123"),// 密码
@WebInitParam(name = "resetEnable", value = "false")// 禁用HTML页面上的“Reset All”功能)
}
)
public class DruidStatViewServlet extends StatViewServlet{
}
|
Filter类:
|
1
2
3
4
5
6
7
8
9
10
11
12
13
14
|
package com.example.web.filter;
import com.alibaba.druid.support.http.WebStatFilter;
import javax.servlet.annotation.WebFilter;
import javax.servlet.annotation.WebInitParam;
/**
* Created by Administrator on 2017/4/28.
*/
@WebFilter(filterName="druidWebStatFilter",urlPatterns="/*",
initParams={
@WebInitParam(name="exclusions",value="*.js,*.gif,*.jpg,*.bmp,*.png,*.css,*.ico,/druid/*")// 忽略资源
}
)
public class DruidWebStatFilter extends WebStatFilter{
}
|
然后,需要在Spring Boot启动类里设置Servlet自动扫描,不然会出现404页面找不到错误,使用
@ServletComponentScan注解
|
1
2
3
4
5
6
7
8
9
10
11
12
13
14
15
16
17
18
19
20
21
|
package com;
import org.springframework.boot.SpringApplication;
import org.springframework.boot.autoconfigure.SpringBootApplication;
import org.springframework.boot.builder.SpringApplicationBuilder;
import org.springframework.boot.context.embedded.ConfigurableEmbeddedServletContainer;
import org.springframework.boot.context.embedded.EmbeddedServletContainerCustomizer;
import org.springframework.boot.web.servlet.ServletComponentScan;
import org.springframework.boot.web.support.SpringBootServletInitializer;
import org.springframework.scheduling.annotation.EnableAsync;
@SpringBootApplication
@ServletComponentScan
@EnableAsync
public class Application implements EmbeddedServletContainerCustomizer {
public static void main(String[] args) {
SpringApplication.run(Application.class, args);
}
@Override
public void customize(ConfigurableEmbeddedServletContainer configurableEmbeddedServletContainer) {
configurableEmbeddedServletContainer.setPort(8087);
}
}
|
方式二使用代码注册Servlet和Filter
|
1
2
3
4
5
6
7
8
9
10
11
12
13
14
15
16
17
18
19
20
21
22
23
24
25
26
27
28
29
30
31
32
33
34
35
36
37
38
39
40
41
42
43
44
45
|
package com.example.config;
import com.alibaba.druid.support.http.StatViewServlet;
import com.alibaba.druid.support.http.WebStatFilter;
import org.springframework.boot.web.servlet.FilterRegistrationBean;
import org.springframework.boot.web.servlet.ServletRegistrationBean;
import org.springframework.context.annotation.Bean;
import org.springframework.context.annotation.Configuration;
/**
* Created by Administrator on 2017/4/28.
*/
@Configuration
public class DruidConfiguration {
/**
* 注册ServletRegistrationBean
* @return
*/
@Bean
public ServletRegistrationBean registrationBean() {
ServletRegistrationBean bean = new ServletRegistrationBean(new StatViewServlet(), "/druid1/*");
/** 初始化参数配置,initParams**/
//白名单
bean.addInitParameter("allow", "127.0.0.1");
//IP黑名单 (存在共同时,deny优先于allow) : 如果满足deny的话提示:Sorry, you are not permitted to view this page.
bean.addInitParameter("deny", "192.168.1.73");
//登录查看信息的账号密码.
bean.addInitParameter("loginUsername", "admin2");
bean.addInitParameter("loginPassword", "123");
//是否能够重置数据.
bean.addInitParameter("resetEnable", "false");
return bean;
}
/**
* 注册FilterRegistrationBean
* @return
*/
@Bean
public FilterRegistrationBean druidStatFilter() {
FilterRegistrationBean bean = new FilterRegistrationBean(new WebStatFilter());
//添加过滤规则.
bean.addUrlPatterns("/*");
//添加不需要忽略的格式信息.
bean.addInitParameter("exclusions","*.js,*.gif,*.jpg,*.png,*.css,*.ico,/druid2/*");
return bean;
}
}
|
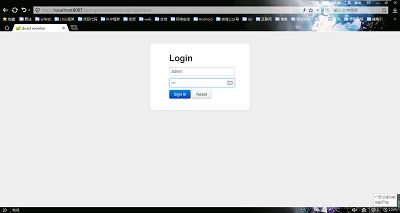
项目监控
然后输入url访问,我的项目访问路径:http://localhost:8087/springbootdemo/druid/login.html,这个需要自己修改,我的Context配置为springbootdemo,端口配置为8087,这些可以参考我上一篇博客
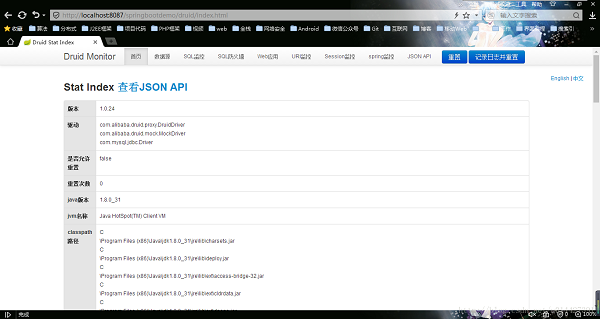
通过平台进行监控
以上所述是小编给大家介绍的Spring Boot使用Druid进行维度的统计和监控,希望对大家有所帮助,如果大家有任何疑问请给我留言,小编会及时回复大家的。在此也非常感谢大家对快网idc网站的支持!
原文链接:http://blog.csdn.net/u014427391/article/details/70890506

相关文章


- ASP.NET本地开发时常见的配置错误及解决方法? 2025-06-10
- ASP.NET自助建站系统的数据库备份与恢复操作指南 2025-06-10
- 个人网站服务器域名解析设置指南:从购买到绑定全流程 2025-06-10
- 个人网站搭建:如何挑选具有弹性扩展能力的服务器? 2025-06-10
- 个人服务器网站搭建:如何选择适合自己的建站程序或框架? 2025-06-10