通常情况下,把api直接暴露出去是风险很大的,不说别的,直接被机器攻击就喝一壶的。那么一般来说,对api要划分出一定的权限级别,然后做一个用户的鉴权,依据鉴权结果给予用户开放对应的api。目前,比较主流的方案有几种:
- 用户名和密码鉴权,使用session保存用户鉴权结果。
- 使用oauth进行鉴权(其实oauth也是一种基于token的鉴权,只是没有规定token的生成方式)
- 自行采用token进行鉴权
第一种就不介绍了,由于依赖session来维护状态,也不太适合移动时代,新的项目就不要采用了。第二种oauth的方案和jwt都是基于token的,但oauth其实对于不做开放平台的公司有些过于复杂。我们主要介绍第三种:jwt。
什么是jwt?
jwt是 json web token 的缩写。它是基于 rfc 7519 标准定义的一种可以安全传输的 小巧 和 自包含 的json对象。由于数据是使用数字签名的,所以是可信任的和安全的。jwt可以使用hmac算法对secret进行加密或者使用rsa的公钥私钥对来进行签名。
jwt的工作流程
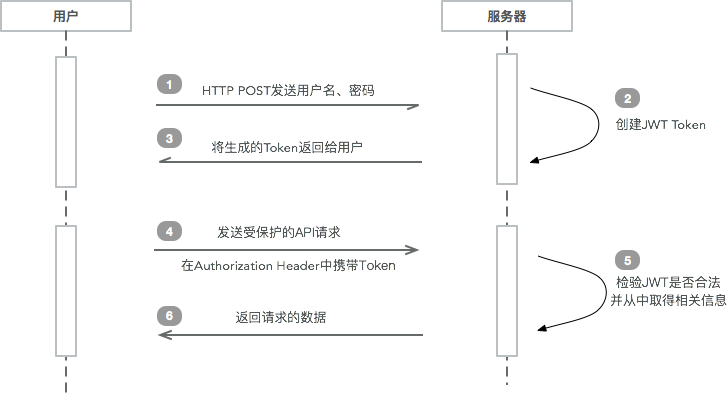
下面是一个jwt的工作流程图。模拟一下实际的流程是这样的(假设受保护的api在/protected中)
- 用户导航到登录页,输入用户名、密码,进行登录
- 服务器验证登录鉴权,如果改用户合法,根据用户的信息和服务器的规则生成jwt token
- 服务器将该token以json形式返回(不一定要json形式,这里说的是一种常见的做法)
- 用户得到token,存在localstorage、cookie或其它数据存储形式中。
- 以后用户请求/protected中的api时,在请求的header中加入 authorization: bearer xxxx(token)。此处注意token之前有一个7字符长度的 bearer
- 服务器端对此token进行检验,如果合法就解析其中内容,根据其拥有的权限和自己的业务逻辑给出对应的响应结果。
- 用户取得结果
jwt工作流程图
为了更好的理解这个token是什么,我们先来看一个token生成后的样子,下面那坨乱糟糟的就是了。
eyjhbgcioijiuzuxmij9.eyjzdwiioij3yw5niiwiy3jlyxrlzci6mtq4ota3otk4mtm5mywizxhwijoxndg5njg0nzgxfq.rc-byce_uz2urtwddupwxip4nmsoeq2o6uf-8tvplqxy1-ci9u1-a-9daajgfnwkhe81mpnr3gxzfrbab3wuag
但仔细看到的话还是可以看到这个token分成了三部分,每部分用 . 分隔,每段都是用 base64 编码的。如果我们用一个base64的解码器的话 (https://www.base64decode.org/ ),可以看到第一部分 eyjhbgcioijiuzuxmij9 被解析成了:
|
1
2
3
|
{
"alg":"hs512"
}
|
这是告诉我们hmac采用hs512算法对jwt进行的签名。
第二部分 eyjzdwiioij3yw5niiwiy3jlyxrlzci6mtq4ota3otk4mtm5mywizxhwijoxndg5njg0nzgxfq 被解码之后是
|
1
2
3
4
5
|
{
"sub":"wang",
"created":1489079981393,
"exp":1489684781
}
|
这段告诉我们这个token中含有的数据声明(claim),这个例子里面有三个声明:sub, created 和 exp。在我们这个例子中,分别代表着用户名、创建时间和过期时间,当然你可以把任意数据声明在这里。
看到这里,你可能会想这是个什么鬼token,所有信息都透明啊,安全怎么保障?别急,我们看看token的第三段 rc-byce_uz2urtwddupwxip4nmsoeq2o6uf-8tvplqxy1-ci9u1-a-9daajgfnwkhe81mpnr3gxzfrbab3wuag。同样使用base64解码之后,咦,这是什么东东
d x dmyteȧluzcpz0$gzay_7wy@
最后一段其实是签名,这个签名必须知道秘钥才能计算。这个也是jwt的安全保障。这里提一点注意事项,由于数据声明(claim)是公开的,千万不要把密码等敏感字段放进去,否则就等于是公开给别人了。
也就是说jwt是由三段组成的,按官方的叫法分别是header(头)、payload(负载)和signature(签名):
header.payload.signature
头中的数据通常包含两部分:一个是我们刚刚看到的 alg,这个词是 algorithm 的缩写,就是指明算法。另一个可以添加的字段是token的类型(按rfc 7519实现的token机制不只jwt一种),但如果我们采用的是jwt的话,指定这个就多余了。
|
1
2
3
4
|
{
"alg": "hs512",
"typ": "jwt"
}
|
payload中可以放置三类数据:系统保留的、公共的和私有的:
- 系统保留的声明(reserved claims):这类声明不是必须的,但是是建议使用的,包括:iss (签发者), exp (过期时间),
- sub (主题), aud (目标受众)等。这里我们发现都用的缩写的三个字符,这是由于jwt的目标就是尽可能小巧。
- 公共声明:这类声明需要在 iana json web token registry 中定义或者提供一个uri,因为要避免重名等冲突。
- 私有声明:这个就是你根据业务需要自己定义的数据了。
签名的过程是这样的:采用header中声明的算法,接受三个参数:base64编码的header、base64编码的payload和秘钥(secret)进行运算。签名这一部分如果你愿意的话,可以采用rsasha256的方式进行公钥、私钥对的方式进行,如果安全性要求的高的话。
|
1
2
3
4
|
hmacsha256(
base64urlencode(header) + "." +
base64urlencode(payload),
secret)
|
jwt的生成和解析
为了简化我们的工作,这里引入一个比较成熟的jwt类库,叫 jjwt ( https://github.com/jwtk/jjwt )。这个类库可以用于java和android的jwt token的生成和验证。
jwt的生成可以使用下面这样的代码完成:
|
1
2
3
4
5
6
7
|
string generatetoken(map<string, object> claims) {
return jwts.builder()
.setclaims(claims)
.setexpiration(generateexpirationdate())
.signwith(signaturealgorithm.hs512, secret) //采用什么算法是可以自己选择的,不一定非要采用hs512
.compact();
}
|
数据声明(claim)其实就是一个map,比如我们想放入用户名,可以简单的创建一个map然后put进去就可以了。
|
1
2
|
map<string, object> claims = new hashmap<>();
claims.put(claim_key_username, username());
|
解析也很简单,利用 jjwt 提供的parser传入秘钥,然后就可以解析token了。
|
1
2
3
4
5
6
7
8
9
10
11
12
|
claims getclaimsfromtoken(string token) {
claims claims;
try {
claims = jwts.parser()
.setsigningkey(secret)
.parseclaimsjws(token)
.getbody();
} catch (exception e) {
claims = null;
}
return claims;
}
|
jwt本身没啥难度,但安全整体是一个比较复杂的事情,jwt只不过提供了一种基于token的请求验证机制。但我们的用户权限,对于api的权限划分、资源的权限划分,用户的验证等等都不是jwt负责的。也就是说,请求验证后,你是否有权限看对应的内容是由你的用户角色决定的。所以我们这里要利用spring的一个子项目spring security来简化我们的工作。
spring security
spring security是一个基于spring的通用安全框架,里面内容太多了,本文的主要目的也不是展开讲这个框架,而是如何利用spring security和jwt一起来完成api保护。所以关于spring secruity的基础内容或展开内容,请自行去官网学习( http://projects.spring.io/spring-security/)。
简单的背景知识
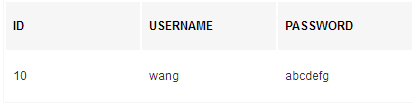
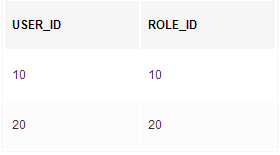
如果你的系统有用户的概念的话,一般来说,你应该有一个用户表,最简单的用户表,应该有三列:id,username和password,类似下表这种
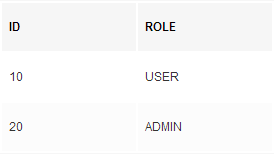
而且不是所有用户都是一种角色,比如网站管理员、供应商、财务等等,这些角色和网站的直接用户需要的权限可能是不一样的。那么我们就需要一个角色表:
当然我们还需要一个可以将用户和角色关联起来建立映射关系的表。
这是典型的一个关系型数据库的用户角色的设计,由于我们要使用的mongodb是一个文档型数据库,所以让我们重新审视一下这个结构。
这个数据结构的优点在于它避免了数据的冗余,每个表负责自己的数据,通过关联表进行关系的描述,同时也保证的数据的完整性:比如当你修改角色名称后,没有脏数据的产生。
但是这种事情在用户权限这个领域发生的频率到底有多少呢?有多少人每天不停的改的角色名称?当然如果你的业务场景确实是需要保证数据完整性,你还是应该使用关系型数据库。但如果没有高频的对于角色表的改动,其实我们是不需要这样的一个设计的。在mongodb中我们可以将其简化为
|
1
2
3
4
5
6
|
{
_id: <id_generated>
username: 'user',
password: 'pass',
roles: ['user', 'admin']
}
|
基于以上考虑,我们重构一下 user 类,
|
1
2
3
4
5
6
7
8
9
10
11
|
@data
public class user {
@id
private string id;
@indexed(unique=true, direction= indexdirection.descending, dropdups=true)
private string username;
private string password;
private string email;
private date lastpasswordresetdate;
private list<string> roles;
}
|
当然你可能发现这个类有点怪,只有一些field,这个简化的能力是一个叫lombok类库提供的 ,这个很多开发过android的童鞋应该熟悉,是用来简化pojo的创建的一个类库。简单说一下,采用 lombok 提供的 @data 修饰符后可以简写成,原来的一坨getter和setter以及constructor等都不需要写了。类似的 todo 可以改写成:
|
1
2
3
4
5
6
7
|
@data
public class todo {
@id private string id;
private string desc;
private boolean completed;
private user user;
}
|
增加这个类库只需在 build.gradle 中增加下面这行
|
1
2
3
4
|
dependencies {
// 省略其它依赖
compile("org.projectlombok:lombok:${lombokversion}")
}
|
引入spring security
要在spring boot中引入spring security非常简单,修改 build.gradle,增加一个引用 org.springframework.boot:spring-boot-starter-security:
|
1
2
3
4
5
6
7
8
|
dependencies {
compile("org.springframework.boot:spring-boot-starter-data-rest")
compile("org.springframework.boot:spring-boot-starter-data-mongodb")
compile("org.springframework.boot:spring-boot-starter-security")
compile("io.jsonwebtoken:jjwt:${jjwtversion}")
compile("org.projectlombok:lombok:${lombokversion}")
testcompile("org.springframework.boot:spring-boot-starter-test")
}
|
你可能发现了,我们不只增加了对spring security的编译依赖,还增加 jjwt 的依赖。
spring security需要我们实现几个东西,第一个是userdetails:这个接口中规定了用户的几个必须要有的方法,所以我们创建一个jwtuser类来实现这个接口。为什么不直接使用user类?因为这个userdetails完全是为了安全服务的,它和我们的领域类可能有部分属性重叠,但很多的接口其实是安全定制的,所以最好新建一个类:
|
1
2
3
4
5
6
7
8
9
10
11
12
13
14
15
16
17
18
19
20
21
22
23
24
25
26
27
28
29
30
31
32
33
34
35
36
37
38
39
40
41
42
43
44
45
46
47
48
49
50
51
52
53
54
55
56
57
58
59
60
61
62
63
64
65
66
67
68
69
|
public class jwtuser implements userdetails {
private final string id;
private final string username;
private final string password;
private final string email;
private final collection<? extends grantedauthority> authorities;
private final date lastpasswordresetdate;
public jwtuser(
string id,
string username,
string password,
string email,
collection<? extends grantedauthority> authorities,
date lastpasswordresetdate) {
this.id = id;
this.username = username;
this.password = password;
this.email = email;
this.authorities = authorities;
this.lastpasswordresetdate = lastpasswordresetdate;
}
//返回分配给用户的角色列表
@override
public collection<? extends grantedauthority> getauthorities() {
return authorities;
}
@jsonignore
public string getid() {
return id;
}
@jsonignore
@override
public string getpassword() {
return password;
}
@override
public string getusername() {
return username;
}
// 账户是否未过期
@jsonignore
@override
public boolean isaccountnonexpired() {
return true;
}
// 账户是否未锁定
@jsonignore
@override
public boolean isaccountnonlocked() {
return true;
}
// 密码是否未过期
@jsonignore
@override
public boolean iscredentialsnonexpired() {
return true;
}
// 账户是否激活
@jsonignore
@override
public boolean isenabled() {
return true;
}
// 这个是自定义的,返回上次密码重置日期
@jsonignore
public date getlastpasswordresetdate() {
return lastpasswordresetdate;
}
}
|
这个接口中规定的很多方法我们都简单粗暴的设成直接返回某个值了,这是为了简单起见,你在实际开发环境中还是要根据具体业务调整。当然由于两个类还是有一定关系的,为了写起来简单,我们写一个工厂类来由领域对象创建 jwtuser,这个工厂就叫 jwtuserfactory 吧:
|
1
2
3
4
5
6
7
8
9
10
11
12
13
14
15
16
17
18
19
|
public final class jwtuserfactory {
private jwtuserfactory() {
}
public static jwtuser create(user user) {
return new jwtuser(
user.getid(),
user.getusername(),
user.getpassword(),
user.getemail(),
maptograntedauthorities(user.getroles()),
user.getlastpasswordresetdate()
);
}
private static list<grantedauthority> maptograntedauthorities(list<string> authorities) {
return authorities.stream()
.map(simplegrantedauthority::new)
.collect(collectors.tolist());
}
}
|
第二个要实现的是 userdetailsservice,这个接口只定义了一个方法 loaduserbyusername,顾名思义,就是提供一种从用户名可以查到用户并返回的方法。注意,不一定是数据库哦,文本文件、xml文件等等都可能成为数据源,这也是为什么spring提供这样一个接口的原因:保证你可以采用灵活的数据源。接下来我们建立一个 jwtuserdetailsserviceimpl 来实现这个接口。
|
1
2
3
4
5
6
7
8
9
10
11
12
13
14
|
@service
public class jwtuserdetailsserviceimpl implements userdetailsservice {
@autowired
private userrepository userrepository;
@override
public userdetails loaduserbyusername(string username) throws usernamenotfoundexception {
user user = userrepository.findbyusername(username);
if (user == null) {
throw new usernamenotfoundexception(string.format("no user found with username '%s'.", username));
} else {
return jwtuserfactory.create(user);
}
}
}
|
为了让spring可以知道我们想怎样控制安全性,我们还需要建立一个安全配置类 websecurityconfig:
|
1
2
3
4
5
6
7
8
9
10
11
12
13
14
15
16
17
18
19
20
21
22
23
24
25
26
27
28
29
30
31
32
33
34
35
36
37
38
39
40
41
42
43
44
45
46
47
|
@configuration
@enablewebsecurity
@enableglobalmethodsecurity(prepostenabled = true)
public class websecurityconfig extends websecurityconfigureradapter{
// spring会自动寻找同样类型的具体类注入,这里就是jwtuserdetailsserviceimpl了
@autowired
private userdetailsservice userdetailsservice;
@autowired
public void configureauthentication(authenticationmanagerbuilder authenticationmanagerbuilder) throws exception {
authenticationmanagerbuilder
// 设置userdetailsservice
.userdetailsservice(this.userdetailsservice)
// 使用bcrypt进行密码的hash
.passwordencoder(passwordencoder());
}
// 装载bcrypt密码编码器
@bean
public passwordencoder passwordencoder() {
return new bcryptpasswordencoder();
}
@override
protected void configure(httpsecurity httpsecurity) throws exception {
httpsecurity
// 由于使用的是jwt,我们这里不需要csrf
.csrf().disable()
// 基于token,所以不需要session
.sessionmanagement().sessioncreationpolicy(sessioncreationpolicy.stateless).and()
.authorizerequests()
//.antmatchers(httpmethod.options, "/**").permitall()
// 允许对于网站静态资源的无授权访问
.antmatchers(
httpmethod.get,
"/",
"/*.html",
"/favicon.ico",
"/**/*.html",
"/**/*.css",
"/**/*.js"
).permitall()
// 对于获取token的rest api要允许匿名访问
.antmatchers("/auth/**").permitall()
// 除上面外的所有请求全部需要鉴权认证
.anyrequest().authenticated();
// 禁用缓存
httpsecurity.headers().cachecontrol();
}
}
|
接下来我们要规定一下哪些资源需要什么样的角色可以访问了,在 usercontroller 加一个修饰符 @preauthorize("hasrole('admin')") 表示这个资源只能被拥有 admin 角色的用户访问。
|
1
2
3
4
5
6
7
8
9
10
11
12
13
14
15
16
17
18
|
/**
* 在 @preauthorize 中我们可以利用内建的 spel 表达式:比如 'hasrole()' 来决定哪些用户有权访问。
* 需注意的一点是 hasrole 表达式认为每个角色名字前都有一个前缀 'role_'。所以这里的 'admin' 其实在
* 数据库中存储的是 'role_admin' 。这个 @preauthorize 可以修饰controller也可修饰controller中的方法。
**/
@restcontroller
@requestmapping("/users")
@preauthorize("hasrole('admin')")
public class usercontroller {
@autowired
private userrepository repository;
@requestmapping(method = requestmethod.get)
public list<user> getusers() {
return repository.findall();
}
// 略去其它部分
}
|
类似的我们给 todocontroller 加上 @preauthorize("hasrole('user')"),标明这个资源只能被拥有 user 角色的用户访问:
|
1
2
3
4
5
6
|
@restcontroller
@requestmapping("/todos")
@preauthorize("hasrole('user')")
public class todocontroller {
// 略去
}
|
使用application.yml配置springboot应用
现在应该spring security可以工作了,但为了可以更清晰的看到工作日志,我们希望配置一下,在和 src 同级建立一个config文件夹,在这个文件夹下面新建一个 application.yml。
|
1
2
3
4
5
6
7
8
9
10
11
12
13
14
15
16
17
18
19
|
# server configuration
server:
port: 8090
contextpath:
# spring configuration
spring:
jackson:
serialization:
indent_output: true
data.mongodb:
host: localhost
port: 27017
database: springboot
# logging configuration
logging:
level:
org.springframework:
data: debug
security: debug
|
我们除了配置了logging的一些东东外,也顺手设置了数据库和http服务的一些配置项,现在我们的服务器会在8090端口监听,而spring data和security的日志在debug模式下会输出到console。
现在启动服务后,访问http://localhost:8090 你可以看到根目录还是正常显示的
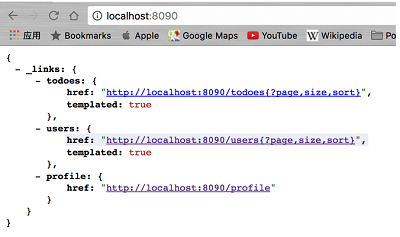
根目录还是正常可以访问的
但我们试一下http://localhost:8090/users ,观察一下console,我们会看到如下的输出,告诉由于用户未鉴权,我们访问被拒绝了。
|
1
2
3
|
2017-03-10 15:51:53.351 debug 57599 --- [nio-8090-exec-4] o.s.s.w.a.exceptiontranslationfilter : access is denied (user is anonymous); redirecting to authentication entry point
org.springframework.security.access.accessdeniedexception: access is denied
at org.springframework.security.access.vote.affirmativebased.decide(affirmativebased.java:84) ~[spring-security-core-4.2.1.release.jar:4.2.1.release]
|
集成jwt和spring security
到现在,我们还是让jwt和spring security各自为战,并没有集成起来。要想要jwt在spring中工作,我们应该新建一个filter,并把它配置在 websecurityconfig 中。
|
1
2
3
4
5
6
7
8
9
10
11
12
13
14
15
16
17
18
19
20
21
22
23
24
25
26
27
28
29
30
31
32
33
34
35
|
@component
public class jwtauthenticationtokenfilter extends onceperrequestfilter {
@autowired
private userdetailsservice userdetailsservice;
@autowired
private jwttokenutil jwttokenutil;
@value("${jwt.header}")
private string tokenheader;
@value("${jwt.tokenhead}")
private string tokenhead;
@override
protected void dofilterinternal(
httpservletrequest request,
httpservletresponse response,
filterchain chain) throws servletexception, ioexception {
string authheader = request.getheader(this.tokenheader);
if (authheader != null && authheader.startswith(tokenhead)) {
final string authtoken = authheader.substring(tokenhead.length()); // the part after "bearer "
string username = jwttokenutil.getusernamefromtoken(authtoken);
logger.info("checking authentication " + username);
if (username != null && securitycontextholder.getcontext().getauthentication() == null) {
userdetails userdetails = this.userdetailsservice.loaduserbyusername(username);
if (jwttokenutil.validatetoken(authtoken, userdetails)) {
usernamepasswordauthenticationtoken authentication = new usernamepasswordauthenticationtoken(
userdetails, null, userdetails.getauthorities());
authentication.setdetails(new webauthenticationdetailssource().builddetails(
request));
logger.info("authenticated user " + username + ", setting security context");
securitycontextholder.getcontext().setauthentication(authentication);
}
}
}
chain.dofilter(request, response);
}
}
|
事实上如果我们足够相信token中的数据,也就是我们足够相信签名token的secret的机制足够好,这种情况下,我们可以不用再查询数据库,而直接采用token中的数据。本例中,我们还是通过spring security的 @userdetailsservice 进行了数据查询,但简单验证的话,你可以采用直接验证token是否合法来避免昂贵的数据查询。
接下来,我们会在 websecurityconfig 中注入这个filter,并且配置到 httpsecurity 中:
|
1
2
3
4
5
6
7
8
9
10
11
12
13
14
|
public class websecurityconfig extends websecurityconfigureradapter{
// 省略其它部分
@bean
public jwtauthenticationtokenfilter authenticationtokenfilterbean() throws exception {
return new jwtauthenticationtokenfilter();
}
@override
protected void configure(httpsecurity httpsecurity) throws exception {
// 省略之前写的规则部分,具体看前面的代码
// 添加jwt filter
httpsecurity
.addfilterbefore(authenticationtokenfilterbean(), usernamepasswordauthenticationfilter.class);
}
}
|
完成鉴权(登录)、注册和更新token的功能
到现在,我们整个api其实已经在安全的保护下了,但我们遇到一个问题:所有的api都安全了,但我们还没有用户啊,所以所有api都没法访问。因此要提供一个注册、登录的api,这个api应该是可以匿名访问的。给它规划的路径呢,我们前面其实在websecurityconfig中已经给出了,就是 /auth。
首先需要一个authservice,规定一下必选动作:
|
1
2
3
4
5
|
public interface authservice {
user register(user usertoadd);
string login(string username, string password);
string refresh(string oldtoken);
}
|
然后,实现这些必选动作,其实非常简单:
- 登录时要生成token,完成spring security认证,然后返回token给客户端
- 注册时将用户密码用bcrypt加密,写入用户角色,由于是开放注册,所以写入角色系统控制,将其写成 role_user
- 提供一个可以刷新token的接口 refresh 用于取得新的token
|
1
2
3
4
5
6
7
8
9
10
11
12
13
14
15
16
17
18
19
20
21
22
23
24
25
26
27
28
29
30
31
32
33
34
35
36
37
38
39
40
41
42
43
44
45
46
47
48
49
50
51
52
|
@service
public class authserviceimpl implements authservice {
private authenticationmanager authenticationmanager;
private userdetailsservice userdetailsservice;
private jwttokenutil jwttokenutil;
private userrepository userrepository;
@value("${jwt.tokenhead}")
private string tokenhead;
@autowired
public authserviceimpl(
authenticationmanager authenticationmanager,
userdetailsservice userdetailsservice,
jwttokenutil jwttokenutil,
userrepository userrepository) {
this.authenticationmanager = authenticationmanager;
this.userdetailsservice = userdetailsservice;
this.jwttokenutil = jwttokenutil;
this.userrepository = userrepository;
}
@override
public user register(user usertoadd) {
final string username = usertoadd.getusername();
if(userrepository.findbyusername(username)!=null) {
return null;
}
bcryptpasswordencoder encoder = new bcryptpasswordencoder();
final string rawpassword = usertoadd.getpassword();
usertoadd.setpassword(encoder.encode(rawpassword));
usertoadd.setlastpasswordresetdate(new date());
usertoadd.setroles(aslist("role_user"));
return userrepository.insert(usertoadd);
}
@override
public string login(string username, string password) {
usernamepasswordauthenticationtoken uptoken = new usernamepasswordauthenticationtoken(username, password);
final authentication authentication = authenticationmanager.authenticate(uptoken);
securitycontextholder.getcontext().setauthentication(authentication);
final userdetails userdetails = userdetailsservice.loaduserbyusername(username);
final string token = jwttokenutil.generatetoken(userdetails);
return token;
}
@override
public string refresh(string oldtoken) {
final string token = oldtoken.substring(tokenhead.length());
string username = jwttokenutil.getusernamefromtoken(token);
jwtuser user = (jwtuser) userdetailsservice.loaduserbyusername(username);
if (jwttokenutil.cantokenberefreshed(token, user.getlastpasswordresetdate())){
return jwttokenutil.refreshtoken(token);
}
return null;
}
}
|
然后建立authcontroller就好,这个authcontroller中我们在其中使用了表达式绑定,比如 @value("${jwt.header}")中的 jwt.header 其实是定义在 applicaiton.yml 中的
|
1
2
3
4
5
6
7
8
9
10
11
|
# jwt
jwt:
header: authorization
secret: mysecret
expiration: 604800
tokenhead: "bearer "
route:
authentication:
path: auth
refresh: refresh
register: "auth/register"
|
同样的 @requestmapping(value = "${jwt.route.authentication.path}", method = requestmethod.post) 中的 jwt.route.authentication.path 也是定义在上面的
|
1
2
3
4
5
6
7
8
9
10
11
12
13
14
15
16
17
18
19
20
21
22
23
24
25
26
27
28
29
|
@restcontroller
public class authcontroller {
@value("${jwt.header}")
private string tokenheader;
@autowired
private authservice authservice;
@requestmapping(value = "${jwt.route.authentication.path}", method = requestmethod.post)
public responseentity<?> createauthenticationtoken(
@requestbody jwtauthenticationrequest authenticationrequest) throws authenticationexception{
final string token = authservice.login(authenticationrequest.getusername(), authenticationrequest.getpassword());
// return the token
return responseentity.ok(new jwtauthenticationresponse(token));
}
@requestmapping(value = "${jwt.route.authentication.refresh}", method = requestmethod.get)
public responseentity<?> refreshandgetauthenticationtoken(
httpservletrequest request) throws authenticationexception{
string token = request.getheader(tokenheader);
string refreshedtoken = authservice.refresh(token);
if(refreshedtoken == null) {
return responseentity.badrequest().body(null);
} else {
return responseentity.ok(new jwtauthenticationresponse(refreshedtoken));
}
}
@requestmapping(value = "${jwt.route.authentication.register}", method = requestmethod.post)
public user register(@requestbody user addeduser) throws authenticationexception{
return authservice.register(addeduser);
}
}
|
验证时间
接下来,我们就可以看看我们的成果了,首先注册一个用户 peng2,很完美的注册成功了
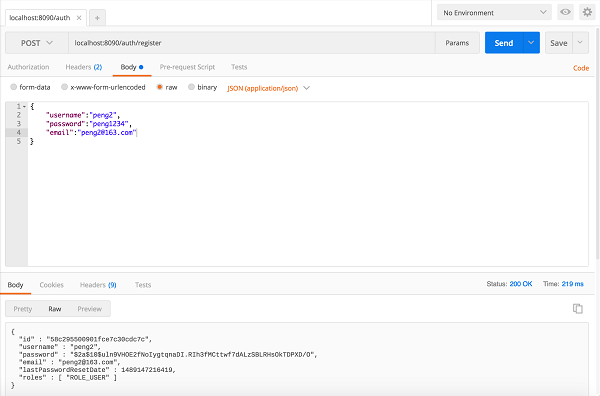
注册用户
然后在 /auth 中取得token,也很成功
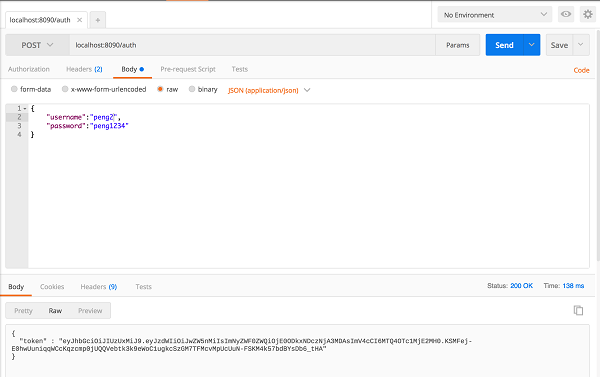
取得token
不使用token时,访问 /users 的结果,不出意料的失败,提示未授权。
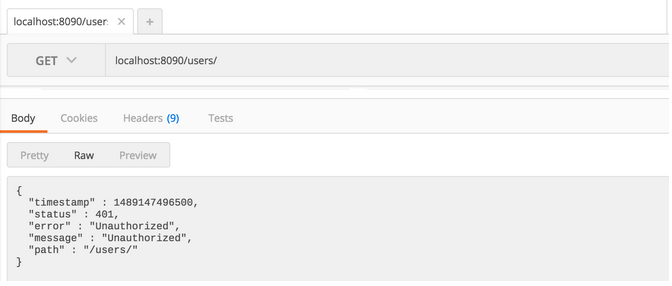
不使用token访问users列表
使用token时,访问 /users 的结果,虽然仍是失败,但这次提示访问被拒绝,意思就是虽然你已经得到了授权,但由于你的会员级别还只是普卡会员,所以你的请求被拒绝。
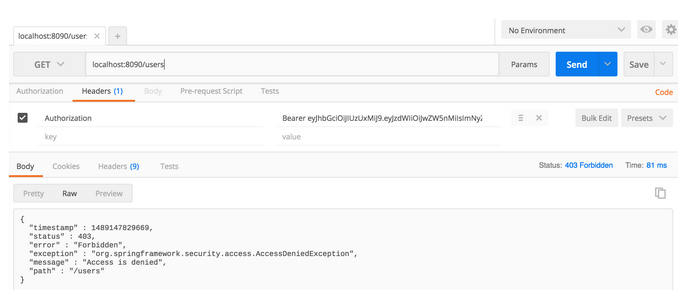
image_1bas22va52vk1rj445fhm87k72a.png-156.9kb
接下来我们访问 /users/?username=peng2,竟然可以访问啊
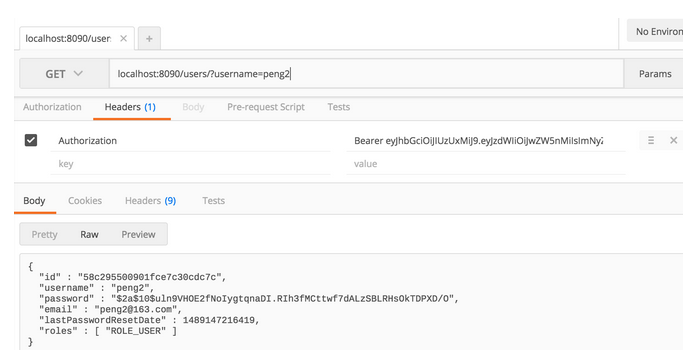
访问自己的信息是允许的
这是由于我们为这个方法定义的权限就是:拥有admin角色或者是当前用户本身。spring security真是很方便,很强大。
|
1
2
3
4
5
|
@postauthorize("returnobject.username == principal.username or hasrole('role_admin')")
@requestmapping(value = "/",method = requestmethod.get)
public user getuserbyusername(@requestparam(value="username") string username) {
return repository.findbyusername(username);
}
|
本章代码:https://github.com/wpcfan/spring-boot-tut/tree/chap04
以上所述是小编给大家介绍的spring boot(四)之使用jwt和spring security保护rest api,希望对大家有所帮助
原文链接:https://juejin.im/post/58c29e0b1b69e6006bce02f4

相关文章


- ASP.NET本地开发时常见的配置错误及解决方法? 2025-06-10
- ASP.NET自助建站系统的数据库备份与恢复操作指南 2025-06-10
- 个人网站服务器域名解析设置指南:从购买到绑定全流程 2025-06-10
- 个人网站搭建:如何挑选具有弹性扩展能力的服务器? 2025-06-10
- 个人服务器网站搭建:如何选择适合自己的建站程序或框架? 2025-06-10