activemq 5.9.0新推出的主从实现,基于zookeeper来选举出一个master,其他节点自动作为slave实时同步消息。因为有实时同步数据的slave的存在,master不用担心数据丢失,所以leveldb会优先采用内存存储消息,异步同步到磁盘,所以该方式的activemq读写性能最好因为选举机制要超过半数,所以最少需要3台节点,才能实现高可用。如果集群是两台则master失效后slave会不起作用,所以集群至少三台。此种方式仅实现主备功能,避免单点故障,没有负载均衡功能。
1、环境准备
ip
192.168.3.10 server1
192.168.3.11 server2
192.168.3.12 server3
安装软件信息:
apache-activemq-5.13.0-bin.tar.gz
zookeeper-3.5.2-alpha.tar.gz
zooinspector.zip
2、搭建zookeeper集群
(1)将zookeeper-3.5.2-alpha.tar.gz文件解压到/home/wzh/zk目录;
(2)将zoo_sample.cfg复制一份为 zoo.cfg,并修改其配置信息
wzh@hd-master:~/zk/zookeeper-3.5.2-alpha/conf$ cp zoo_sample.cfg zoo.cfg
wzh@hd-master:~/zk/zookeeper-3.5.2-alpha/conf$vim zoo.cfg
|
1
|
|
2
3
4
5
6
7
8
9
10
11
|
ticktime=2000
initlimit=10
synclimit=5
datadir=/tmp/zookeeper
clientport=2181
server.1=192.168.3.10:2888:3888
server.2=192.168.3.11:2888:3888
server.3=192.168.3.11:2888:3888
|
(3)创建/tmp/zookeeper目录
在该目录下创建名为myid的文件,内容为1(这个值随server而改变)
(4)将server1上的/home/wzh/zk/zookeeper-3.5.2-alpha文件夹复制到server2,server3,然后创建/tmp/zookeeper目录
在该目录下创建名为myid的文件,内容为2
(5)启动zookeeper
[192.168.3.10]
|
1
|
|
2
3
4
|
wzh@hd-master:~/zk/zookeeper-3.5.2-alpha/bin$ ./zkserver.sh start
zookeeper jmx enabled by default
using config: /home/wzh/zk/zookeeper-3.5.2-alpha/bin/../conf/zoo.cfg
starting zookeeper ... started
|
[192.168.3.11]
|
1
|
|
2
3
4
|
wzh@hd-slave1:~/zk/zookeeper-3.5.2-alpha/bin$ ./zkserver.sh start
zookeeper jmx enabled by default
using config: /home/wzh/zk/zookeeper-3.5.2-alpha/bin/../conf/zoo.cfg
starting zookeeper ... started
|
[192.168.3.12]
|
1
|
|
2
3
4
|
wzh@hd-slave2:~/zk/zookeeper-3.5.2-alpha/bin$ ./zkserver.sh start
zookeeper jmx enabled by default
using config: /home/wzh/zk/zookeeper-3.5.2-alpha/bin/../conf/zoo.cfg
starting zookeeper ... started
|
3、搭建activemq集群
(1)将apache-activemq-5.13.0-bin.tar.gz解压到/home/wzh/amq
(2)修改activemq.xml配置文件
【1】将broker节点的brokername设置为wzhamq
【2】将persistenceadapter的持久化方式选用replicatedleveldb,将kahadb方式注释掉
|
1
|
|
2
3
4
5
6
7
8
9
10
11
12
13
|
<persistenceadapter>
<!--
<kahadb directory="${activemq.data}/kahadb"/>
-->
<replicatedleveldb
directory="${activemq.data}/leveldb"
replicas="3"
bind="tcp://0.0.0.0:0"
zkaddress="192.168.3.10:2181,192.168.3.11:2181"
hostname="192.168.3.10"
sync="local_disk"
zkpath="/activemq/leveldb-stores"/>
</persistenceadapter>
|
将apache-activemq-5.13.复制到11,12机器
wzh@hd-master:~/amq$ scp -r apache-activemq-5.13.0/ wzh@192.168.3.11:/tmp
修改配置文件中的hostname="192.168.3.11"
修改配置文件中的hostname="192.168.3.12"
(3)启动activemq
|
1
|
|
2
3
4
5
|
wzh@hd-master:~/amq$ ./apache-activemq-5.13.0/bin/activemq status
info: loading '/home/wzh/amq/apache-activemq-5.13.0//bin/env'
info: using java '/opt/java/jdk1.8.0_91/bin/java'
activemq is running (pid '2031')
wzh@hd-master:~/amq$
|
依次启动192.168.3.11,192.168.3.12机器
4:集群管理
(1)通过使用zooinspector工具查看zookeeper集群情况

(2)http://192.168.3.10:8161/admin/ 默认用户名与口令为admin登录activemq管理端
5、通过spring-boot操作activemq jms
(1)通过gradle构建spring-boot应用,在 gradle文件中增加
|
1
|
|
2
3
4
5
|
dependencies {
compile('org.springframework.boot:spring-boot-starter-activemq')
compile('org.springframework.boot:spring-boot-starter-web')
testcompile('org.springframework.boot:spring-boot-starter-test')
}
|
(2)application中增加以下配置
|
1
|
|
2
3
4
5
|
spring.activemq.broker-url=failover:(tcp://192.168.3.10:61616,tcp://192.168.3.11:61616,tcp://192.168.3.12:61616)
spring.activemq.in-memory=true
spring.activemq.pool.enabled=false
spring.activemq.user=admin
spring.activemq.password=admin
|
(3)jms消息发送
|
1
|
|
2
3
4
5
6
7
8
9
10
|
@service
public class producer {
@autowired
private jmsmessagingtemplate jmstemplate;
public void sendmessage(destination destination, final string message){
jmstemplate.convertandsend(destination, message);
}
}
|
(4)jms消息接收
|
1
|
|
2
3
4
5
6
7
8
|
@component
public class consumer {
@jmslistener(destination = "test.queue")
public void receivequeue(string text){
system.out.println("consumer收到的报文为:"+text);
}
}
|
(5)测试
|
1
|
|
2
3
4
5
6
7
8
9
10
11
12
13
14
15
16
17
18
19
20
21
22
23
24
25
26
|
@restcontroller
@requestmapping(
value = "/test",
headers = "accept=application/json",
produces = "application/json;charset=utf-8"
)
public class testctrl {
@autowired
producer producer;
destination destination = new activemqqueue("test.queue");
@requestmapping(
value = "/say/{msg}/to/{name}",
method = requestmethod.get
)
public map<string, object> say(@pathvariable string msg, @pathvariable string name){
map<string, object> map = new hashmap<>();
map.put("msg", msg);
map.put("name", name);
producer.sendmessage(destination, msg);
return map;
}
}
|
(6)进入activemq管理控制台创建一个消息队列
test.queue

(7)通过postman进行测试
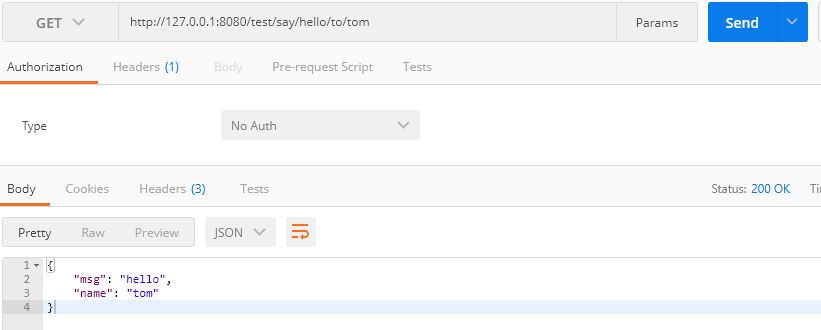
2017-08-03 08:10:44.928 info 12820 — [activemq task-3] o.a.a.t.failover.failovertransport : successfully reconnected to tcp://192.168.3.10:61616
2017-08-03 08:11:08.854 info 12820 — [activemq task-1] o.a.a.t.failover.failovertransport : successfully connected to tcp://192.168.3.10:61616
consumer收到的报文为:hello
2017-08-03 08:43:39.464 info 12820 — [activemq task-1] o.a.a.t.failover.failovertransport : successfully connected to tcp://192.168.3.10:61616
consumer收到的报文为:hello
(8)目前系统连接的是10,如果此时将10集群down掉,系统会理解选择一台slave作为master提供服务,从而启动案例主备的效果。
以上就是本文的全部内容,希望对大家的学习有所帮助,也希望大家多多支持快网idc。

相关文章


- 个人网站服务器域名解析设置指南:从购买到绑定全流程 2025-06-10
- 个人网站搭建:如何挑选具有弹性扩展能力的服务器? 2025-06-10
- 个人服务器网站搭建:如何选择适合自己的建站程序或框架? 2025-06-10
- 64M VPS建站:能否支持高流量网站运行? 2025-06-10
- 64M VPS建站:怎样选择合适的域名和SSL证书? 2025-06-10