本文实例讲述了java设计模式之桥接模式。分享给大家供大家参考,具体如下:
概念:
桥接模式(bridge pattern):将抽象部分与它的实现部分分离,使它们都可以独立地变化。
桥接模式将继承关系转换为关联关系,从而降低了类与类之间的耦合,减少了代码编写量。
什么情况下会用桥接模式?
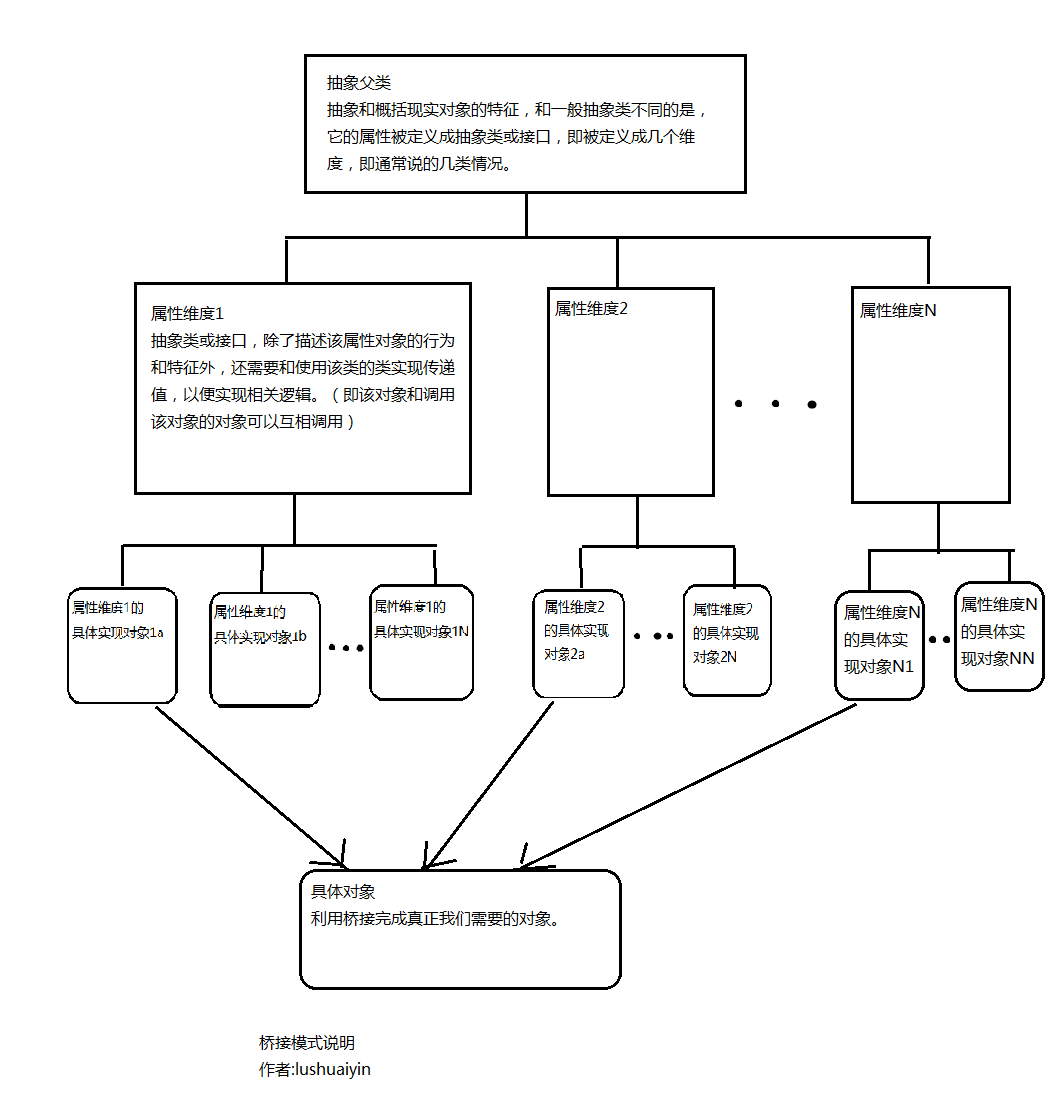
简单的说就是我们在抽象对象的特征时,对象的特征属性又很抽象,不得不把属性再次抽象。
否则的话,具体子类的数量将会成几何增长,而且不易扩展。没办法维护现有代码。
举例,我们在抽象手机这二个对象时,它的几个属性,如操作系统,cpu,屏幕,运营商网络等都很复杂。我们不能简单的把这几个属性直接定义,必须再次抽象化。而具体的一个手机对象就是这些属性的组合,但不是简单的组合,属性需要实现自己作为属性的功能。在这样的设计下,代码的维护和扩展也就容易了。
注意:在说这个模式的时候,我不能保证说的和写得例子都是正确的,毕竟我也是新接触到,所有例子均基于与个人理解。
我认为的桥接模式说明图:
下面是例子:
1. 首先定义抽象类,抽象和描述对象的特征。
在对象的属性上划分维度,为了以后桥接和扩展。
?
|
1
2
3
4
5
6
7
8
9
10
11
12
13
14
15
16
17
18
19
20
21
22
23
24
25
26
27
28
29
30
31
32
|
package test.design.bridge;
public abstract class cellphone {
private string cellphonename;
public cellphonesystem cellphonesystem;
public cellphonecpu cellphonecpu;
public void works(){
system.out.println("---------------------");
system.out.println("this cellphone is:"+this.getcellphonename()+",welcome to use. ");
system.out.println("this cellphone detail infomation:");
system.out.println("系统类型:"+this.getcellphonesystem().getsystemname());
system.out.println("cpu型号:"+this.getcellphonecpu().getcpuname());
system.out.println("---------------------");
}
public string getcellphonename() {
return cellphonename;
}
public void setcellphonename(string cellphonename) {
this.cellphonename = cellphonename;
}
public cellphonesystem getcellphonesystem() {
return cellphonesystem;
}
public void setcellphonesystem(cellphonesystem cellphonesystem) {
this.cellphonesystem = cellphonesystem;
}
public cellphonecpu getcellphonecpu() {
return cellphonecpu;
}
public void setcellphonecpu(cellphonecpu cellphonecpu) {
this.cellphonecpu = cellphonecpu;
}
}
|
2. 属性维度的抽象。(可以使用接口定义,关键看你的具体功能)
?
|
1
2
3
4
5
6
7
8
9
10
11
12
13
14
15
16
17
18
19
20
21
22
23
24
25
26
27
|
package test.design.bridge;
/**
* 属性cpu被抽象成一个维度,为了以后扩展
* @author lushuaiyin
*
*/
public abstract class cellphonecpu {
public cellphone cellphone;
public string cpuname;
public void cpuworks(){
system.out.println("i am cpu. my pattern is:"+this.getcpuname());
system.out.println("i am working for this cellphone:"+this.getcellphone().getcellphonename());
}
public cellphone getcellphone() {
return cellphone;
}
public void setcellphone(cellphone cellphone) {
this.cellphone = cellphone;
this.getcellphone().setcellphonecpu(this);// 装配(桥接,或者可以认为对象类与其属性类的传递)
}
public string getcpuname() {
return cpuname;
}
public void setcpuname(string cpuname) {
this.cpuname = cpuname;
}
}
|
?
|
1
2
3
4
5
6
7
8
9
10
11
12
13
14
15
16
17
18
19
20
21
22
23
24
25
26
27
|
package test.design.bridge;
/**
* 属性操作系统被抽象成一个维度,为了以后扩展
* @author lushuaiyin
*
*/
public abstract class cellphonesystem {
public cellphone cellphone;
public string systemname;
public void systemworks(){
system.out.println("i am "+this.getsystemname()+" system.");
system.out.println("i am working for this cellphone:"+this.getcellphone().getcellphonename());
}
public cellphone getcellphone() {
return cellphone;
}
public void setcellphone(cellphone cellphone) {
this.cellphone = cellphone;
this.getcellphone().setcellphonesystem(this);// 装配(桥接,或者可以认为对象类与其属性类的传递)
}
public string getsystemname() {
return systemname;
}
public void setsystemname(string systemname) {
systemname = systemname;
}
}
|
3. 具体的维度属性对象。
这里我们在操作系统属性和cpu属性上各定义2个具体对象,
?
|
1
2
3
|
package test.design.bridge;
public class androidsystem extends cellphonesystem{
}
|
?
|
1
2
3
|
package test.design.bridge;
public class iossystem extends cellphonesystem{
}
|
?
|
1
2
3
4
5
6
7
8
|
package test.design.bridge;
/**
* 双核cpu
* @author administrator
*
*/
public class twocore extends cellphonecpu{
}
|
?
|
1
2
3
4
5
6
7
8
|
package test.design.bridge;
/**
* 四核cpu
* @author administrator
*
*/
public class fourcore extends cellphonecpu{
}
|
4. 测试代码。
其中说了在需要扩展维度的情况下,怎么扩展的。
定义一个手机对象
?
|
1
2
3
4
|
package test.design.bridge;
public class phone1 extends cellphone{
//具体对象的属性与逻辑
}
|
测试main函数
?
|
1
2
3
4
5
6
7
8
9
10
11
12
13
14
15
16
17
18
19
20
21
22
23
24
25
26
27
28
29
30
31
32
33
34
35
36
37
38
39
40
41
42
43
44
45
46
47
48
49
50
|
package test.design.bridge;
public class testmain {
/**
* @param args
*/
public static void main(string[] args) {
//任何一种具体的对象都是复杂多种属性的集合,在此可以看出桥接模式在构建对象时的灵活性
//产生一个具体对象1
cellphone p1=new phone1();
p1.setcellphonename(" iphone 6 ");
cellphonesystem system1=new iossystem();//操作系统属性维度
system1.setsystemname("ios7");
system1.setcellphone(p1);//装配
system1.systemworks();//工作
/*装配说的简单点就是传值。因为我们把一个对象的属性按维度分开来了,
那么桥接的时候就必须相互传递对象。即对象类可以调用子属相类对象,
子属性类对象也可以调用该对象类.
关于这样的传值方式有多种,你可以在构造函数中传递,也可以在
调用具体逻辑方法时传递。这里我直接用set方法传递,只是为了更清楚.
如果某个属性维度是必须出现的,那就可以在抽象类的构造函数中传入*/
cellphonecpu cpu1=new twocore();//cpu属性维度
cpu1.setcpuname("a6");
cpu1.setcellphone(p1);
cpu1.cpuworks();
p1.works();//最终整体对象功能
/*
桥接模式就是为了应对属性的扩展,在此说的属性必须是在维度确定的情况下。
比如,这里我们在定义手机对象时,确定两个属性维度:操作系统和cpu型号。
以后再这两个属性中,需要扩展时,就可以使用该模式。比如,一种新的cpu
型号出现了,那么我不用重新设计现在的代码,只要增添一个cpu类即可。
如果出现了新的维度属性,比如手机对象必须考虑屏幕大小。那桥接模式
在此就需要从根本上修改代码来了。
*/
system.out.println("-----------分割---------------------------");
//在cpu维度上扩展。比如出现新型cpu:8核三星exynos 5 octa芯片".
//三星手机推出了galaxy note ⅲ就是使用这种新型cpu. 写一个新类eightcore扩展cpu维度.
//同时定义这个手机对象galaxy note ⅲ为phonegalaxynote3
cellphone note3=new phonegalaxynote3();
note3.setcellphonename("galaxy note ⅲ");
cellphonesystem system2=new androidsystem();
system2.setsystemname("android4");
system2.setcellphone(note3);//装配
system2.systemworks();//工作
cellphonecpu cpu2=new eightcore();//最新8核cpu
cpu2.setcpuname("三星exynos 5 octa芯片");
cpu2.setcellphone(note3);
cpu2.cpuworks();
note3.works();//三星galaxy note ⅲ新体验
}
}
|
如果需要扩展,定义新的维度属性
?

|
1
2
3
|
package test.design.bridge;
public class eightcore extends cellphonecpu {
}
|
?
|
1
2
3
4
|
package test.design.bridge;
public class phonegalaxynote3 extends cellphone{
//具体对象的属性与逻辑
}
|
测试打印;
?
|
1
2
3
4
5
6
7
8
9
10
11
12
13
14
15
16
17
18
19
20
21
|
i am ios7 system.
i am working for this cellphone: iphone 6
i am cpu. my pattern is:a6
i am working for this cellphone: iphone 6
---------------------
this cellphone is: iphone 6 ,welcome to use.
this cellphone detail infomation:
系统类型:ios7
cpu型号:a6
---------------------
-----------分割---------------------------
i am android4 system.
i am working for this cellphone:galaxy note ⅲ
i am cpu. my pattern is:三星exynos 5 octa芯片
i am working for this cellphone:galaxy note ⅲ
---------------------
this cellphone is:galaxy note ⅲ,welcome to use.
this cellphone detail infomation:
系统类型:android4
cpu型号:三星exynos 5 octa芯片
---------------------
|
希望本文所述对大家java程序设计有所帮助。
原文链接:http://blog.csdn.net/lushuaiyin/article/details/9345495

相关文章


猜你喜欢
- ASP.NET本地开发时常见的配置错误及解决方法? 2025-06-10
- ASP.NET自助建站系统的数据库备份与恢复操作指南 2025-06-10
- 个人网站服务器域名解析设置指南:从购买到绑定全流程 2025-06-10
- 个人网站搭建:如何挑选具有弹性扩展能力的服务器? 2025-06-10
- 个人服务器网站搭建:如何选择适合自己的建站程序或框架? 2025-06-10