最近有好久没有更新博客了,感谢小伙伴的默默支持,不知道是谁又打赏了我一个小红包,谢谢。
今天我们讲讲怎么在spring boot中使用模板引擎freemarker,先看看今天的大纲:
(1) freemarker介绍;
(2) 新建spring-boot-freemarker工程;
(3) 在pom.xml引入相关依赖;
(4) 编写启动类;
(5) 编写模板文件hello.ftl;
(6) 编写访问类hellocontroller;
(7) 测试;
(8) freemarker配置;
(9) freemarker常用语法;
(10) freemarker layout 布局
(1) freemarker介绍;
freemarker是一款模板引擎: 即一种基于模板和要改变的数据, 并用来生成输出文本(html网页、电子邮件、配置文件、源代码等)的通用工具。 它不是面向最终用户的,而是一个java类库,是一款程序员可以嵌入他们所开发产品的组件。
(2) 新建spring-boot-freemarker工程;
我们新建一个maven工程,取名为:spring-boot-freemarker
(3) 在pom.xml引入相关依赖;
这里使用freemarker需要引入相关依赖包:spring-boot-starter-freemarker,
|
1
2
3
4
5
6
7
8
9
10
11
12
13
14
15
16
17
18
19
20
21
22
23
24
25
26
27
28
29
30
31
32
33
34
35
36
37
38
39
40
41
42
43
44
45
46
47
48
49
50
51
|
<project xmlns="http://maven.apache.org/pom/4.0.0" xmlns:xsi="http://www.w3.org/2001/xmlschema-instance"
xsi:schemalocation="http://maven.apache.org/pom/4.0.0 http://maven.apache.org/xsd/maven-4.0.0.xsd">
<modelversion>4.0.0</modelversion>
<groupid>com.kfit</groupid>
<artifactid>spring-boot-velocity</artifactid>
<version>0.0.1-snapshot</version>
<packaging>jar</packaging>
<name>spring-boot-velocity</name>
<url>http://maven.apache.org</url>
<properties>
<project.build.sourceencoding>utf-8</project.build.sourceencoding>
<!-- jdk版本号,angel在这里使用1.8,大家修改为大家本地配置的jdk版本号即可 -->
<java.version>1.8</java.version>
</properties>
<!--
spring boot 父节点依赖,
引入这个之后相关的引入就不需要添加version配置,
spring boot会自动选择最合适的版本进行添加。
-->
<parent>
<groupid>org.springframework.boot</groupid>
<artifactid>spring-boot-starter-parent</artifactid>
<version>1.4.1.release</version><!-- 1.4.1.release , 1.3.3.release-->
</parent>
<dependencies>
<dependency>
<groupid>junit</groupid>
<artifactid>junit</artifactid>
<scope>test</scope>
</dependency>
<!-- spring boot web支持:mvc,aop... -->
<dependency>
<groupid>org.springframework.boot</groupid>
<artifactid>spring-boot-starter-web</artifactid>
</dependency>
<!-- 引入freemarker的依赖包. -->
<dependency>
<groupid>org.springframework.boot</groupid>
<artifactid>spring-boot-starter-freemarker</artifactid>
</dependency>
</dependencies>
</project>
|
(4) 编写启动类;
启动类没有什么特别之处,不过多介绍,请看代码:
|
1
2
3
4
5
6
7
8
9
10
11
12
13
14
15
16
17
|
package com.kfit;
import org.springframework.boot.springapplication;
import org.springframework.boot.autoconfigure.springbootapplication;
/**
*
* @author angel --守护天使
* @version v.0.1
* @date 2016年10月4日
*/
@springbootapplication
public class app {
publicstaticvoid main(string[] args) {
springapplication.run(app.class, args);
}
}
|
(5) 编写模板文件hello.ftl;
编写一个hello.ftl文件,此文件的路径在src/main/resources/templates下,其中hello.ftl文件的内容如下:
|
1
2
3
4
5
|
<html>
<body>
welcome ${name} to freemarker!
</body>
</html>
|
(6) 编写访问类hellocontroller;
有了模板文件之后,我们需要有个controller控制类,能够访问到hello.ftl文件,这里也很简单,具体看如下代码:
|
1
2
3
4
5
6
7
8
9
10
11
12
13
14
15
16
17
18
19
20
21
22
23
|
package com.kfit.demo.web;
import java.util.map;
import org.springframework.stereotype.controller;
import org.springframework.web.bind.annotation.requestmapping;
/**
* 测试velocity;
* @author angel --守护天使
* @version v.0.1
* @date 2016年10月4日
*/
@controller
public class hellocontroller {
@requestmapping("/hello")
public string hello(map<string,object> map){
map.put("name", "[angel -- 守护天使]");
return "hello";
}
}
|
(7) 测试;
好了,到这里,我们就可以启动我们的程序进行测试了,访问地址:
http://127.0.0.1:8080/hello ,如果你在浏览器中看到如下信息:
welcome [angel — 守护天使] to freemarker!
那么说明你的demo ok 了。
(8) freemarker配置;
在spring boot的application.properties属性文件中为freemarker提供了一些常用的配置,如下:
|
1
2
3
4
5
6
7
8
9
10
11
12
13
14
15
16
17
|
########################################################
###freemarker (freemarkerautoconfiguration)
########################################################
spring.freemarker.allow-request-override=false
spring.freemarker.cache=true
spring.freemarker.check-template-location=true
spring.freemarker.charset=utf-8
spring.freemarker.content-type=text/html
spring.freemarker.expose-request-attributes=false
spring.freemarker.expose-session-attributes=false
spring.freemarker.expose-spring-macro-helpers=false
#spring.freemarker.prefix=
#spring.freemarker.request-context-attribute=
#spring.freemarker.settings.*=
#spring.freemarker.suffix=.ftl
#spring.freemarker.template-loader-path=classpath:/templates/ #comma-separated list
#spring.freemarker.view-names= # whitelist of view names that can be resolved
|
(9) freemarker常用语法;
freemarker的语法并不是本节的重点,这里还是简单的介绍下几个常用的if else,list;
首先我们改造下hellocontroller的hello方法
|
1
2
3
4
5
6
7
8
9
10
11
12
13
14
15
16
17
|
@requestmapping("/hello")
public string hello(map<string,object> map){
map.put("name", "[angel -- 守护天使]");
map.put("gender",1);//gender:性别,1:男;0:女;
list<map<string,object>> friends =new arraylist<map<string,object>>();
map<string,object> friend = new hashmap<string,object>();
friend.put("name", "张三");
friend.put("age", 20);
friends.add(friend);
friend = new hashmap<string,object>();
friend.put("name", "李四");
friend.put("age", 22);
friends.add(friend);
map.put("friends", friends);
return "hello";
}
|
这里我们返回了gender和friends的列表;
接下来我们看看怎么在freemarker进行展示呢?
|
1
2
3
4
5
6
7
8
9
10
11
12
13
14
15
16
17
18
19
20
21
22
23
24
25
26
27
28
29
30
31
|
<!doctype html>
<html xmlns="http://www.w3.org/1999/xhtml" xmlns:th="http://www.thymeleaf.org"
xmlns:sec="http://www.thymeleaf.org/thymeleaf-extras-springsecurity3">
<head>
<title>hello world!</title>
</head>
<body>
<p>
welcome ${name} to freemarker!
</p>
<p>性别:
<#if gender==0>
女
<#elseif gender==1>
男
<#else>
保密
</#if>
</p>
<h4>我的好友:</h4>
<#list friends as item>
姓名:${item.name} , 年龄${item.age}
<br>
</#list>
</body>
</html>
|
(10) freemarker layout
freemarker layout主要处理具有相同内容的页面,比如每个网站的header和footer页面。
freemarker 的布局主要常见的两种方式是#import(“文件路径”)和#include(“文件路径”),其中import和include的区别在于,include常用于公共部分的页面,如果要使用<#assign username=“张三”>涉及到内部函数以及变量声明之类的,使用import进行导入,如果在import中的页面含有页面当前将不会进行渲染。 我们编写一个header和footer,其中的header使用include引入,footer页面也使用include引入。(当然freemarker 还有别的布局方式,这里只是介绍一种,请自行学习研究)
header.ftl内容:
|
1
2
3
4
|
<header>
this is a header,welcome ${name} to my web site!
</header>
<hr>
|
footer.ftl内容:
|
1
2
3
4
|
<hr>
<footer>
this is a footer,welcome ${name} to my web site!
</footer>
|
修改hello.ftl:
|
1
2
3
4
5
6
7
8
9
10
11
12
13
14
15
16
17
18
19
20
21
22
23
24
25
26
27
28
29
30
31
32
33
34
35
36
|
<!doctype html>
<html xmlns="http://www.w3.org/1999/xhtml" xmlns:th="http://www.thymeleaf.org"
xmlns:sec="http://www.thymeleaf.org/thymeleaf-extras-springsecurity3">
<head>
<title>hello world!</title>
</head>
<body>
<#include "/header.ftl" >
<p>
welcome ${name} to freemarker!
</p>
<p>性别:
<#if gender==0>
女
<#elseif gender==1>
男
<#else>
保密
</#if>
</p>
<h4>我的好友:</h4>
<#list friends as item>
姓名:${item.name} , 年龄${item.age}
<br>
</#list>
<#include "/footer.ftl" >
</body>
</html>
|
到这里就ok了,我们访问/hello页面,应该会看到如下图的效果:
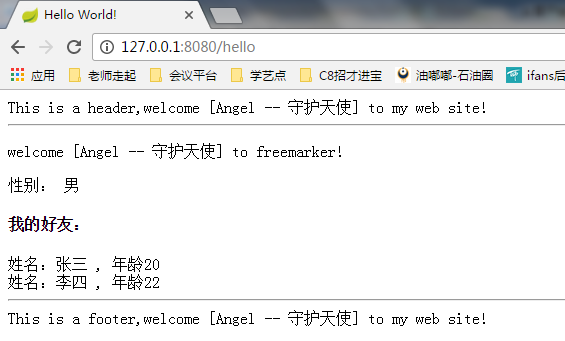
以上就是本文的全部内容,希望对大家的学习有所帮助,也希望大家多多支持快网idc。
原文链接:http://412887952-qq-com.iteye.com/blog/2335218

相关文章


- ASP.NET自助建站系统的数据库备份与恢复操作指南 2025-06-10
- 个人网站服务器域名解析设置指南:从购买到绑定全流程 2025-06-10
- 个人网站搭建:如何挑选具有弹性扩展能力的服务器? 2025-06-10
- 个人服务器网站搭建:如何选择适合自己的建站程序或框架? 2025-06-10
- 64M VPS建站:能否支持高流量网站运行? 2025-06-10