一、异步通信
之前接触到的rmi,hessian等技术都是同步通信机制。当客户端调用远程方法时,客户端必须等到远程方法完成后,才能继续执行。这段时间客户端一直会被阻塞(这样造成的用户体验很不好)。
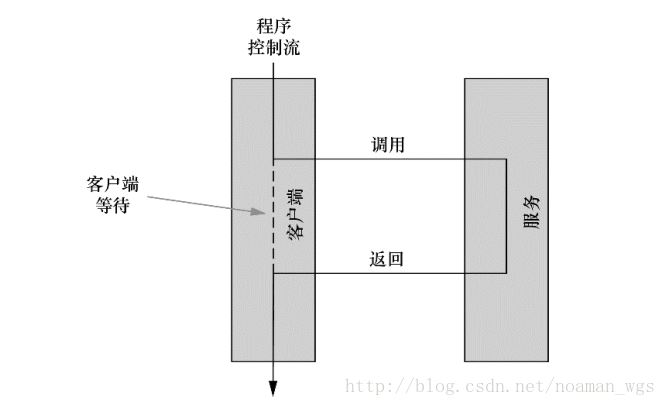
(同步通信)
同步通信有并不是程序之间交互的唯一方式,异步通信机制中,客户端不需要等待服务处理消息,可以继续执行,并且最终能够收到并处理消息。
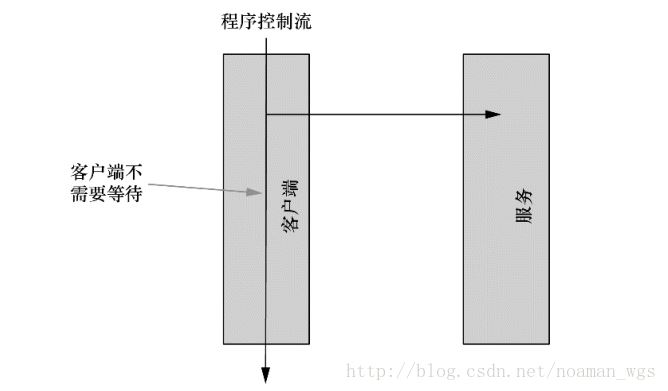
(异步通信)
异步通信的优势
无需等待。客户端只需要将消息发送给消息代理,不需要等待就可以继续执行别的任务,且确信消息会被投递给相应的目的地。
面向消息和解耦。 客户端不需要担心远程服务的接口规范,只需要把消息放入消息队列然后获取结果即可。
二、jms
1. 简介
在jms出现之前,每个消息代理都是有不同的实现,这就使得不同代理之间的消息代码很难通用。jms(java message service,java消息服务)是一个标准,定义了使用消息代理的通用api。即所有遵从规范的实现都使用通用的接口,类似于jdbc为数据库操作提供通用接口。
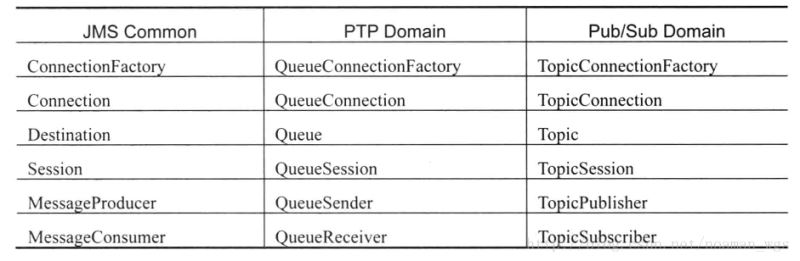
jms几个重要的要素:
destination:消息从发送端发出后要走的通道。
connectionfactory:连接工厂,用于创建连接的对象。
connection:连接接口,用于创建session。
session:会话接口,用于创建消息的发送者,接受者以及消息对象本身。
messageconsumer:消息的消费者。
messageproducer:消息的生产者。
xxxmessage:各种类型的消息对象,包括bytemessage、mapmessage、objectmessage、streammessage和textmessage 5种。
2. jms消息模型
不同的消息系统有不同的消息模型。jms提供了两种模型:queue(点对点)和topic(发布/订阅)。
jms queue(点对点)模型
在点对点模型中,消息生产者生产消息发送到queue中,然后消息消费者从queue中取出并且消费消息,但不可重复消费。
如图:
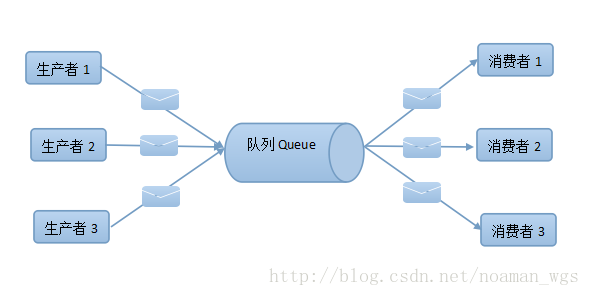
发送者1,发送者2,发送者3各发送一条消息到服务器;
消息1,2,3就会按照顺序形成一个队列,队列中的消息不知道自己会被哪个接收者消费;
接收者1,2,3分别从队列中取出一条消息进行消费,每取出一条消息,队列就会将该消息删除,这样即保证了消息不会被重复消费。
jms queue模型也成为p2p(point to point)模型。
jms topic(发布/订阅)模型
jms topic模型与jms queue模型的最大差别在于消息接收的部分。topic模型类似于微信公众号,订阅了该公众号的接收者都可以接收到公众号推送的消息。
如图:

发布者1,2,3分别发布3个主题1,2,3;
这样订阅了主题1的用户群:订阅者1,2,3即能接收到主题1消息;同理订阅者4,5,6即能接收到主题2消息,订阅者7,8,9即能接收到主题3消息。
jms topic模型也成为pus/sub模型。
两种模式下各要素的对比:
3. 传统jms编程模型
producer:
(1)创建连接工厂connectionfactory;
(2) 使用连接工厂创建连接;
(3)启动连接;
(4)创建会话;
(5) 创建消息发送的目的地;
(6)创建生产者;
(7)创建消息类型和消息内容;
(8)发送消息;
consumer:
(1)创建连接工厂connectionfactory;
(2) 使用连接工厂创建连接;
(3)启动连接;
(4)创建会话;
(5) 创建消息发送的目的地;
(6)创建消费者
(7)创建消息类型;
(8)接收消息;
三、 activemq简介
activemq 是apache出品,最流行的,能力强劲的开源消息总线。activemq 是一个完全支持jms1.1和j2ee 1.4规范的 jms provider实现,尽管jms规范出台已经是很久的事情了,但是jms在当今的j2ee应用中间仍然扮演着特殊的地位。
activemq 主要特性:
多种语言和协议编写客户端。语言: java,c,c++,c#,ruby,perl,python,php。应用协议:
openwire,stomp rest,ws notification,xmpp,amqp
完全支持jms1.1和j2ee 1.4规范 (持久化,xa消息,事务)
对spring的支持,activemq可以很容易内嵌到使用spring的系统里面去,而且也支持spring2.0的特性
通过了常见j2ee服务器(如 geronimo,jboss 4,glassfish,weblogic)的测试,其中通过jca 1.5 resource adaptors的配置,可以让activemq可以自动的部署到任何兼容j2ee 1.4 商业服务器上
支持多种传送协议:in-vm,tcp,ssl,nio,udp,jgroups,jxta
支持通过jdbc和journal提供高速的消息持久化
从设计上保证了高性能的集群,客户端-服务器,点对点
支持ajax
支持与axis的整合
可以很容易得调用内嵌jms provider,进行测试
四、 activemq实战
下面看看如何activemq实现一个简单的消息队列。
传统的jms编程模型
1. jms queue模型代码实现:
producer:
|
1
2
3
4
5
6
7
8
9
10
11
12
13
14
15
16
17
18
19
20
21
22
23
24
25
26
27
28
29
30
31
32
33
34
35
|
package com.wgs.mq.queue;
import org.apache.activemq.activemqconnectionfactory;
import javax.jms.*;
/**
* created by genshenwang.nomico on 2017/10/19.
*/
public class activemqproducer {
private static final string url = "tcp://localhost:61616";
private static final string queue_name = "queue-name";
public static void main(string[] args) throws jmsexception {
//1 创建连接工厂connectionfactory
connectionfactory connectionfactory = new activemqconnectionfactory(url);
//2 使用连接工厂创建连接
connection connection = connectionfactory.createconnection();
//3 启动连接
connection.start();
//4 创建会话
session session = connection.createsession(false, session.auto_acknowledge);
//5 创建消息发送的目的地
destination destination = session.createqueue(queue_name);
//6 创建生产者
messageproducer messageproducer = session.createproducer(destination);
//7 创建消息
textmessage textmessage = session.createtextmessage();
for (int i = 1; i <= 100; i++) {
//8 创建消息内容
textmessage.settext("发送者- 1 -发送消息:" + i);
//9 发送消息
messageproducer.send(textmessage);
}
system.out.println("消息发送成功");
session.close();
connection.close();
}
}
|
conusmer:
|
1
2
3
4
5
6
7
8
9
10
11
12
13
14
15
16
17
18
19
20
21
22
23
24
25
26
27
28
29
30
31
32
33
34
35
36
37
38
|
package com.wgs.mq.queue;
import org.apache.activemq.activemqconnectionfactory;
import javax.jms.*;
/**
* created by genshenwang.nomico on 2017/10/19.
*/
public class activemqconsumer {
private static final string url = "tcp://localhost:61616";
private static final string queue_name = "queue-name";
public static void main(string[] args) throws jmsexception {
//1 创建连接工厂connectionfactory
connectionfactory connectionfactory = new activemqconnectionfactory(url);
//2 使用连接工厂创建连接
connection connection = connectionfactory.createconnection();
//3 启动连接
connection.start();
//4 创建会话
session session = connection.createsession(false, session.auto_acknowledge);
//5 创建消息发送的目的地
destination destination = session.createqueue(queue_name);
//6 创建消费者
messageconsumer messageconsumer = session.createconsumer(destination);
messageconsumer.setmessagelistener(new messagelistener() {
public void onmessage(message message) {
//7 创建消息
textmessage textmessage = (textmessage)message;
try {
//7 接收消息
system.out.println("消费者- 1 -接收消息:【" + textmessage.gettext() + "】");
}
catch (jmsexception e) {
e.printstacktrace();
}
}
}
);
}
}
|
2. jms topic模型代码实现:
producer:
|
1
2
3
4
5
6
7
8
9
10
11
12
13
14
15
16
17
18
19
20
21
22
23
24
25
26
27
28
29
30
31
32
33
34
35
36
|
package com.wgs.mq.topic;
import org.apache.activemq.activemqconnectionfactory;
import javax.jms.*;
/**
* 发布订阅模式
* created by genshenwang.nomico on 2017/10/19.
*/
public class activemqproducer {
private static final string url = "tcp://localhost:61616";
private static final string topic_name = "topic-name";
public static void main(string[] args) throws jmsexception {
//1 创建连接工厂connectionfactory
connectionfactory connectionfactory = new activemqconnectionfactory(url);
//2 使用连接工厂创建连接
connection connection = connectionfactory.createconnection();
//3 启动连接
connection.start();
//4 创建会话
session session = connection.createsession(false, session.auto_acknowledge);
//5 创建带有主题的消息发送的目的地
destination destination = session.createtopic(topic_name);
//6 创建生产者
messageproducer messageproducer = session.createproducer(destination);
//7 创建消息
textmessage textmessage = session.createtextmessage();
for (int i = 1; i <= 100; i++) {
//8 创建消息内容
textmessage.settext("发送者- 1 -发送消息:" + i);
//9 发送消息
messageproducer.send(textmessage);
}
system.out.println("消息发送成功");
session.close();
connection.close();
}
}
|
consumer:
|
1
2
3
4
5
6
7
8
9
10
11
12
13
14
15
16
17
18
19
20
21
22
23
24
25
26
27
28
29
30
31
32
33
34
35
36
37
38
39
|
package com.wgs.mq.topic;
import org.apache.activemq.activemqconnectionfactory;
import javax.jms.*;
/**
* 发布订阅模式
* created by genshenwang.nomico on 2017/10/19.
*/
public class activemqconsumer {
private static final string url = "tcp://localhost:61616";
private static final string topic_name = "topic-name";
public static void main(string[] args) throws jmsexception {
//1 创建连接工厂connectionfactory
connectionfactory connectionfactory = new activemqconnectionfactory(url);
//2 使用连接工厂创建连接
connection connection = connectionfactory.createconnection();
//3 启动连接
connection.start();
//4 创建会话
session session = connection.createsession(false, session.auto_acknowledge);
//5 创建消息发送的目的地
destination destination = session.createtopic(topic_name);
//6 创建消费者
messageconsumer messageconsumer = session.createconsumer(destination);
messageconsumer.setmessagelistener(new messagelistener() {
public void onmessage(message message) {
//7 创建消息
textmessage textmessage = (textmessage)message;
try {
//7 接收消息
system.out.println("消费者- 1 -接收消息:【" + textmessage.gettext() + "】");
}
catch (jmsexception e) {
e.printstacktrace();
}
}
}
);
}
}
|
使用spring的jms模板
虽然jms为所有的消息代理提供了统一的接口,但如同jdbc一样,在处理连接,语句,结果集和异常时会显得很繁杂。不过,spring为我们提供了jmstemplate来消除冗余和重复的jms代码。
下面看看如何使用jmstemplate来实现消息队列。
1. jms queue模型代码实现:
配置文件:
producer.xml:
|
1
2
3
4
5
6
7
8
9
10
11
12
13
14
15
16
17
18
19
20
21
22
23
24
25
26
27
28
29
30
31
32
33
34
35
36
|
<?xml version="1.0" encoding="utf-8"?>
<beans xmlns="http://www.springframework.org/schema/beans"
xmlns:xsi="http://www.w3.org/2001/xmlschema-instance"
xmlns:context="http://www.springframework.org/schema/context"
xsi:schemalocation="http://www.springframework.org/schema/beans http://www.springframework.org/schema/beans/spring-beans.xsd http://www.springframework.org/schema/context http://www.springframework.org/schema/context/spring-context.xsd">
<context:annotation-config/>
<!-- activemq提供的connectionfactory-->
<bean id="targetconnectionfactory" class="org.apache.activemq.activemqconnectionfactory">
<property name="brokerurl" value="tcp://localhost:61616"/>
</bean>
<!-- 在spring 中配置jms连接工厂,连接到activemq提供的connectionfactory-->
<bean id="connectionfactory" class="org.springframework.jms.connection.singleconnectionfactory">
<property name="targetconnectionfactory" ref = "targetconnectionfactory"/>
</bean>
<!-- 配置jmstemplate,用于发送消息 -->
<bean id="jmstemplate" class="org.springframework.jms.core.jmstemplate">
<property name="connectionfactory" ref="connectionfactory"/>
</bean>
<!-- 配置队列目的地的名称-->
<bean id="queuedestination" class="org.apache.activemq.command.activemqqueue">
<constructor-arg value="queue-spring-name"/>
</bean>
<!-- 配置队列目的地的名称-->
<bean id="topicdestination" class="org.apache.activemq.command.activemqtopic">
<constructor-arg value="topic-spring-name"/>
</bean>
<bean id="producerserviceimpl" class="com.wgs.jms.producer.activemqproducerserviceimpl"/>
</beans>
|
consumer.xml:
|
1
2
3
4
5
6
7
8
9
10
11
12
13
14
15
16
17
18
19
20
21
22
23
24
25
26
27
28
29
30
31
32
33
34
35
|
<?xml version="1.0" encoding="utf-8"?>
<beans xmlns="http://www.springframework.org/schema/beans"
xmlns:xsi="http://www.w3.org/2001/xmlschema-instance"
xmlns:context="http://www.springframework.org/schema/context"
xsi:schemalocation="http://www.springframework.org/schema/beans http://www.springframework.org/schema/beans/spring-beans.xsd http://www.springframework.org/schema/context http://www.springframework.org/schema/context/spring-context.xsd">
<context:annotation-config/>
<!-- activemq提供的connectionfactory-->
<bean id="targetconnectionfactory" class="org.apache.activemq.activemqconnectionfactory">
<property name="brokerurl" value="tcp://localhost:61616"/>
</bean>
<!-- 在spring 中配置jms连接工厂,连接到activemq提供的connectionfactory-->
<bean id="connectionfactory" class="org.springframework.jms.connection.singleconnectionfactory">
<property name="targetconnectionfactory" ref = "targetconnectionfactory"/>
</bean>
<!-- 配置队列目的地的名称-->
<bean id="queuedestination" class="org.apache.activemq.command.activemqqueue">
<constructor-arg value="queue-spring-name"/>
</bean>
<!-- 配置消息监听器-->
<bean id="consumermessagelistener" class="com.wgs.jms.consumer.consumermessagelistener"/>
<!-- 配置队列目的地的名称-->
<bean id="jmscontainer" class="org.springframework.jms.listener.defaultmessagelistenercontainer">
<property name="destination" ref="queuedestination"/>
<property name="connectionfactory" ref="connectionfactory"/>
<property name="messagelistener" ref="consumermessagelistener"/>
</bean>
<!-- 配置队列目的地的名称-->
<bean id="topicdestination" class="org.apache.activemq.command.activemqtopic">
<constructor-arg value="topic-spring-name"/>
</bean>
</beans>
|
生产者producer:
(1)先写一个接口:
|
1
2
3
4
5
6
7
|
package com.wgs.jms.producer;
/**
* created by genshenwang.nomico on 2017/10/20.
*/
public interface activemqproducerservice {
void sendmessage(final string message);
}
|
(2)接口的实现:
|
1
2
3
4
5
6
7
8
9
10
11
12
13
14
15
16
17
18
19
20
21
22
23
24
25
|
package com.wgs.jms.producer;
import org.springframework.beans.factory.annotation.autowired;
import org.springframework.jms.core.jmstemplate;
import org.springframework.jms.core.messagecreator;
import javax.annotation.resource;
import javax.jms.*;
/**
* created by genshenwang.nomico on 2017/10/20.
*/
public class activemqproducerserviceimpl implements activemqproducerservice {
@autowired
jmstemplate jmstemplate;
@resource(name = "queuedestination")
destination destination;
public void sendmessage(final string message) {
jmstemplate.send(destination, new messagecreator() {
public message createmessage(session session) throws jmsexception {
textmessage textmessage = session.createtextmessage(message);
return textmessage;
}
}
);
system.out.println("生产者- 1 -发送消息成功:" + message);
}
}
|
(3)测试:
|
1
2
3
4
5
6
7
8
9
10
11
12
13
14
15
|
package com.wgs.jms.producer;
import org.springframework.context.support.classpathxmlapplicationcontext;
/**
* created by genshenwang.nomico on 2017/10/20.
*/
public class activemqproducermain {
public static void main(string[] args) {
classpathxmlapplicationcontext context = new classpathxmlapplicationcontext("producer.xml");
activemqproducerservice service = context.getbean(activemqproducerservice.class);
for (int i = 0; i < 100; i++) {
service.sendmessage("test" + i);
}
context.close();
}
}
|
消费者:
(1)创建消息监听器:
|
1
2
3
4
5
6
7
8
9
10
11
12
13
14
15
16
17
18
19
|
package com.wgs.jms.consumer;
import javax.jms.jmsexception;
import javax.jms.message;
import javax.jms.messagelistener;
import javax.jms.textmessage;
/**
* created by genshenwang.nomico on 2017/10/20.
*/
public class consumermessagelistener implements messagelistener {
public void onmessage(message message) {
try {
textmessage textmessage = (textmessage) message;
system.out.println("消费者- 1 -接收消息:" + textmessage.gettext());
}
catch (jmsexception e) {
e.printstacktrace();
}
}
}
|
(2)测试:
|
1
2
3
4
5
6
7
8
9
10
|
package com.wgs.jms.consumer;
import org.springframework.context.support.classpathxmlapplicationcontext;
/**
* created by genshenwang.nomico on 2017/10/20.
*/
public class activemqconsumermain {
public static void main(string[] args) {
classpathxmlapplicationcontext context = new classpathxmlapplicationcontext("consumer.xml");
}
}
|
2. jms topic模型代码实现:
将上述代码中出现的queuedestination改为topicdestination即可。
总结
以上就是本文关于jms简介与activemq实战代码分享的全部内容,希望对大家有所帮助。感兴趣的朋友可以继续参阅本站其他相关专题,如有不足之处,欢迎留言指出。感谢朋友们对本站的支持!
原文链接:http://blog.csdn.net/noaman_wgs/article/details/78392718

相关文章


- 个人服务器网站搭建:如何选择合适的服务器提供商? 2025-06-10
- ASP.NET自助建站系统中如何实现多语言支持? 2025-06-10
- 64M VPS建站:如何选择最适合的网站建设平台? 2025-06-10
- ASP.NET本地开发时常见的配置错误及解决方法? 2025-06-10
- ASP.NET自助建站系统的数据库备份与恢复操作指南 2025-06-10