最近滑动验证码在很多网站逐步流行起来,一方面对用户体验来说,比较新颖,操作简单,另一方面相对图形验证码来说,安全性并没有很大的降低。当然到目前为止,没有绝对的安全验证,只是不断增加攻击者的绕过成本。
接下来分析下滑动验证码的核心流程:
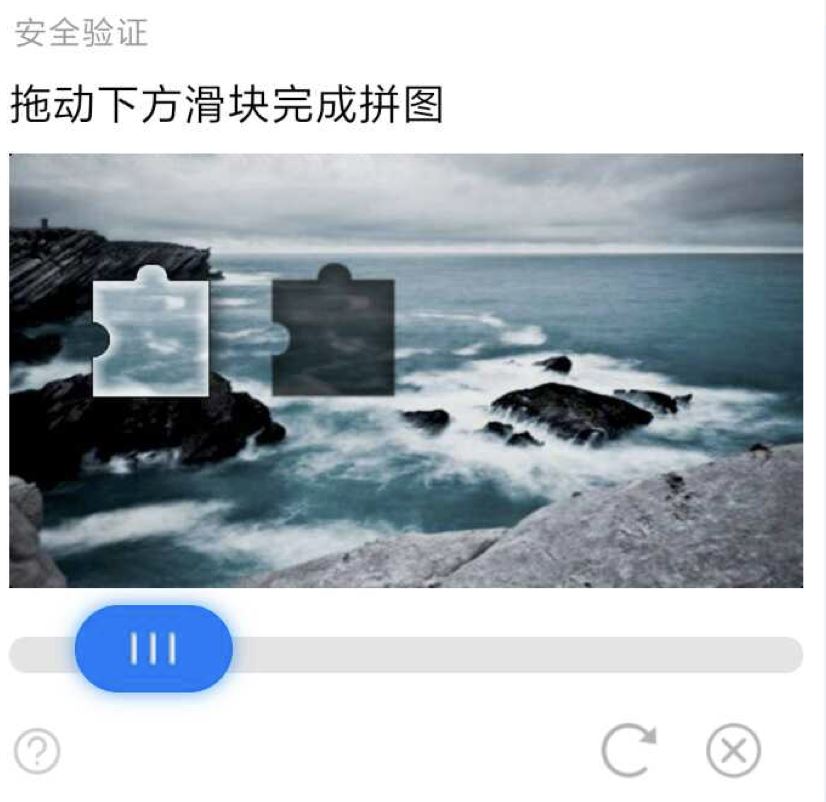
后端随机生成抠图和带有抠图阴影的背景图片,后台保存随机抠图位置坐标
前端实现滑动交互,将抠图拼在抠图阴影之上,获取到用户滑动距离值,比如以下示例
前端将用户滑动距离值传入后端,后端校验误差是否在容许范围内。
这里单纯校验用户滑动距离是最基本的校验,出于更高的安全考虑,可能还会考虑用户滑动的整个轨迹,用户在当前页面的访问行为等。这些可以很复杂,甚至借助到用户行为数据分析模型,最终的目标都是增加非法的模拟和绕过的难度。这些有机会可以再归纳总结常用到的方法,本文重点集中在如何基于java来一步步实现滑动验证码的生成。
可以看到,滑动图形验证码,重要有两个图片组成,抠块和带有抠块阴影的原图,这里面有两个重要特性保证被暴力破解的难度:抠块的形状随机和抠块所在原图的位置随机。这样就可以在有限的图集中制造出随机的、无规律可寻的抠图和原图的配对。
用代码如何从一张大图中抠出一个有特定随机形状的小图呢?
第一步,先确定一个抠出图的轮廓,方便后续真正开始执行图片处理操作
图片是有像素组成,每个像素点对应一种颜色,颜色可以用rgb形式表示,外加一个透明度,把一张图理解成一个平面图形,左上角为原点,向右x轴,向下y轴,一个坐标值对应该位置像素点的颜色,这样就可以把一张图转换成一个二维数组。基于这个考虑,轮廓也用二维数组来表示,轮廓内元素值为1,轮廓外元素值对应0。
这时候就要想这个轮廓形状怎么生成了。有坐标系、有矩形、有圆形,没错,用到数学的图形函数。典型用到一个圆的函数方程和矩形的边线的函数,类似:
(x-a)²+(y-b)²=r²中,有三个参数a、b、r,即圆心坐标为(a,b),半径r。这些将抠图放在上文描述的坐标系上很容易就图算出来具体的值。
示例代码如下:
|
1
2
3
4
5
6
7
8
9
10
11
12
13
14
15
16
17
18
19
20
21
22
23
24
25
26
27
28
|
private int[][] getblockdata() {
int[][] data = new int[targetlength][targetwidth];
double x2 = targetlength-circler-2;
//随机生成圆的位置
double h1 = circler + math.random() * (targetwidth-3*circler-r1);
double po = circler*circler;
double xbegin = targetlength-circler-r1;
double ybegin = targetwidth-circler-r1;
for (int i = 0; i < targetlength; i++) {
for (int j = 0; j < targetwidth; j++) {
//右边○
double d3 = math.pow(i - x2,2) + math.pow(j - h1,2);
if (d1 <= po
|| (j >= ybegin && d2 >= po)
|| (i >= xbegin && d3 >= po)
) {
data[i][j] = 0;
} else {
data[i][j] = 1;
}
}
}
return data;
}
|
第二步,有这个轮廓后就可以依据这个二维数组的值来判定抠图并在原图上抠图位置处加阴影。
操作如下:
|
1
2
3
4
5
6
7
8
9
10
11
12
13
14
15
16
17
18
19
20
21
22
|
private void cutbytemplate(bufferedimage oriimage,bufferedimage targetimage, int[][] templateimage, int x,
int y){
for (int i = 0; i < targetlength; i++) {
for (int j = 0; j < targetwidth; j++) {
int rgb = templateimage[i][j];
// 原图中对应位置变色处理
int rgb_ori = oriimage.getrgb(x + i, y + j);
if (rgb == 1) {
//抠图上复制对应颜色值
targetimage.setrgb(i, y + j, rgb_ori);
int r = (0xff & rgb_ori);
int g = (0xff & (rgb_ori >> 8));
int b = (0xff & (rgb_ori >> 16)));
rgb_ori = r + (g << 8) + (b << 16) + (200 << 24);
//原图对应位置颜色变化
oriimage.setrgb(x + i, y + j, rgb_ori);
}
}
}
}
|
经过前面两步后,就得到了抠图和带抠图阴影的原图。为增加混淆和提高网络加载效果,还需要对图片做进一步处理。一般有两件事需要做,一对图片做模糊处理增加机器识别难度,二做适当同质量压缩。模糊处理很容易想到高斯模糊,原理很好理解,大家可以去google了解下。具体到java里面的实现,有很多版本,现在不借助任何第三方jar,提供一个示例:
|
1
2
3
4
5
6
7
8
9
10
11
12
13
14
15
16
17
18
19
20
21
22
23
24
25
26
27
28
29
30
31
32
33
34
35
36
37
38
|
public static convolveop getgaussianblurfilter(int radius,
boolean horizontal) {
if (radius < 1) {
throw new illegalargumentexception("radius must be >= 1");
}
int size = radius * 2 + 1;
float[] data = new float[size];
float sigma = radius / 3.0f;
float twosigmasquare = 2.0f * sigma * sigma;
float sigmaroot = (float) math.sqrt(twosigmasquare * math.pi);
float total = 0.0f;
for (int i = -radius; i <= radius; i++) {
float distance = i * i;
int index = i + radius;
data[index] = (float) math.exp(-distance / twosigmasquare) / sigmaroot;
total += data[index];
}
for (int i = 0; i < data.length; i++) {
data[i] /= total;
}
kernel kernel = null;
if (horizontal) {
kernel = new kernel(size, 1, data);
} else {
kernel = new kernel(1, size, data);
}
return new convolveop(kernel, convolveop.edge_no_op, null);
}
public static void simpleblur(bufferedimage src,bufferedimage dest) {
bufferedimageop op = getgaussianblurfilter(2,false);
op.filter(src, dest);
}
|
经测试模糊效果很不错。另外是图片压缩,也不借助任何第三方工具,做同质压缩。
|
1
2
3
4
5
6
7
8
9
10
11
12
13
14
15
16
17
18
19
20
21
22
23
24
25
26
|
public static byte[] frombufferedimage2(bufferedimage img,string imagtype) throws ioexception {
bos.reset();
// 得到指定format图片的writer
iterator<imagewriter> iter = imageio.getimagewritersbyformatname(imagtype);
imagewriter writer = (imagewriter) iter.next();
// 得到指定writer的输出参数设置(imagewriteparam )
imagewriteparam iwp = writer.getdefaultwriteparam();
iwp.setcompressionmode(imagewriteparam.mode_explicit); // 设置可否压缩
iwp.setcompressionquality(1f); // 设置压缩质量参数
iwp.setprogressivemode(imagewriteparam.mode_disabled);
colormodel colormodel = colormodel.getrgbdefault();
// 指定压缩时使用的色彩模式
iwp.setdestinationtype(new javax.imageio.imagetypespecifier(colormodel,
colormodel.createcompatiblesamplemodel(16, 16)));
writer.setoutput(imageio
.createimageoutputstream(bos));
iioimage iiamge = new iioimage(img, null, null);
writer.write(null, iiamge, iwp);
byte[] d = bos.tobytearray();
return d;
}
|
至此,滑动验证码核心的代码处理流程已全部结束,这里面有很多细节可以不断打磨优化,让滑动体验可以变得更好。希望可以帮助到某些准备自己构建滑动验证码的同学。
以上代码实现都非常的精炼,一方面为了保证性能,另一方面好理解。另外由于各方面原因也不便引入过多细节,如果疑问,可留言交流。经测试,该生成滑动图形的流程响应时间可以控制在20ms左右,如果原图分辨率在300px*150px以下,可以到10ms左右,在可接受范围内。如果有更高效的方式,希望多多指教。也希望大家多多支持快网idc。
原文链接:https://my.oschina.net/yaohonv/blog/1604185

相关文章


- ASP.NET本地开发时常见的配置错误及解决方法? 2025-06-10
- ASP.NET自助建站系统的数据库备份与恢复操作指南 2025-06-10
- 个人网站服务器域名解析设置指南:从购买到绑定全流程 2025-06-10
- 个人网站搭建:如何挑选具有弹性扩展能力的服务器? 2025-06-10
- 个人服务器网站搭建:如何选择适合自己的建站程序或框架? 2025-06-10