spring security记住我基本原理:
登录的时候,请求发送给过滤器usernamepasswordauthenticationfilter,当该过滤器认证成功后,会调用remembermeservice,会生成一个token,将token写入到浏览器cookie,同时remembermeservice里边还有个tokenrepository,将token和用户信息写入到数据库中。这样当用户再次访问系统,访问某一个接口时,会经过一个remembermeauthenticationfilter的过滤器,他会读取cookie中的token,交给rememberservice,rememberservice会用tokenrepository根据token从数据库中查是否有记录,如果有记录会把用户名取出来,再调用userdetailservice根据用户名获取用户信息,然后放在securitycontext里。
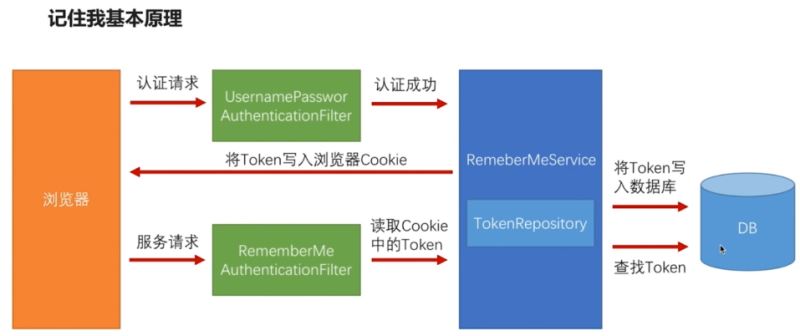
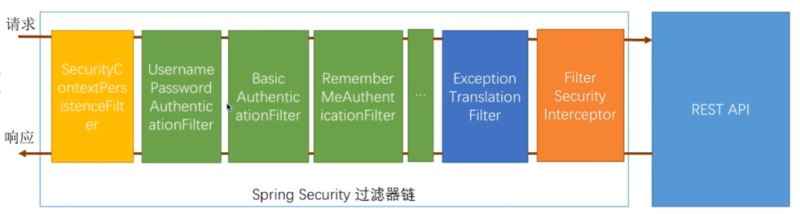
remembermeauthenticationfilter在spring security中认证过滤器链的倒数第二个过滤器位置,当其他认证过滤器都没法认证成功的时候,就会调用remembermeauthenticationfilter尝试认证。
实现:
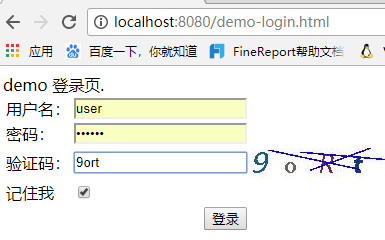
1,登录表单加上<input type="checkbox" name="remember-me" value="true"/>,springsecurity在springsessionremembermeservices类里定义了一个常量,默认值就是remember-me
2,根据上边的原理图可知,要配置tokenrepository,把生成的token存进数据库,这是一个配置bean的配置,放在了browsersecurityconfig里
3,在configure里配置
4,在browserproperties里加上自动登录时间,把记住我时间做成可配置的
|
1
2
3
4
5
6
7
8
9
10
11
12
13
14
15
16
17
18
19
20
21
22
23
24
25
26
27
28
29
30
31
32
33
34
35
36
37
38
39
40
41
42
43
44
45
46
47
48
49
50
51
52
53
54
55
56
57
58
59
60
61
62
63
64
65
66
67
68
69
70
71
72
73
74
75
76
77
78
79
80
81
82
83
84
|
//记住我秒数配置
private int remembermeseconds = 10;齐活
package com.imooc.s@configuration //这是一个配置
public class browsersecurityconfig extends websecurityconfigureradapter{
//读取用户配置的登录页配置
@autowired
private securityproperties securityproperties;
//自定义的登录成功后的处理器
@autowired
private authenticationsuccesshandler imoocauthenticationsuccesshandler;
//自定义的认证失败后的处理器
@autowired
private authenticationfailurehandler imoocauthenticationfailurehandler;
//数据源
@autowired
private datasource datasource;
@autowired
private userdetailsservice userdetailsservice;
//注意是org.springframework.security.crypto.password.passwordencoder
@bean
public passwordencoder passwordencoder(){
//bcryptpasswordencoder implements passwordencoder
return new bcryptpasswordencoder();
}
/**
* 记住我tokenrepository配置,在登录成功后执行
* 登录成功后往数据库存token的
* @description: 记住我tokenrepository配置
* @param @return jdbctokenrepositoryimpl
* @return persistenttokenrepository
* @throws
* @author lihaoyang
* @date 2018年3月5日
*/
@bean
public persistenttokenrepository persistenttokenrepository(){
jdbctokenrepositoryimpl jdbctokenrepository = new jdbctokenrepositoryimpl();
jdbctokenrepository.setdatasource(datasource);
//启动时自动生成相应表,可以在jdbctokenrepositoryimpl里自己执行create_table_sql脚本生成表
jdbctokenrepository.setcreatetableonstartup(true);
return jdbctokenrepository;
}
//版本二:可配置的登录页
@override
protected void configure(httpsecurity http) throws exception {
//验证码过滤器
validatecodefilter validatecodefilter = new validatecodefilter();
//验证码过滤器中使用自己的错误处理
validatecodefilter.setauthenticationfailurehandler(imoocauthenticationfailurehandler);
//配置的验证码过滤url
validatecodefilter.setsecurityproperties(securityproperties);
validatecodefilter.afterpropertiesset();
//实现需要认证的接口跳转表单登录,安全=认证+授权
//http.httpbasic() //这个就是默认的弹框认证
//
http //把验证码过滤器加载登录过滤器前边
.addfilterbefore(validatecodefilter, usernamepasswordauthenticationfilter.class)
//表单认证相关配置
.formlogin()
.loginpage("/authentication/require") //处理用户认证browsersecuritycontroller
//登录过滤器usernamepasswordauthenticationfilter默认登录的url是"/login",在这能改
.loginprocessingurl("/authentication/form")
.successhandler(imoocauthenticationsuccesshandler)//自定义的认证后处理器
.failurehandler(imoocauthenticationfailurehandler) //登录失败后的处理
.and()
//记住我相关配置
.rememberme()
.tokenrepository(persistenttokenrepository())//tokenrepository,登录成功后往数据库存token的
.tokenvalidityseconds(securityproperties.getbrowser().getremembermeseconds())//记住我秒数
.userdetailsservice(userdetailsservice) //记住我成功后,调用userdetailsservice查询用户信息
.and()
//授权相关的配置
.authorizerequests()
// /authentication/require:处理登录,securityproperties.getbrowser().getloginpage():用户配置的登录页
.antmatchers("/authentication/require",
securityproperties.getbrowser().getloginpage(),//放过登录页不过滤,否则报错
"/verifycode/image").permitall() //验证码
.anyrequest() //任何请求
.authenticated() //都需要身份认证
.and()
.csrf().disable() //关闭csrf防护
;
}
}ecurity.browser;
|
其中由于要和数据库打交道,所以需要注入一个数据源:application.properties
|
1
2
3
4
|
spring.datasource.driver-class-name=com.mysql.jdbc.driver
spring.datasource.url=jdbc:mysql://127.0.0.1:3306/imooc-demo
spring.datasource.username=root
spring.datasource.password=root
|
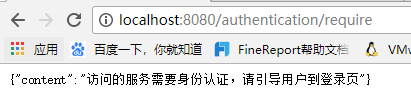
启动应用,访问 localhost:8080/user,需要登录
登录成功:

数据库:生成一个persistent_logins表,存进去了一条数据

停止服务,从新启动(注释掉生成保存token表的jdbctokenrepository.setcreatetableonstartup(true);)因为我们的用户登录信息都存在了session中,所以重启服务后,再访问localhost:8080/user,本应该重新引导到登录页,但是由于配置了记住我,所以能够直接访问,拿到了接口数据

请求头:

至此基本的rememberme已做好
完整代码放在了github:https://github.com/lhy1234/spring-security
总结
以上所述是小编给大家介绍的spring security 构建rest服务实现rememberme 记住我功能,希望对大家有所帮助,如果大家有任何疑问请给我留言,小编会及时回复大家的。在此也非常感谢大家对快网idc网站的支持!
原文链接:https://www.cnblogs.com/lihaoyang/archive/2018/03/06/8507889.html

相关文章


- 个人服务器网站搭建:如何选择合适的服务器提供商? 2025-06-10
- ASP.NET自助建站系统中如何实现多语言支持? 2025-06-10
- 64M VPS建站:如何选择最适合的网站建设平台? 2025-06-10
- ASP.NET本地开发时常见的配置错误及解决方法? 2025-06-10
- ASP.NET自助建站系统的数据库备份与恢复操作指南 2025-06-10