

简介:本文将帮助您使用 spring boot 创建简单的 rest 服务。
你将学习
- 什么是 rest 服务?
- 如何使用 spring initializr 引导创建 rest 服务应用程序?
- 如何创建获取 rest 服务以检索学生注册的课程?
- 如何为学生注册课程创建 post rest 服务?
- 如何利用 postman 执行 rest 服务?
本教程使用的 rest 服务
在本教程中,我们将使用适当的 uri 和 http 方法创建三个服务:
@getmapping(“/ students / {studentid} / courses”):您可以使用请求方法 get 和示例 uri / students / student1 / courses 来查询特定学生已注册的课程。
@getmapping(“/students/{studentid}/courses/{courseid}”):您可以使用请求方法 get 和示例 uri / students / student1 / courses / course1 获取特定学生的特定课程。
@postmapping(“/students/{studentid}/courses”) :您可以通过向 uuri /students/student1/courses 发送 post 请求来为学生注册一门课程
您将需要的工具
- maven 3.0+ 是您的构建工具
- 你最喜欢的 ide。我们使用 eclipse。
- jdk 1.8+
完整的 spring booot rest maven 项目代码示例子
我们的 github 存储库包含所有代码示例 -https://github.com/in28minutes/in28minutes.github.io/tree/master/code-zip-files
带有单元和集成测试的 rest 服务
website-springbootrestservices-simplerestserviceswithunitandintegrationtests.zip
什么是 rest?
rest 代表 representational state transfer。rest 指定了一组体系结构约束。任何满足以下这些条件的服务都称为 restful 服务。
restful web service 的五个重要条件:
- 客户端 – 服务器:应该有一个服务生产者和一个服务使用者。
- 接口(url)是统一的并且暴露资源。
- 该服务是无状态的。
- 服务结果应该是可缓存的。例如 http 缓存。
- 服务应该采用分层架构。客户端不应该直接连接到服务器 – 它可能从中间层获取信息 – 缓存。
理查森成熟度模型
richardson 成熟度模型用于识别 restful web service 的成熟度级别。以下是不同级别和特点:
级别 0:以 rest 风格公开 soap web 服务。公开的操作使用 rest 服务(http:// server / getposts,http:// server / deleteposts,http:// server / dothis,http:// server / dothat 等)。
级别 1:使用正确的 uri(使用名词)公开资源。例如:http:// server / accounts,http:// server / accounts / 10。但是,http 方法并未使用。
级别 2:资源使用正确的 uri + http 方法。例如,要更新一个账户,你需要做一个 put。创建一个帐户,你做一个 post。uri 看起来像 posts/1/comments/5 和 accounts/1/friends/1.
等级 3:hateoas (hypermedia as the engine of application state)。您不仅可以了解所请求的信息,还可以了解服务消费者可以采取的下一个可能的操作。当请求有关 facebook 用户的信息时,rest 服务可以返回用户详细信息以及有关如何获取他最近的帖子,如何获取他最近的评论以及如何检索他朋友的列表的信息。
使用适当的请求方法
始终使用 http 方法。有关每种 http 方法的最佳做法如下所述:
get:不应该更新任何东西。应该是幂等的(多次调用相同的结果)。可能的返回码 200(ok)+ 404(not found)+400(bad request)
post:应该创建新的资源。理想情况下返回 json 和链接到新创建的资源。尽可能使用相同的返回码。另外:返回码 201(创建)是可能的。
put:更新已知资源。例如:更新客户详细信息。可能的返回码:200(ok)
delete:用于删除资源。
项目结构
以下屏幕截图显示了我们将创建的项目的结构。
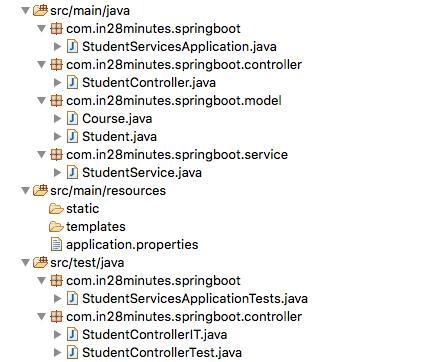
一些细节:
- studentcontroller.java – rest 控制器提供上面讨论的所有三种服务方法。
- course.java, student.java, studentservice.java – 应用程序的业务逻辑。studentservice 提供了一些我们从 rest 控制器中消耗的方法。
- studentcontrollerit.java – rest 服务的集成测试。
- studentcontrollertest.java – test 服务的单元测试。
- studentservicesapplication.java – spring boot 应用程序的启动器。要运行该应用程序,只需将该文件作为 java 应用程序启动。
- pom.xml – 包含构建此项目所需的所有依赖。我们将使用 spring boot starter web。
使用 spring initializr 引导创建 rest 服务
用 spring initializr 创建一个 rest 服务是非常的容易小菜一碟。我们将使用 spring web mvc 作为我们的 web 层框架。
spring initializr http://start.spring.io/ 是引导创建 spring boot 项目的好工具。
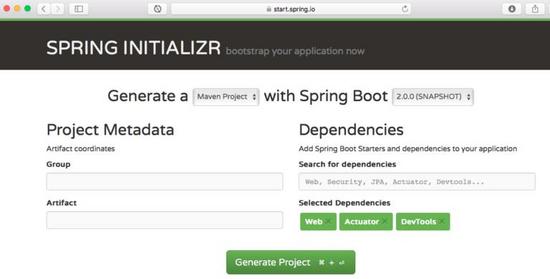
如上图所示,必须执行以下步骤
启动 spring initializr 并选择以下内容
选择 com.in28minutes.springboot 为 group
选择 student-services 为 artifact
选择以下依赖项
- web
- actuator
- devtools
点击生成项目。
将项目导入 eclipse。文件 – > 导入 – > 现有的 maven 项目。
如果你想了解这个项目的所有文件,你可以继续向下阅读。
应用业务层实现
所有应用都需要数据。我们将使用 arraylist 这种内存数据存储,而不是与真实数据库交互。
一名学生可以参加多门课程。课程有一个 id,名称,说明和完成课程需要完成的步骤列表。学生有一个身份证,姓名,说明和他 / 她目前注册的课程列表。studentservice 提供以下公开方法
public list retrieveallstudents() – 检索所有学生的详细信息
public student retrievestudent(string studentid) – 检索特定的学生详细信息
public list retrievecourses(string studentid) – 检索学生注册的所有课程
public course retrievecourse(string studentid, string courseid) – 检索学生注册的特定课程的详细信息
public course addcourse(string studentid, course course) – 为现有学生添加课程
请参阅下面这些文件,具体的实现服务类 studentservice 和模型类 course 和 student。
- src/main/java/com/in28minutes/springboot/model/course.java
- src/main/java/com/in28minutes/springboot/model/student.java
- src/main/java/com/in28minutes/springboot/service/studentservice.java
添加几个 get rest 服务
rest 服务 studentcontroller 暴露了几个 get 服务。
- @autowired private studentservice studentservice :我们使用 spring autowiring 将 student 服务自动注入到 studentcontroller。
- @getmapping(“/students/{studentid}/courses”):以 studentid 作为路径变量公开获取服务
- @getmapping(“/students/{studentid}/courses/{courseid}”):公开获取服务以检索学生的特定课程。
- @pathvariable string studentid:来自 uri 的 studentid 的值将映射到此参数。
|
1
2
3
4
5
6
7
8
9
10
11
12
13
14
15
16
17
18
19
20
21
22
23
24
25
|
package com.in28minutes.springboot.controller;
import java.util.list;
import org.springframework.beans.factory.annotation.autowired;
import org.springframework.web.bind.annotation.getmapping;
import org.springframework.web.bind.annotation.pathvariable;
import org.springframework.web.bind.annotation.restcontroller;
import com.in28minutes.springboot.model.course;
import com.in28minutes.springboot.service.studentservice;
@restcontroller
public class studentcontroller {
@autowired
private studentservice studentservice;
@getmapping("/students/{studentid}/courses")
public list<course> retrievecoursesforstudent(@pathvariable string studentid) {
return studentservice.retrievecourses(studentid);
}
@getmapping("/students/{studentid}/courses/{courseid}")
public course retrievedetailsforcourse(@pathvariable string studentid,
@pathvariable string courseid) {
return studentservice.retrievecourse(studentid, courseid);
}
}
|
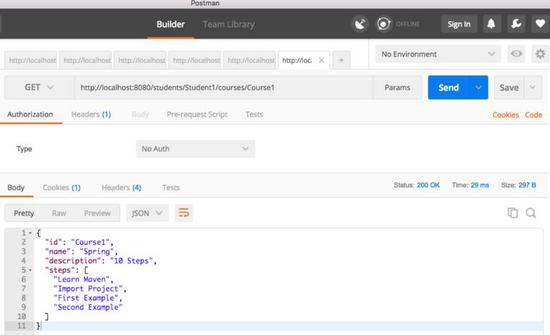
使用 postman 执行获取服务
我们将向 http:// localhost:8080 / students / student1 / courses / course1 发起请求以测试该服务。回应如下所示。
|
1
2
3
4
5
6
7
8
9
10
11
|
{
"id": "course1",
"name": "spring",
"description": "10 steps",
"steps": [
"learn maven",
"import project",
"first example",
"second example"
]
}
|
下面的图片显示了我们如何执行 postman 的 get service – 我最喜欢的运行 rest 服务的工具。
添加 post rest 服务
当资源创建成功时,post 服务应该返回创建的状态(201)。
- @postmapping(“/students/{studentid}/courses”):为 post 请求映射 url
- @requestbody course newcourse:使用绑定将请求正文绑定到课程对象。
- responseentity.created(location).build():返回已创建的状态。还将创建资源的位置作为响应标题返回。
|
1
2
3
4
5
6
7
8
9
10
11
|
@postmapping("/students/{studentid}/courses")
public responseentity<void> registerstudentforcourse(
@pathvariable string studentid, @requestbody course newcourse) {
course course = studentservice.addcourse(studentid, newcourse);
if (course == null)
return responseentity.nocontent().build();
uri location = servleturicomponentsbuilder.fromcurrentrequest().path(
"/{id}").buildandexpand(course.getid()).touri();
return responseentity.created(location).build();
}
|
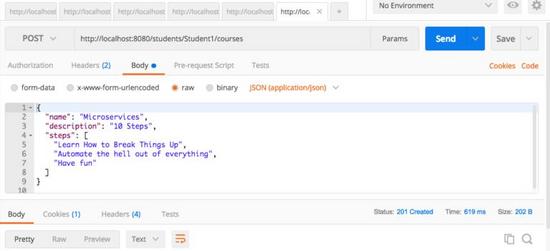
执行 post rest 服务
示例请求如下所示。它包含了学生注册课程的所有细节。
|
1
2
3
4
5
6
7
8
9
|
{
"name": "microservices",
"description": "10 steps",
"steps": [
"learn how to break things up",
"automate the hell out of everything",
"have fun"
]
}
|
下图显示了我们如何从 postman 执行 post 服务 – 我最喜欢的运行 rest 服务的工具。确保你去 body 选项卡并选择 raw。从下拉菜单中选择 json。将上述请求复制到 body 中。
我们使用的 url 是 http:// localhost:8080 / students / student1 / courses。
完整的代码示例
pom.xml
|
1
2
3
4
5
6
7
8
9
10
11
12
13
14
15
16
17
18
19
20
21
22
23
24
25
26
27
28
29
30
31
32
33
34
35
36
37
38
39
40
41
42
43
44
45
46
47
48
49
50
51
52
53
54
55
56
57
|
<?xml version="1.0" encoding="utf-8"?>
<project xmlns="http://maven.apache.org/pom/4.0.0" xmlns:xsi="http://www.w3.org/2001/xmlschema-instance"
xsi:schemalocation="http://maven.apache.org/pom/4.0.0 http://maven.apache.org/xsd/maven-4.0.0.xsd">
<modelversion>4.0.0</modelversion>
<groupid>com.in28minutes.springboot</groupid>
<artifactid>student-services</artifactid>
<version>0.0.1-snapshot</version>
<packaging>jar</packaging>
<name>student-services</name>
<description>demo project for spring boot</description>
<parent>
<groupid>org.springframework.boot</groupid>
<artifactid>spring-boot-starter-parent</artifactid>
<version>1.4.4.release</version>
<relativepath/> <!-- lookup parent from repository -->
</parent>
<properties>
<project.build.sourceencoding>utf-8</project.build.sourceencoding>
<project.reporting.outputencoding>utf-8</project.reporting.outputencoding>
<java.version>1.8</java.version>
</properties>
<dependencies>
<dependency>
<groupid>org.springframework.boot</groupid>
<artifactid>spring-boot-starter-actuator</artifactid>
</dependency>
<dependency>
<groupid>org.springframework.boot</groupid>
<artifactid>spring-boot-starter-web</artifactid>
</dependency>
<dependency>
<groupid>org.springframework.boot</groupid>
<artifactid>spring-boot-devtools</artifactid>
<scope>runtime</scope>
</dependency>
<dependency>
<groupid>org.springframework.boot</groupid>
<artifactid>spring-boot-starter-test</artifactid>
<scope>test</scope>
</dependency>
</dependencies>
<build>
<plugins>
<plugin>
<groupid>org.springframework.boot</groupid>
<artifactid>spring-boot-maven-plugin</artifactid>
</plugin>
</plugins>
</build>
</project>
|
src/main/java/com/in28minutes/springboot/controller/studentcontroller.java
|
1
2
3
4
5
6
7
8
9
10
11
12
13
14
15
16
17
18
19
20
21
22
23
24
25
26
27
28
29
30
31
32
33
34
35
36
37
38
39
40
41
42
43
44
45
46
|
import java.net.uri;
import java.util.list;
import org.springframework.beans.factory.annotation.autowired;
import org.springframework.http.responseentity;
import org.springframework.web.bind.annotation.getmapping;
import org.springframework.web.bind.annotation.pathvariable;
import org.springframework.web.bind.annotation.postmapping;
import org.springframework.web.bind.annotation.requestbody;
import org.springframework.web.bind.annotation.restcontroller;
import org.springframework.web.servlet.support.servleturicomponentsbuilder;
import com.in28minutes.springboot.model.course;
import com.in28minutes.springboot.service.studentservice;
@restcontroller
public class studentcontroller {
@autowired
private studentservice studentservice;
@getmapping("/students/{studentid}/courses")
public list<course> retrievecoursesforstudent(@pathvariable string studentid) {
return studentservice.retrievecourses(studentid);
}
@getmapping("/students/{studentid}/courses/{courseid}")
public course retrievedetailsforcourse(@pathvariable string studentid,
@pathvariable string courseid) {
return studentservice.retrievecourse(studentid, courseid);
}
@postmapping("/students/{studentid}/courses")
public responseentity<void> registerstudentforcourse(
@pathvariable string studentid, @requestbody course newcourse) {
course course = studentservice.addcourse(studentid, newcourse);
if (course == null)
return responseentity.nocontent().build();
uri location = servleturicomponentsbuilder.fromcurrentrequest().path(
"/{id}").buildandexpand(course.getid()).touri();
return responseentity.created(location).build();
}
}
|
src/main/java/com/in28minutes/springboot/model/course.java
|
1
2
3
4
5
6
7
8
9
10
11
12
13
14
15
16
17
18
19
20
21
22
23
24
25
26
27
28
29
30
31
32
33
34
35
36
37
38
39
40
41
42
43
44
45
46
47
48
49
50
51
52
53
54
55
56
57
58
59
60
61
62
63
64
65
66
67
68
69
70
71
72
73
74
75
76
|
import java.util.list;
public class course {
private string id;
private string name;
private string description;
private list<string> steps;
// needed by caused by: com.fasterxml.jackson.databind.jsonmappingexception:
// can not construct instance of com.in28minutes.springboot.model.course:
// no suitable constructor found, can not deserialize from object value
// (missing default constructor or creator, or perhaps need to add/enable
// type information?)
public course() {
}
public course(string id, string name, string description, list<string> steps) {
super();
this.id = id;
this.name = name;
this.description = description;
this.steps = steps;
}
public string getid() {
return id;
}
public void setid(string id) {
this.id = id;
}
public string getdescription() {
return description;
}
public string getname() {
return name;
}
public list<string> getsteps() {
return steps;
}
@override
public string tostring() {
return string.format(
"course [id=%s, name=%s, description=%s, steps=%s]", id, name,
description, steps);
}
@override
public int hashcode() {
final int prime = 31;
int result = 1;
result = prime * result + ((id == null) ? 0 : id.hashcode());
return result;
}
@override
public boolean equals(object obj) {
if (this == obj)
return true;
if (obj == null)
return false;
if (getclass() != obj.getclass())
return false;
course other = (course) obj;
if (id == null) {
if (other.id != null)
return false;
} else if (!id.equals(other.id))
return false;
return true;
}
}
|
src/main/java/com/in28minutes/springboot/model/student.java
|
1
2
3
4
5
6
7
8
9
10
11
12
13
14
15
16
17
18
19
20
21
22
23
24
25
26
27
28
29
30
31
32
33
34
35
36
37
38
39
40
41
42
43
44
45
46
47
48
49
50
51
52
53
54
55
56
57
58
|
package com.in28minutes.springboot.model;
import java.util.list;
public class student {
private string id;
private string name;
private string description;
private list<course> courses;
public student(string id, string name, string description,
list<course> courses) {
super();
this.id = id;
this.name = name;
this.description = description;
this.courses = courses;
}
public string getid() {
return id;
}
public void setid(string id) {
this.id = id;
}
public string getname() {
return name;
}
public void setname(string name) {
this.name = name;
}
public string getdescription() {
return description;
}
public void setdescription(string description) {
this.description = description;
}
public list<course> getcourses() {
return courses;
}
public void setcourses(list<course> courses) {
this.courses = courses;
}
@override
public string tostring() {
return string.format(
"student [id=%s, name=%s, description=%s, courses=%s]", id,
name, description, courses);
}
}
|
src/main/java/com/in28minutes/springboot/service/studentservice.java
|
1
2
3
4
5
6
7
8
9
10
11
12
13
14
15
16
17
18
19
20
21
22
23
24
25
26
27
28
29
30
31
32
33
34
35
36
37
38
39
40
41
42
43
44
45
46
47
48
49
50
51
52
53
54
55
56
57
58
59
60
61
62
63
64
65
66
67
68
69
70
71
72
73
74
75
76
77
78
79
80
81
82
83
84
85
86
87
88
89
90
91
92
93
94
95
96
97
98
99
100
101
102
|
package com.in28minutes.springboot.service;
import java.math.biginteger;
import java.security.securerandom;
import java.util.arraylist;
import java.util.arrays;
import java.util.list;
import org.springframework.stereotype.component;
import com.in28minutes.springboot.model.course;
import com.in28minutes.springboot.model.student;
@component
public class studentservice {
private static list<student> students = new arraylist<>();
static {
//initialize data
course course1 = new course("course1", "spring", "10 steps", arrays
.aslist("learn maven", "import project", "first example",
"second example"));
course course2 = new course("course2", "spring mvc", "10 examples",
arrays.aslist("learn maven", "import project", "first example",
"second example"));
course course3 = new course("course3", "spring boot", "6k students",
arrays.aslist("learn maven", "learn spring",
"learn spring mvc", "first example", "second example"));
course course4 = new course("course4", "maven",
"most popular maven course on internet!", arrays.aslist(
"pom.xml", "build life cycle", "parent pom",
"importing into eclipse"));
student ranga = new student("student1", "ranga karanam",
"hiker, programmer and architect", new arraylist<>(arrays
.aslist(course1, course2, course3, course4)));
student satish = new student("student2", "satish t",
"hiker, programmer and architect", new arraylist<>(arrays
.aslist(course1, course2, course3, course4)));
students.add(ranga);
students.add(satish);
}
public list<student> retrieveallstudents() {
return students;
}
public student retrievestudent(string studentid) {
for (student student : students) {
if (student.getid().equals(studentid)) {
return student;
}
}
return null;
}
public list<course> retrievecourses(string studentid) {
student student = retrievestudent(studentid);
if (student == null) {
return null;
}
return student.getcourses();
}
public course retrievecourse(string studentid, string courseid) {
student student = retrievestudent(studentid);
if (student == null) {
return null;
}
for (course course : student.getcourses()) {
if (course.getid().equals(courseid)) {
return course;
}
}
return null;
}
private securerandom random = new securerandom();
public course addcourse(string studentid, course course) {
student student = retrievestudent(studentid);
if (student == null) {
return null;
}
string randomid = new biginteger(130, random).tostring(32);
course.setid(randomid);
student.getcourses().add(course);
return course;
}
}
|
src/main/java/com/in28minutes/springboot/studentservicesapplication.java
|
1
2
3
4
5
6
7
8
9
10
11
|
package com.in28minutes.springboot;
import org.springframework.boot.springapplication;
import org.springframework.boot.autoconfigure.springbootapplication;
@springbootapplication
public class studentservicesapplication {
public static void main(string[] args) {
springapplication.run(studentservicesapplication.class, args);
}
}
|
以上就是本文的全部内容,希望对大家的学习有所帮助,也希望大家多多支持快网idc。
原文链接:http://www.cnblogs.com/yangactive/p/8607427.html

相关文章


- 个人网站服务器域名解析设置指南:从购买到绑定全流程 2025-06-10
- 个人网站搭建:如何挑选具有弹性扩展能力的服务器? 2025-06-10
- 个人服务器网站搭建:如何选择适合自己的建站程序或框架? 2025-06-10
- 64M VPS建站:能否支持高流量网站运行? 2025-06-10
- 64M VPS建站:怎样选择合适的域名和SSL证书? 2025-06-10


