

前言
spring针对redis的使用,封装了一个比较强大的template以方便使用;之前在spring的生态圈中也使用过redis,但直接使用jedis进行相应的交互操作,现在正好来看一下redistemplate是怎么实现的,以及使用起来是否更加便利
i. 基本配置
1. 依赖
依然是采用jedis进行连接池管理,因此除了引入 spring-data-redis之外,再加上jedis依赖,pom文件中添加
|
1
2
3
4
5
6
7
8
9
10
11
|
<dependency>
<groupid>org.springframework.data</groupid>
<artifactid>spring-data-redis</artifactid>
<version>1.8.4.release</version>
</dependency>
<dependency>
<groupid>redis.clients</groupid>
<artifactid>jedis</artifactid>
<version>2.9.0</version>
</dependency>
|
如果需要指定序列化相关参数,也可以引入jackson,本篇为简单入门级,就不加这个了
2. 配置文件
准备redis相关的配置参数,常见的有host, port, password, timeout…,下面是一份简单的配置,并给出了相应的含义
|
1
2
3
4
5
6
7
8
9
10
11
12
13
14
15
16
17
18
19
20
21
22
|
redis.hostname=127.0.0.1
redis.port=6379
redis.password=https://blog.hhui.top
# 连接超时时间
redis.timeout=10000
#最大空闲数
redis.maxidle=300
#控制一个pool可分配多少个jedis实例,用来替换上面的redis.maxactive,如果是jedis 2.4以后用该属性
redis.maxtotal=1000
#最大建立连接等待时间。如果超过此时间将接到异常。设为-1表示无限制。
redis.maxwaitmillis=1000
#连接的最小空闲时间 默认1800000毫秒(30分钟)
redis.minevictableidletimemillis=300000
#每次释放连接的最大数目,默认3
redis.numtestsperevictionrun=1024
#逐出扫描的时间间隔(毫秒) 如果为负数,则不运行逐出线程, 默认-1
redis.timebetweenevictionrunsmillis=30000
#是否在从池中取出连接前进行检验,如果检验失败,则从池中去除连接并尝试取出另一个
redis.testonborrow=true
#在空闲时检查有效性, 默认false
redis.testwhileidle=true
|
说明
redis密码请一定记得设置,特别是在允许远程访问的时候,如果没有密码,默认端口号,很容易就被是扫描注入脚本,然后开始给人挖矿(亲身经历…)
ii. 使用与测试
根据一般的思路,首先是得加载上面的配置,创建redis连接池,然后再实例化redistemplate对象,最后持有这个实力开始各种读写操作
1. 配置类
使用javaconfig的方式来配置,主要是两个bean,读取配置文件设置各种参数的redisconnectionfactory以及预期的redistemplate
|
1
2
3
4
5
6
7
8
9
10
11
12
13
14
15
16
17
18
19
20
21
22
23
24
25
26
27
28
29
30
31
32
33
34
35
|
@configuration
@propertysource("classpath:redis.properties")
public class redisconfig extends jcacheconfigurersupport {
@autowired
private environment environment;
@bean
public redisconnectionfactory redisconnectionfactory() {
jedisconnectionfactory fac = new jedisconnectionfactory();
fac.sethostname(environment.getproperty("redis.hostname"));
fac.setport(integer.parseint(environment.getproperty("redis.port")));
fac.setpassword(environment.getproperty("redis.password"));
fac.settimeout(integer.parseint(environment.getproperty("redis.timeout")));
fac.getpoolconfig().setmaxidle(integer.parseint(environment.getproperty("redis.maxidle")));
fac.getpoolconfig().setmaxtotal(integer.parseint(environment.getproperty("redis.maxtotal")));
fac.getpoolconfig().setmaxwaitmillis(integer.parseint(environment.getproperty("redis.maxwaitmillis")));
fac.getpoolconfig().setminevictableidletimemillis(
integer.parseint(environment.getproperty("redis.minevictableidletimemillis")));
fac.getpoolconfig()
.setnumtestsperevictionrun(integer.parseint(environment.getproperty("redis.numtestsperevictionrun")));
fac.getpoolconfig().settimebetweenevictionrunsmillis(
integer.parseint(environment.getproperty("redis.timebetweenevictionrunsmillis")));
fac.getpoolconfig().settestonborrow(boolean.parseboolean(environment.getproperty("redis.testonborrow")));
fac.getpoolconfig().settestwhileidle(boolean.parseboolean(environment.getproperty("redis.testwhileidle")));
return fac;
}
@bean
public redistemplate<string, string> redistemplate(redisconnectionfactory redisconnectionfactory) {
redistemplate<string, string> redis = new redistemplate<>();
redis.setconnectionfactory(redisconnectionfactory);
redis.afterpropertiesset();
return redis;
}
}
|
2. 测试与使用
|
1
2
3
4
5
6
7
8
9
10
11
12
13
14
15
16
17
18
19
|
@runwith(springjunit4classrunner.class)
@contextconfiguration(classes = {redisconfig.class})
public class redistest {
@autowired
private redistemplate<string, string> redistemplate;
@test
public void testredisobj() {
map<string, object> properties = new hashmap<>();
properties.put("123", "hello");
properties.put("abc", 456);
redistemplate.opsforhash().putall("hash", properties);
map<object, object> ans = redistemplate.opsforhash().entries("hash");
system.out.println("ans: " + ans);
}
}
|
执行后输出如下
|
1
|
ans: {123=hello, abc=456}
|
从上面的配置与实现来看,是很简单的了,基本上没有绕什么圈子,但是使用redis-cli连上去,却查询不到 hash 这个key的内容
|
1
2
3
4
|
127.0.0.1:6379> get hash
(nil)
127.0.0.1:6379> keys *
1) "\\xac\\xed\\x00\\x05t\\x00\\x04hash"
|
使用代码去查没问题,直接控制台连接,发现这个key和我们预期的不一样,多了一些前缀,why ?
3. 序列化问题
为了解决上面的问题,只能debug进去,看下是什么引起的了
对应源码位置:
|
1
2
3
4
5
6
|
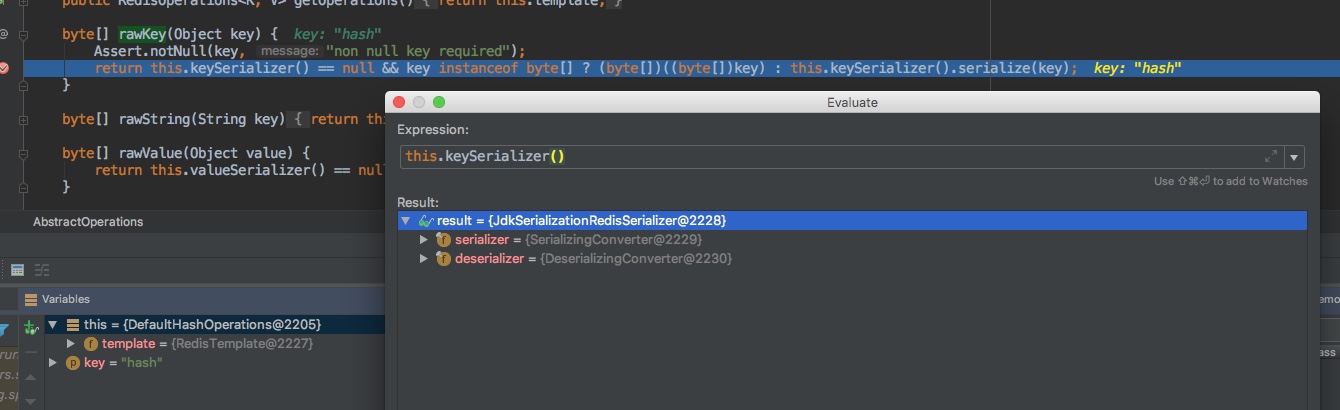
// org.springframework.data.redis.core.abstractoperations#rawkey
byte[] rawkey(object key) {
assert.notnull(key, "non null key required");
return this.keyserializer() == null && key instanceof byte[] ? (byte[])((byte[])key) : this.keyserializer().serialize(key);
}
|
可以看到这个key不是我们预期的 key.getbytes(), 而是调用了this.keyserializer().serialize(key),而debug的结果,默认serializer是jdkserializationredisserializer
然后就是顺藤摸瓜一步一步深入进去,链路如下
|
1
2
3
4
5
6
7
8
9
10
11
12
13
14
15
16
17
18
|
// org.springframework.core.serializer.support.serializingconverter#convert
// org.springframework.core.serializer.defaultserializer#serialize
public class defaultserializer implements serializer<object> {
public defaultserializer() {
}
public void serialize(object object, outputstream outputstream) throws ioexception {
if (!(object instanceof serializable)) {
throw new illegalargumentexception(this.getclass().getsimplename() + " requires a serializable payload but received an object of type [" + object.getclass().getname() + "]");
} else {
objectoutputstream objectoutputstream = new objectoutputstream(outputstream);
objectoutputstream.writeobject(object);
objectoutputstream.flush();
}
}
}
|
所以具体的实现很清晰了,就是 objectoutputstream,这个东西就是java中最原始的序列化反序列流工具,会包含类型信息,所以会带上那串前缀了
所以要解决这个问题,也比较明确了,替换掉原生的jdkserializationredisserializer,改为string的方式,正好提供了一个stringredisserializer,所以在redistemplate的配置处,稍稍修改
|
1
2
3
4
5
6
7
8
9
10
11
12
13
14
15
|
@bean
public redistemplate<string, string> redistemplate(redisconnectionfactory redisconnectionfactory) {
redistemplate<string, string> redis = new redistemplate<>();
redis.setconnectionfactory(redisconnectionfactory);
// 设置redis的string/value的默认序列化方式
stringredisserializer stringredisserializer = new stringredisserializer();
redis.setkeyserializer(stringredisserializer);
redis.setvalueserializer(stringredisserializer);
redis.sethashkeyserializer(stringredisserializer);
redis.sethashvalueserializer(stringredisserializer);
redis.afterpropertiesset();
return redis;
}
|
再次执行,结果尴尬的事情出现了,抛异常了,类型转换失败
|
1
2
3
4
5
6
|
java.lang.classcastexception: java.lang.integer cannot be cast to java.lang.string
at org.springframework.data.redis.serializer.stringredisserializer.serialize(stringredisserializer.java:33)
at org.springframework.data.redis.core.abstractoperations.rawhashvalue(abstractoperations.java:171)
at org.springframework.data.redis.core.defaulthashoperations.putall(defaulthashoperations.java:129)
...
|
看前面的测试用例,map中的value有integer,而stringredisserializer接收的参数必须是string,所以不用这个,自己照样子重新写一个兼容掉
|
1
2
3
4
5
6
7
8
9
10
11
12
13
14
15
16
17
18
19
20
21
22
23
24
|
public class defaultstrserializer implements redisserializer<object> {
private final charset charset;
public defaultstrserializer() {
this(charset.forname("utf8"));
}
public defaultstrserializer(charset charset) {
assert.notnull(charset, "charset must not be null!");
this.charset = charset;
}
@override
public byte[] serialize(object o) throws serializationexception {
return o == null ? null : string.valueof(o).getbytes(charset);
}
@override
public object deserialize(byte[] bytes) throws serializationexception {
return bytes == null ? null : new string(bytes, charset);
}
}
|
然后可以开始愉快的玩耍了,执行完之后测试
|
1
2
3
4
5
6
7
8
|
keys *
1) "\\xac\\xed\\x00\\x05t\\x00\\x04hash"
2) "hash"
127.0.0.1:6379> hgetall hash
1) "123"
2) "hello"
3) "abc"
4) "456"
|
iii. redistemplate使用姿势
1. opsforxxx
简单过来一下redistemplate的使用姿势,针对不同的数据结构(string, list, zset, hash)读封装了比较使用的调用方式 opsforxxx
|
1
2
3
4
5
6
7
8
9
10
11
12
13
14
|
// hash 数据结构操作
org.springframework.data.redis.core.redistemplate#opsforhash
// list
org.springframework.data.redis.core.redistemplate#opsforlist
// string
org.springframework.data.redis.core.redistemplate#opsforvalue
// set
org.springframework.data.redis.core.redistemplate#opsforset
// zset
org.springframework.data.redis.core.redistemplate#opsforzset
|
2. execute
除了上面的这种使用方式之外,另外一种常见的就是直接使用execute了,一个简单的case如下
|
1
2
3
4
5
6
7
8
9
10
11
12
13
14
15
16
17
18
19
20
21
22
23
24
|
@test
public void testredis() {
string key = "hello";
string value = "world";
redistemplate.execute((rediscallback<void>) con -> {
con.set(key.getbytes(), value.getbytes());
return null;
});
string asn = redistemplate.execute((rediscallback<string>) con -> new string(con.get(key.getbytes())));
system.out.println(asn);
string hkey = "hkey";
redistemplate.execute((rediscallback<void>) con -> {
con.hset(hkey.getbytes(), "23".getbytes(), "what".getbytes());
return null;
});
map<byte[], byte[]> map = redistemplate.execute((rediscallback<map<byte[], byte[]>>) con -> con.hgetall(hkey.getbytes()));
for (map.entry<byte[], byte[]> entry : map.entryset()) {
system.out.println("key: " + new string(entry.getkey()) + " | value: " + new string(entry.getvalue()));
}
}
|
输出结果如下
world
key: 23 | value: what
3. 区别
一个自然而然能想到的问题就是上面的两种方式有什么区别?
opsforxxx 的底层,就是通过调用execute方式来做的,其主要就是封装了一些使用姿势,定义了序列化,使用起来更加的简单和便捷;这种方式下,带来的小号就是每次都需要新建一个defaultxxxoperations对象,多绕了一步,基于此是否会带来额外的性能和内存开销呢?没测过,但个人感觉量小的情况下,应该没什么明显的影响;而qps很高的情况下,这方便的优化能带来的帮助,估计也不太大
iv. 其他
0. 项目
study-demo/spring-redis
总结
以上就是这篇文章的全部内容了,希望本文的内容对大家的学习或者工作具有一定的参考学习价值,如果有疑问大家可以留言交流,谢谢大家对快网idc的支持。
原文链接:https://liuyueyi.github.io/hexblog/2018/06/11/180611-Spring之RedisTemplate配置与使用/

相关文章


- 64M VPS建站:怎样优化以提高网站加载速度? 2025-06-10
- 64M VPS建站:是否适合初学者操作和管理? 2025-06-10
- ASP.NET自助建站系统中的用户注册和登录功能定制方法 2025-06-10
- ASP.NET自助建站系统的域名绑定与解析教程 2025-06-10
- 个人服务器网站搭建:如何选择合适的服务器提供商? 2025-06-10


