直接使用 activemq 的方式需要重复写很多代码,且不利于管理,spring 提供了一种更加简便的方式————spring jms ,通过它可以更加方便地使用 activemq。
maven 依赖
结合spring使用activemq的依赖如下:
|
1
2
3
4
5
6
7
8
9
10
11
12
13
14
15
16
17
18
19
20
21
22
23
|
<!-- spring jms -->
<dependency>
<groupid>org.springframework</groupid>
<artifactid>spring-jms</artifactid>
<version>${spring.version}</version>
</dependency>
<!-- xbean 如<amq:connectionfactory /> -->
<dependency>
<groupid>org.apache.xbean</groupid>
<artifactid>xbean-spring</artifactid>
<version>3.16</version>
</dependency>
<!-- actiivemq -->
<dependency>
<groupid>org.apache.activemq</groupid>
<artifactid>activemq-core</artifactid>
<version>5.7.0</version>
</dependency>
<dependency>
<groupid>org.apache.activemq</groupid>
<artifactid>activemq-pool</artifactid>
<version>5.7.0</version>
</dependency>
|
activemq.xml 文件
|
1
2
3
4
5
6
7
8
9
10
11
12
13
14
15
16
17
18
19
20
21
22
23
24
25
26
27
28
29
30
31
32
33
34
35
36
37
38
39
40
41
42
43
44
45
46
47
48
49
50
51
|
<?xml version="1.0" encoding="utf-8"?>
<beans xmlns="http://www.springframework.org/schema/beans"
xmlns:xsi="http://www.w3.org/2001/xmlschema-instance"
xmlns:amq="http://activemq.apache.org/schema/core"
xsi:schemalocation="http://www.springframework.org/schema/beans
http://www.springframework.org/schema/beans/spring-beans-4.0.xsd
http://activemq.apache.org/schema/core
http://activemq.apache.org/schema/core/activemq-core-5.12.1.xsd">
<!-- activemq 连接工厂 -->
<amq:connectionfactory id="amqconnectionfactory"
brokerurl="tcp://localhost:61616"
username="admin"
password="admin" />
<!-- 提高效率,配置jms连接工厂 -->
<bean id="connectionfactory" class="org.springframework.jms.connection.cachingconnectionfactory">
<constructor-arg ref="amqconnectionfactory" />
<property name="sessioncachesize" value="100" />
</bean>
<!-- 定义消息队列(queue)-->
<!-- <bean id="queuedestination" class="org.apache.activemq.command.activemqqueue">
<!– 设置消息队列的名字 –>
<constructor-arg value="queue-zy"/>
</bean>-->
<!--定义主题(topic)-->
<bean id="topicdestination" class="org.apache.activemq.command.activemqtopic">
<constructor-arg value="topic-zy"/>
</bean>
<!-- 配置jms模板(queue),spring提供的jms工具类,利用它发送、接收消息。 -->
<bean id="jmstemplate" class="org.springframework.jms.core.jmstemplate">
<property name="connectionfactory" ref="connectionfactory" />
<property name="defaultdestination" ref="topicdestination" />
<property name="receivetimeout" value="10000" />
<!-- true是topic,false是queue,默认是false -->
<property name="pubsubdomain" value="true" />
</bean>
<!-- 配置消息队列监听者(queue or topic) -->
<bean id="messagelistener" class="com.service.topicmessagelistener" />
<!-- 显示注入消息监听容器,配置连接工厂,监听的目标是queuedestination,监听器是上面定义的监听器 -->
<bean id="listenercontainer"
class="org.springframework.jms.listener.defaultmessagelistenercontainer">
<property name="connectionfactory" ref="connectionfactory" />
<property name="destination" ref="topicdestination" />
<property name="messagelistener" ref="messagelistener" />
</bean>
</beans>
|
配置 connectionfactory
connectionfactory 是 spring 用于创建到 jms 服务器链接的,spring 提供了多种 connectionfactory。
|
1
2
3
4
5
6
7
8
9
10
|
<!-- activemq 连接工厂 -->
<amq:connectionfactory id="amqconnectionfactory"
brokerurl="tcp://localhost:61616"
username="admin"
password="admin" />
<!-- 提高效率,配置jms连接工厂 -->
<bean id="connectionfactory" class="org.springframework.jms.connection.cachingconnectionfactory">
<constructor-arg ref="amqconnectionfactory" />
<property name="sessioncachesize" value="100" />
</bean>
|
配置queue
|
1
2
3
4
|
<bean id="queuedestination" class="org.apache.activemq.command.activemqqueue">
<!-- 设置消息队列的名字 -->
<constructor-arg value="queue-zy"/>
</bean>
|
配置topic
|
1
2
3
|
<bean id="topicdestination" class="org.apache.activemq.command.activemqtopic">
<constructor-arg value="topic-zy"/>
</bean>
|
配置jms消息模板——jmstemplate
|
1
2
3
4
5
6
7
8
|
<!-- 配置jms模板,spring提供的jms工具类,利用它发送、接收消息-->
<bean id="jmstemplate" class="org.springframework.jms.core.jmstemplate">
<property name="connectionfactory" ref="connectionfactory" />
<property name="defaultdestination" ref="queuedestination" />
<!--<property name="defaultdestination" ref="topicdestination" />-->
<property name="receivetimeout" value="10000" />
<property name="pubsubdomain" value="false" /><!-- true是topic,false是queue,默认是false -->
</bean>
|
最后,在 applicationcontext.xml 中引入配置好的 activemq.xml
|
1
|
<import resource="activemq.xml" />
|
以上就是配置文件相关的,下面是具体的业务代码。
消息生产者服务
|
1
2
3
4
5
6
7
8
9
10
11
12
13
14
15
16
17
18
19
20
21
22
23
|
@service
public class producerservice {
@autowired
private jmstemplate jmstemplate;
//使用默认目的地
public void sendmessagedefault(final string msg){
destination destination = jmstemplate.getdefaultdestination();
system.out.println("向队列: " + destination + " 成功发送一条消息");
jmstemplate.send(new messagecreator() {
public message createmessage(session session) throws jmsexception {
return session.createtextmessage(msg);
}
});
}
//可指定目的地
public void sendmessage(destination destination,final string msg){
jmstemplate.send(destination, new messagecreator() {
public message createmessage(session session) throws jmsexception {
return session.createtextmessage(msg);
}
});
}
}
|
消息消费者服务
|
1
2
3
4
5
6
7
8
9
10
11
12
13
14
15
16
17
18
19
20
21
22
23
24
25
26
27
28
29
30
|
@service
public class consumerservice {
@autowired
private jmstemplate jmstemplate;
//从指定的destination接收消息
public textmessage recive(destination destination){
textmessage message = (textmessage) jmstemplate.receive(destination);
try {
system.out.println("从队列" + destination.tostring() + "收到了消息" + message.gettext());
} catch (jmsexception e) {
e.printstacktrace();
}
return message;
}
//从默认的destination接收消息
public void recivedefault(){
destination destination = jmstemplate.getdefaultdestination();
jmstemplate.setreceivetimeout(5000);
while(true){
textmessage message = (textmessage) jmstemplate.receive(destination);
try {
//这里还是同一个消费者
system.out.println("消费者 从目的地 " + destination.tostring() + " 收到了消息" + message.gettext());
} catch (jmsexception e) {
e.printstacktrace();
}
}
}
}
|
生产者
直接在 main 方法中获取 applicationcontext 运行,便于测试。
|
1
2
3
4
5
6
7
8
9
10
11
12
13
14
15
16
17
|
@component
public class msgproducer {
@autowired
private producerservice producerservice;
public void send(){
system.out.println("生产者开始发送消息:");
for(int i = 1; i < 11; i++){
string msg = "生产者发出的消息";
producerservice.sendmessagedefault(msg + "-----" + i);
}
}
public static void main(string[] args) {
applicationcontext context = new classpathxmlapplicationcontext("classpath:/applicationcontext.xml");
msgproducer msgproducer = context.getbean(msgproducer.class);
msgproducer.send();
}
}
|
消费者
|
1
2
3
4
5
6
7
8
9
10
11
12
13
14
|
@component
public class msgconsumer {
@autowired
private consumerservice consumerservice;
public void recive(){
system.out.println("消费者 1 开始接收消息:");
consumerservice.recivedefault();
}
public static void main(string[] args) {
applicationcontext context = new classpathxmlapplicationcontext("classpath:/applicationcontext.xml");
msgconsumer msgconsumer = context.getbean(msgconsumer.class);
msgconsumer.recive();
}
}
|
接下来就可以启动项目。同样是使用两种方式测试。
第一种方式————点对点(queue)
同步的方式
先启动生产者发送10条消息, 再启动消费者,可以看到控制台显示成功收到10条消息。
异步监听的方式
通过监听器即可实现异步接收消息的效果,而不是像上面使用 while() 轮询同步的方式。
项目中一般都是使用异步监听的方式,在 a 服务中发送了一条消息,b 服务可以利用消息监听器监听,当收到消息后,进行相应的操作。
消息监听器(3种)
通过继承 jms 中的 messagelistener 接口,实现 onmessage() 方法,就可以自定义监听器。这是最基本的监听器。(可根据业务实现自定义的功能)
另外spring也给我们提供了其他类型的消息监听器,比如sessionawaremessagelistener,它的作用不仅可以接收消息,还可以发送一条消息通知对方表示自己收到了消息。(还有一种是 messagelisteneradapter)
一个简单的自定义监听器如下:收到消息后打印消息
|
1
2
3
4
5
6
7
8
9
10
11
12
13
|
public class queuemessagelistener implements messagelistener {
public void onmessage(message message) {
//如果有消息
textmessage tmessage = (textmessage) message;
try {
if(tmessage != null){
system.out.println("监听器监听消息:"+tmessage.gettext());
}
} catch (jmsexception e) {
e.printstacktrace();
}
}
}
|
在 activemq.xml 中引入消息监听器:
|
1
2
3
4
5
6
7
8
9
10
11
|
<!-- 配置消息队列监听者(queue) -->
<bean id="queuemessagelistener" class="com.service.queuemessagelistener" />
<!-- 显示注入消息监听容器,配置连接工厂,监听的目标是queuedestination 或 topicdestination,监听器是上面自定义的监听器 -->
<bean id="queuelistenercontainer"
class="org.springframework.jms.listener.defaultmessagelistenercontainer">
<property name="connectionfactory" ref="connectionfactory" />
<property name="destination" ref="queuedestination" />
<!--<property name="destination" ref="topicdestination" />-->
<property name="messagelistener" ref="queuemessagelistener" />
</bean>
|
可以看到,当使用消息监听器之后,每发送一条消息立马就会被监听到:
第二种方式————发布/订阅(topic)
同步的方式
类似点对点中同步的方式,只是每个消费者都能收到生产者发出的全部消息,不再赘述。
异步监听的方式
启动两个监听器(两个消费者),对消息进行异步监听。看是否各自能收到生产者发送的消息。
|
1
2
3
|
<!-- 配置两个监听器 -->
<bean id="messagelistener" class="com.service.topicmessagelistener" />
<bean id="messagelistener2" class="com.service.topicmessagelistener2" />
|
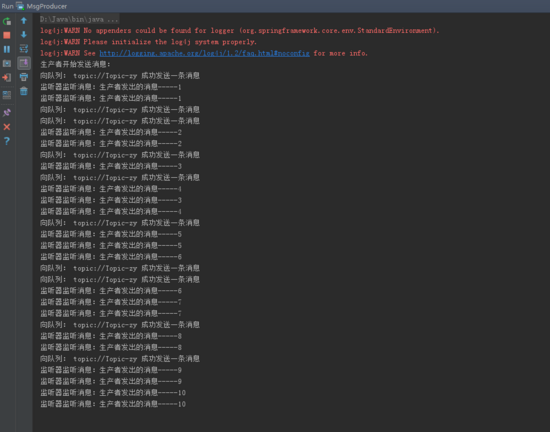
可以看到,每个监听器各自都收到了生产者发送的10条消息。
以上就是本文的全部内容,希望对大家的学习有所帮助,也希望大家多多支持快网idc。
原文链接:http://www.importnew.com/30159.html

相关文章


- 个人网站搭建:如何挑选具有弹性扩展能力的服务器? 2025-06-10
- 个人服务器网站搭建:如何选择适合自己的建站程序或框架? 2025-06-10
- 64M VPS建站:能否支持高流量网站运行? 2025-06-10
- 64M VPS建站:怎样选择合适的域名和SSL证书? 2025-06-10
- 64M VPS建站:怎样优化以提高网站加载速度? 2025-06-10