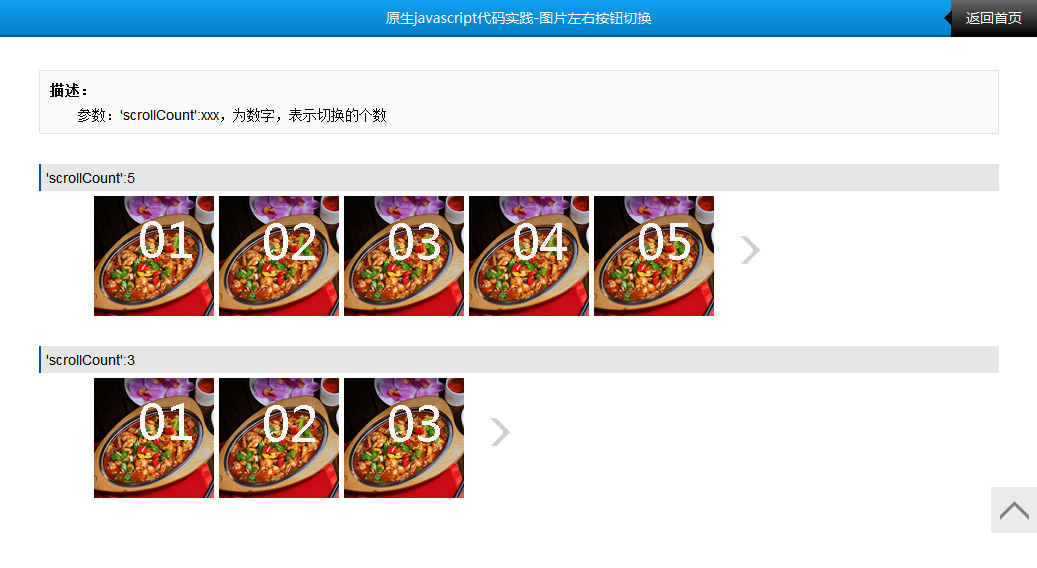
先给大家看下效果展示图
以下为详细代码:
function LGY_picSwitch(option){
this.oWrap = this.getId(option.wrapID); //最外层元素
this.olistWrap = this.getNodeByClassname(this.oWrap,'gy_picSwitch_listWrap')[0];
this.oUl = this.olistWrap.getElementsByTagName('ul')[0];
this.oBtnPrev = this.getNodeByClassname(this.oWrap,'gy_picSwitch_prev')[0];
this.oBtnNext = this.getNodeByClassname(this.oWrap,'gy_picSwitch_next')[0];
this.nLen = this.oUl.getElementsByTagName('li').length; //图片总数
this.nScollCount = option.scrollCount; //每次滚动的数量
this.nScollLen = Math.ceil(this.nLen/option.scrollCount); // 切换判断的最大值
this.nSwitchWidth = 0; //每次切换移动的距离,在代码里面动态获取值
this.nIndex = 0; //切换图片的当前索引
this.timer = null; //切换图片的引值
this.int();
}
LGY_picSwitch.prototype = {
getId:function(id){
return document.getElementById(id);
},
getNodeByClassname:function(parent,classname){
var classElements = new Array();
var els = parent.getElementsByTagName('*');
var elsLen = els.length;
var pattern = new RegExp("(^|\\\\s)"+classname+"(\\\\s|$)");
for (i = 0, j = 0; i < elsLen; i++) {
if ( pattern.test(els[i].className) ) {
classElements[j] = els[i];
j++;
}
}
return classElements;
},
getCss:function(node,value)
{
return node.currentStyle?node.currentStyle[value]:getComputedStyle(node,null)[value];
},
setCss:function(node,val){
for(var v in val){
node.style.cssText += ';'+ v +':'+val[v];
}
},
moveFn:function(node,value,targetValue,callback){
var _that = this;
clearInterval(this.timer);
this.timer = setInterval(function()
{
var val = parseFloat(_that.getCss(node,value));
var speed = ( targetValue- val )/8;
speed = speed>0?Math.ceil(speed):Math.floor(speed);
if(speed ==0)
{
clearInterval(_that.timer);
callback&&callback();
}
else
{
node.style[value] = ( val + speed ) +'px';
}
},20);
},
picChange:function(){
this.moveFn(this.oUl,'marginLeft',-this.nIndex*this.nSwitchWidth);
},
cancelBubble:function(e){
e.stopPropagation?e.stopPropagation():e.cancelBubble = true;
},
btnIsShow:function(){
this.setCss(this.oBtnNext,{'display':'block'});
this.setCss(this.oBtnPrev,{'display':'block'});
if( this.nIndex == 0 ) this.setCss(this.oBtnPrev,{'display':'none'});
if( this.nIndex ==(this.nScollLen-1) ) this.setCss(this.oBtnNext,{'display':'none'});
},
btnPrev:function(){
var _that = this;
this.oBtnPrev.onclick = function(e){
var e = e || window.event;
_that.cancelBubble(e);
if(_that.nIndex != 0 ) {
_that.nIndex–;
_that.picChange();
_that.btnIsShow();
}
}
},
btnNext:function(){
var _that = this;
this.oBtnNext.onclick = function(e){
var e = e || window.event;
_that.cancelBubble(e);
if(_that.nIndex != (_that.nScollLen-1) ) {
_that.nIndex++;
_that.picChange();
_that.btnIsShow();
}
}
},
int:function(){
//动态获取移动的宽度
var oLi = this.oUl.getElementsByTagName('li')[0],
oLi_w = oLi.offsetWidth + parseInt(this.getCss(oLi,'marginLeft')) + parseInt(this.getCss(oLi,'marginRight'));
this.nSwitchWidth = oLi_w*this.nScollCount;
//按钮显示初始化
this.btnIsShow();
//左右切换
this.btnPrev();
this.btnNext();
}
}
HTML代码:
/*
* HTML结构必需是以下:外层ID名,自己传入 如下面的:id="gy_picSwitch02" ,ID名,自己随便给
但,里面的结构必需一样,包括类名classname
<div id="gy_picSwitch02">
<span class="gy_picSwitch_prev"></span>
<span class="gy_picSwitch_next"></span>
<div class="gy_picSwitch_listWrap">
<ul>
<li><img src="images/pic01.jpg" id=\”code6366\”>
*
*/
//实例化
new LGY_picSwitch({'wrapID':'gy_picSwitch','scrollCount':5});
是不是很方便的功能呢,使用也很简单,这里推荐给小伙伴,希望对大家能有所帮助


相关文章


- 个人网站服务器域名解析设置指南:从购买到绑定全流程 2025-06-10
- 个人网站搭建:如何挑选具有弹性扩展能力的服务器? 2025-06-10
- 个人服务器网站搭建:如何选择适合自己的建站程序或框架? 2025-06-10
- 64M VPS建站:能否支持高流量网站运行? 2025-06-10
- 64M VPS建站:怎样选择合适的域名和SSL证书? 2025-06-10