在使用springsecurity中,大伙都知道默认的登录数据是通过key/value的形式来传递的,默认情况下不支持json格式的登录数据,如果有这种需求,就需要自己来解决,本文主要和小伙伴来聊聊这个话题。
基本登录方案
在说如何使用json登录之前,我们还是先来看看基本的登录吧,本文为了简单,springsecurity在使用中就不连接数据库了,直接在内存中配置用户名和密码,具体操作步骤如下:
创建spring boot工程
首先创建springboot工程,添加springsecurity依赖,如下:
|
1
2
3
4
5
6
7
8
|
<dependency>
<groupid>org.springframework.boot</groupid>
<artifactid>spring-boot-starter-security</artifactid>
</dependency>
<dependency>
<groupid>org.springframework.boot</groupid>
<artifactid>spring-boot-starter-web</artifactid>
</dependency>
|
添加security配置
创建securityconfig,完成springsecurity的配置,如下:
|
1
2
3
4
5
6
7
8
9
10
11
12
13
14
15
16
17
18
19
20
21
22
23
24
25
26
27
28
29
30
31
32
33
34
35
36
37
38
39
40
41
42
43
44
45
46
47
48
49
50
51
52
53
54
55
56
57
58
59
60
61
62
63
64
65
66
67
68
69
70
71
72
73
74
75
76
77
78
79
80
|
@configuration
public class securityconfig extends websecurityconfigureradapter {
@bean
passwordencoder passwordencoder() {
return new bcryptpasswordencoder();
}
@override
protected void configure(authenticationmanagerbuilder auth) throws exception {
auth.inmemoryauthentication().withuser("zhangsan").password("$2a$10$2o4ewlrrfpebotfdotc0f.rpumk.3q3kvbhrx7xxkumlbgjoobs8q").roles("user");
}
@override
public void configure(websecurity web) throws exception {
}
@override
protected void configure(httpsecurity http) throws exception {
http.authorizerequests()
.anyrequest().authenticated()
.and()
.formlogin()
.loginprocessingurl("/dologin")
.successhandler(new authenticationsuccesshandler() {
@override
public void onauthenticationsuccess(httpservletrequest req, httpservletresponse resp, authentication authentication) throws ioexception, servletexception {
respbean ok = respbean.ok("登录成功!",authentication.getprincipal());
resp.setcontenttype("application/json;charset=utf-8");
printwriter out = resp.getwriter();
out.write(new objectmapper().writevalueasstring(ok));
out.flush();
out.close();
}
})
.failurehandler(new authenticationfailurehandler() {
@override
public void onauthenticationfailure(httpservletrequest req, httpservletresponse resp, authenticationexception e) throws ioexception, servletexception {
respbean error = respbean.error("登录失败");
resp.setcontenttype("application/json;charset=utf-8");
printwriter out = resp.getwriter();
out.write(new objectmapper().writevalueasstring(error));
out.flush();
out.close();
}
})
.loginpage("/login")
.permitall()
.and()
.logout()
.logouturl("/logout")
.logoutsuccesshandler(new logoutsuccesshandler() {
@override
public void onlogoutsuccess(httpservletrequest req, httpservletresponse resp, authentication authentication) throws ioexception, servletexception {
respbean ok = respbean.ok("注销成功!");
resp.setcontenttype("application/json;charset=utf-8");
printwriter out = resp.getwriter();
out.write(new objectmapper().writevalueasstring(ok));
out.flush();
out.close();
}
})
.permitall()
.and()
.csrf()
.disable()
.exceptionhandling()
.accessdeniedhandler(new accessdeniedhandler() {
@override
public void handle(httpservletrequest req, httpservletresponse resp, accessdeniedexception e) throws ioexception, servletexception {
respbean error = respbean.error("权限不足,访问失败");
resp.setstatus(403);
resp.setcontenttype("application/json;charset=utf-8");
printwriter out = resp.getwriter();
out.write(new objectmapper().writevalueasstring(error));
out.flush();
out.close();
}
});
}
}
|
这里的配置虽然有点长,但是很基础,配置含义也比较清晰,首先提供bcryptpasswordencoder作为passwordencoder,可以实现对密码的自动加密加盐,非常方便,然后提供了一个名为zhangsan的用户,密码是123,角色是user,最后配置登录逻辑,所有的请求都需要登录后才能访问,登录接口是/dologin,用户名的key是username,密码的key是password,同时配置登录成功、登录失败以及注销成功、权限不足时都给用户返回json提示,另外,这里虽然配置了登录页面为/login,实际上这不是一个页面,而是一段json,在logincontroller中提供该接口,如下:
|
1
2
3
4
5
6
7
8
9
10
11
12
|
@restcontroller
@responsebody
public class logincontroller {
@getmapping("/login")
public respbean login() {
return respbean.error("尚未登录,请登录");
}
@getmapping("/hello")
public string hello() {
return "hello";
}
}
|
这里/login只是一个json提示,而不是页面, /hello则是一个测试接口。
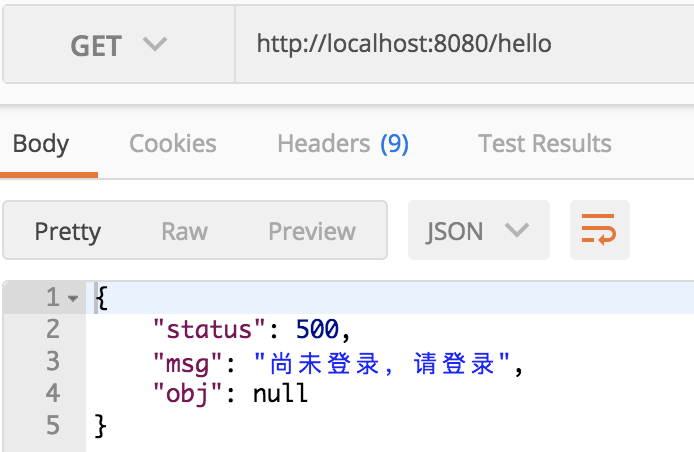
ok,做完上述步骤就可以开始测试了,运行springboot项目,访问/hello接口,结果如下:
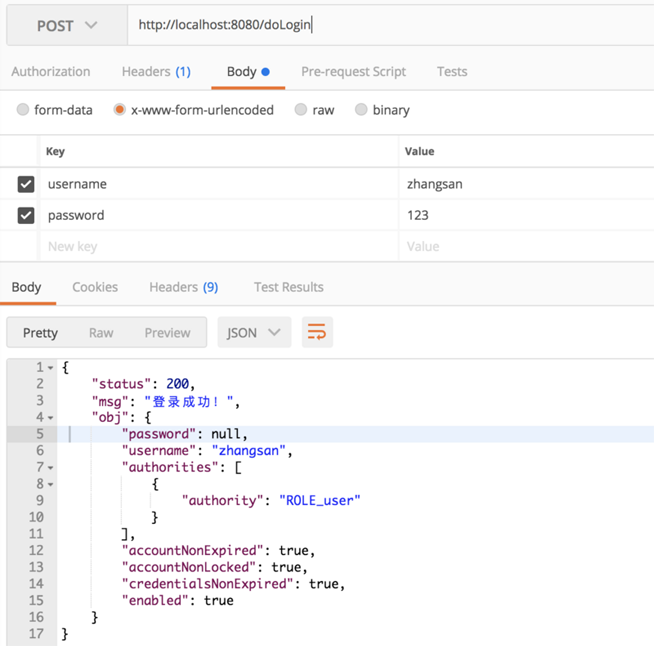
登录成功后,再去访问/hello接口就可以成功访问了。
使用json登录
上面演示的是一种原始的登录方案,如果想将用户名密码通过json的方式进行传递,则需要自定义相关过滤器,通过分析源码我们发现,默认的用户名密码提取在usernamepasswordauthenticationfilter过滤器中,部分源码如下:
|
1
2
3
4
5
6
7
8
9
10
11
12
13
14
15
16
17
18
19
20
21
22
23
24
25
26
27
28
29
30
31
32
33
34
35
36
37
38
39
40
41
42
43
44
45
46
47
48
49
50
51
|
public class usernamepasswordauthenticationfilter extends
abstractauthenticationprocessingfilter {
public static final string spring_security_form_username_key = "username";
public static final string spring_security_form_password_key = "password";
private string usernameparameter = spring_security_form_username_key;
private string passwordparameter = spring_security_form_password_key;
private boolean postonly = true;
public usernamepasswordauthenticationfilter() {
super(new antpathrequestmatcher("/login", "post"));
}
public authentication attemptauthentication(httpservletrequest request,
httpservletresponse response) throws authenticationexception {
if (postonly && !request.getmethod().equals("post")) {
throw new authenticationserviceexception(
"authentication method not supported: " + request.getmethod());
}
string username = obtainusername(request);
string password = obtainpassword(request);
if (username == null) {
username = "";
}
if (password == null) {
password = "";
}
username = username.trim();
usernamepasswordauthenticationtoken authrequest = new usernamepasswordauthenticationtoken(
username, password);
// allow subclasses to set the "details" property
setdetails(request, authrequest);
return this.getauthenticationmanager().authenticate(authrequest);
}
protected string obtainpassword(httpservletrequest request) {
return request.getparameter(passwordparameter);
}
protected string obtainusername(httpservletrequest request) {
return request.getparameter(usernameparameter);
}
//...
//...
}
|
从这里可以看到,默认的用户名/密码提取就是通过request中的getparameter来提取的,如果想使用json传递用户名密码,只需要将这个过滤器替换掉即可,自定义过滤器如下:
|
1
2
3
4
5
6
7
8
9
10
11
12
13
14
15
16
17
18
19
20
21
22
23
24
25
|
public class customauthenticationfilter extends usernamepasswordauthenticationfilter {
@override
public authentication attemptauthentication(httpservletrequest request, httpservletresponse response) throws authenticationexception {
if (request.getcontenttype().equals(mediatype.application_json_utf8_value)
|| request.getcontenttype().equals(mediatype.application_json_value)) {
objectmapper mapper = new objectmapper();
usernamepasswordauthenticationtoken authrequest = null;
try (inputstream is = request.getinputstream()) {
map<string,string> authenticationbean = mapper.readvalue(is, map.class);
authrequest = new usernamepasswordauthenticationtoken(
authenticationbean.get("username"), authenticationbean.get("password"));
} catch (ioexception e) {
e.printstacktrace();
authrequest = new usernamepasswordauthenticationtoken(
"", "");
} finally {
setdetails(request, authrequest);
return this.getauthenticationmanager().authenticate(authrequest);
}
}
else {
return super.attemptauthentication(request, response);
}
}
}
|
这里只是将用户名/密码的获取方案重新修正下,改为了从json中获取用户名密码,然后在securityconfig中作出如下修改:
|
1
2
3
4
5
6
7
8
9
10
11
12
13
14
15
16
17
18
19
20
21
22
23
24
25
26
27
28
29
30
31
32
33
34
35
36
|
@override
protected void configure(httpsecurity http) throws exception {
http.authorizerequests().anyrequest().authenticated()
.and()
.formlogin()
.and().csrf().disable();
http.addfilterat(customauthenticationfilter(), usernamepasswordauthenticationfilter.class);
}
@bean
customauthenticationfilter customauthenticationfilter() throws exception {
customauthenticationfilter filter = new customauthenticationfilter();
filter.setauthenticationsuccesshandler(new authenticationsuccesshandler() {
@override
public void onauthenticationsuccess(httpservletrequest req, httpservletresponse resp, authentication authentication) throws ioexception, servletexception {
resp.setcontenttype("application/json;charset=utf-8");
printwriter out = resp.getwriter();
respbean respbean = respbean.ok("登录成功!");
out.write(new objectmapper().writevalueasstring(respbean));
out.flush();
out.close();
}
});
filter.setauthenticationfailurehandler(new authenticationfailurehandler() {
@override
public void onauthenticationfailure(httpservletrequest req, httpservletresponse resp, authenticationexception e) throws ioexception, servletexception {
resp.setcontenttype("application/json;charset=utf-8");
printwriter out = resp.getwriter();
respbean respbean = respbean.error("登录失败!");
out.write(new objectmapper().writevalueasstring(respbean));
out.flush();
out.close();
}
});
filter.setauthenticationmanager(authenticationmanagerbean());
return filter;
}
|
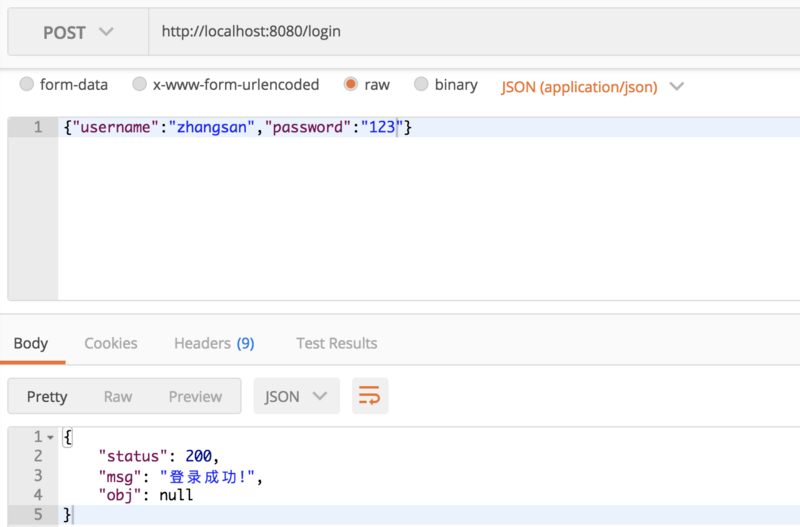
将自定义的customauthenticationfilter类加入进来即可,接下来就可以使用json进行登录了,如下:
好了,本文就先介绍到这里,有问题欢迎留言讨论。 希望对大家的学习有所帮助,也希望大家多多支持快网idc。
原文链接:https://segmentfault.com/a/1190000018157525
相关文章
- ASP.NET本地开发时常见的配置错误及解决方法? 2025-06-10
- ASP.NET自助建站系统的数据库备份与恢复操作指南 2025-06-10
- 个人网站服务器域名解析设置指南:从购买到绑定全流程 2025-06-10
- 个人网站搭建:如何挑选具有弹性扩展能力的服务器? 2025-06-10
- 个人服务器网站搭建:如何选择适合自己的建站程序或框架? 2025-06-10
- 2025-07-10 怎样使用阿里云的安全工具进行服务器漏洞扫描和修复?
- 2025-07-10 怎样使用命令行工具优化Linux云服务器的Ping性能?
- 2025-07-10 怎样使用Xshell连接华为云服务器,实现高效远程管理?
- 2025-07-10 怎样利用云服务器D盘搭建稳定、高效的网站托管环境?
- 2025-07-10 怎样使用阿里云的安全组功能来增强服务器防火墙的安全性?
快网idc优惠网
QQ交流群
-
2025-05-29 72
-
2025-05-25 92
-
2025-05-25 67
-
2025-06-04 50
-
2025-05-25 43


